Using the TV Buttons on the Remote Control
Basic Connections/Auto Setup
POWER | OPEN/CLOSE |
| 1 |
3
2
3
4
4
Your VCR remote control will work with Samsung televisions and compatible brands.
To determine whether your television is compatible, follow the instructions below.
1Switch your television on.
2Point the remote control towards the television.
3Hold down the TV button and enter the
Brand | Codes | Brand | Codes |
SAMSUNG | 01, 14, 15, 23 | LOEWE | 28 |
SHARP | 02, 16, 22 | ZENITH | 17 |
SONY | 03 | LG | 06, 08, 18 |
RCA | 07, 29 | MAGNAVOX | 04 |
TOSHIBA | 09 | EMERSON | 21 |
PANASONIC | 12, 24 | SANYO | 05, 20 |
JVC | 11 | DAEWOO | 19 |
HITACHI | 10 | NOBLEX | 25 |
MITSUBISHI | 13 | TELEFUNKEN 26 | |
NEWSAN | 27 |
|
|
|
|
|
|
Result: If your television is compatible with the remote control, it will switch off. It is now programmed to operate with the remote control.
➢If several codes are indicated for your television brand, try each one in turn until you find one that works.
☛When you change the batteries in the remote control, you must reprogram the code, following the same procedure.
You can then control the television using the following buttons.
Button | Function |
You will need to connect the
NOTES:
•See Appendix A for Advanced Connections.
•Standard RF or Line connection between your TV are required to run DVD+VCR setup menu, even if you connect
or Component Video Output for a better picture quality.
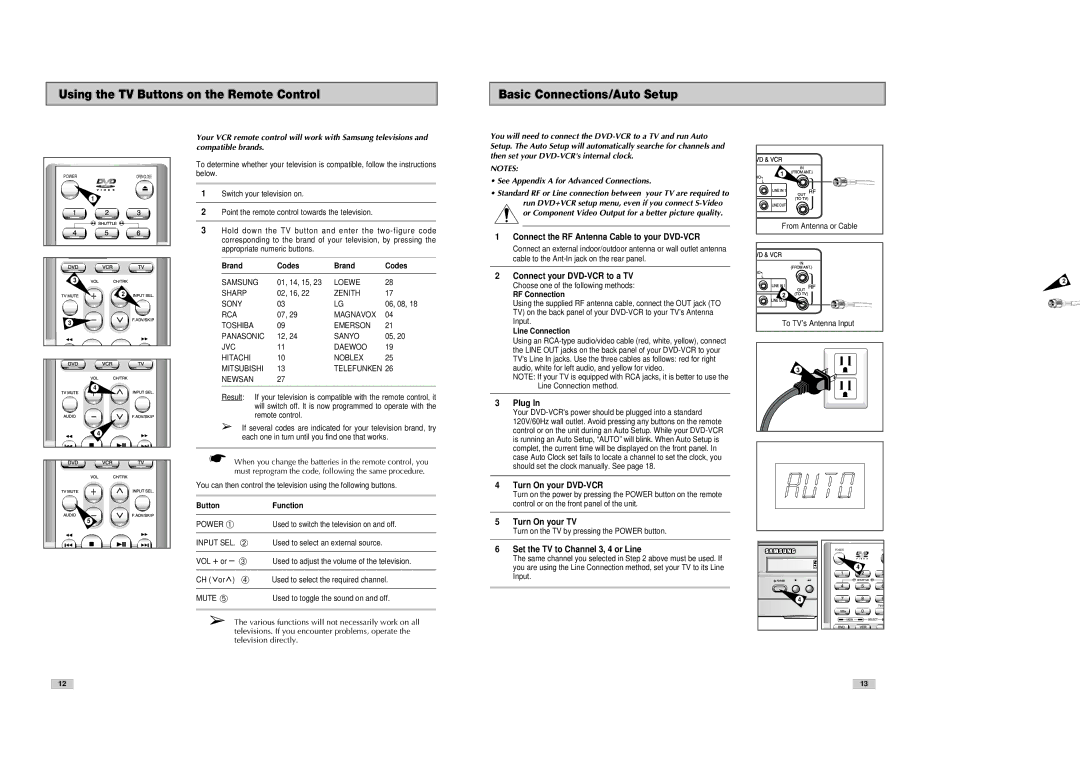
1Connect the RF Antenna Cable to your DVD-VCR
Connect an external indoor/outdoor antenna or wall outlet antenna cable to the
2Connect your DVD-VCR to a TV
Choose one of the following methods:
RF Connection
Using the supplied RF antenna cable, connect the OUT jack (TO TV) on the back panel of your
Line Connection
Using an
NOTE: If your TV is equipped with RCA jacks, it is better to use the Line Connection method.
3Plug In
Your
4Turn On your DVD-VCR
Turn on the power by pressing the POWER button on the remote control or on the front panel of the unit.
1 |
From Antenna or Cable |
2
To TV’s Antenna Input
3
2
5
POWER ➀ | Used to switch the television on and off. |
|
|
INPUT SEL. ➁ | Used to select an external source. |
|
|
VOL + or – ➂ | Used to adjust the volume of the television. |
|
|
CH ( or ) ➃ | Used to select the required channel. |
|
|
MUTE ➄ | Used to toggle the sound on and off. |
➢The various functions will not necessarily work on all televisions. If you encounter problems, operate the television directly.
5Turn On your TV
Turn on the TV by pressing the POWER button.
6Set the TV to Channel 3, 4 or Line
The same channel you selected in Step 2 above must be used. If you are using the Line Connection method, set your TV to its Line Input.
POWER |
4 |
POWER | OP |
| 4 |
12
13