Basic Operation

Recording Formats

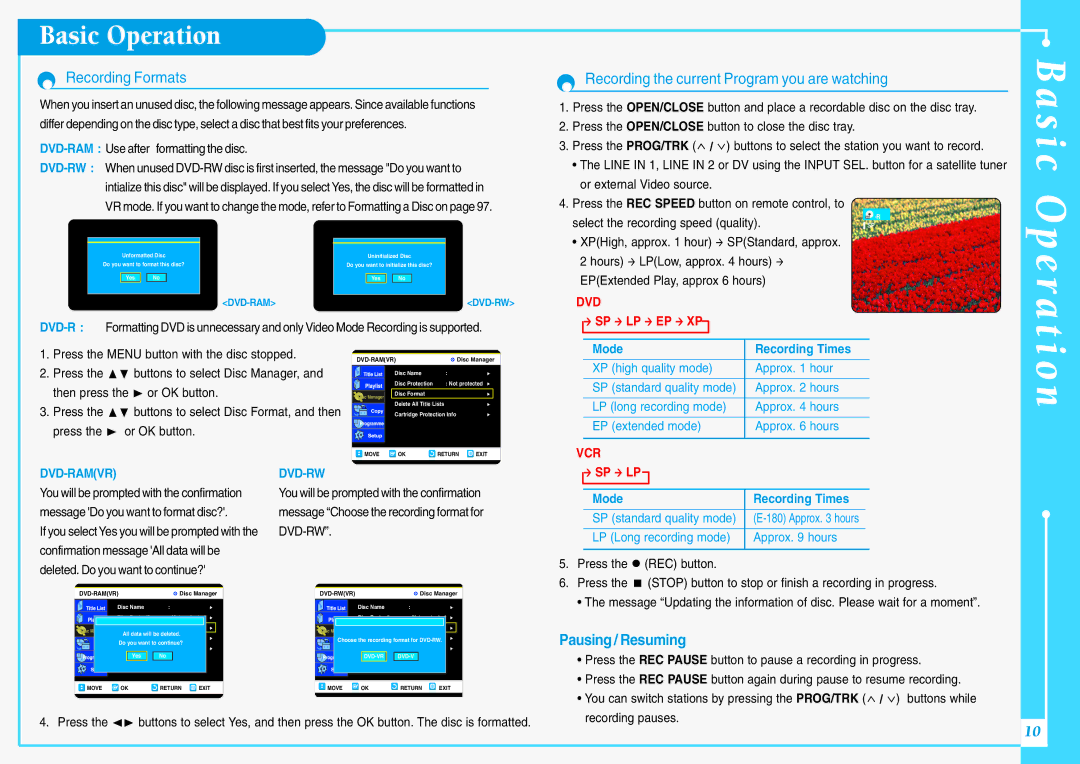
When you insert an unused disc, the following message appears. Since available functions differ depending on the disc type, select a disc that best fits your preferences.

DVD-RAM : Use after

formatting the disc.


DVD-RW :When unused DVD-RW disc is first inserted, the message "Do you want to


intialize this disc" will be displayed. If you select Yes, the disc will be formatted in


VR mode. If you want to change the mode, refer to Formatting a Disc on page 97.


Unformatted Disc


Uninitialized Disc


Do you want to format this disc?


Do you want to initialize this disc?


Yes


No


Yes


No


<DVD-RAM>


<DVD-RW>

DVD-R :Formatting DVD is unnecessary and only Video Mode Recording is supported.


Recording the current Program you are watching

B


a


1. Press the OPEN/CLOSE button and place a recordable disc on the disc tray.

s

2. Press the OPEN/CLOSE button to close the disc tray.


i

3. Press the PROG/TRK ( /

) buttons to select the station you want to record.

c


• The LINE IN 1, LINE IN 2 or DV using the INPUT SEL. button for a satellite tuner


or external Video source.


O

4. Press the REC SPEED button on remote control, to


select the recording speed (quality).


-R


SP


p


• XP(High, approx. 1 hour)

SP(Standard, approx.


2 hours)

LP(Low, approx. 4 hours)


e


EP(Extended Play, approx 6 hours)


r


DVD


a


SP

LP EP XP


ti


Mode


Recording Times


1.Press the MENU button with the disc stopped.

2.Press the buttons to select Disc Manager, and then press the or OK button.

3.Press the buttons to select Disc Format, and then press the or OK button.

DVD-RAM(VR)

DVD-RW

DVD-RAM(VR)

Disc Manager

Disc Name

:

Disc Protection

: Not protected

Disc Format


Delete All Title Lists

Cartridge Protection Info

MOVE

OK

RETURN

EXIT


XP (high quality mode)

Approx. 1 hour


o


SP (standard quality mode)

Approx. 2 hours


n


LP (long recording mode)

Approx. 4 hours


EP (extended mode)

Approx. 6 hours


VCR


SP LP


You will be prompted with the confirmation message 'Do you want to format disc?'.

If you select Yes you will be prompted with the confirmation message 'All data will be deleted. Do you want to continue?'

You will be prompted with the confirmation message “Choose the recording format for DVD-RW”.


Mode


Recording Times


SP (standard quality mode)

(E-180) Approx. 3 hours


LP (Long recording mode)

Approx. 9 hours


5.

Press the

(REC) button.


6.

Press the

(STOP) button to stop or finish a recording in progress.

DVD-RAM(VR)

Disc Manager

DVD-RW(VR)


Disc Manager


Disc Name

:


Disc Name

:


All data will be deleted.

Choose the recording format for DVD-RW.


Do you want to continue?


Yes

No


DVD-VR

DVD-V


MOVE

OK

RETURN

EXIT

MOVE

OK

RETURN

EXIT

4. Press the ➛❿ buttons to select Yes, and then press the OK button. The disc is formatted.

The message “Updating the information of disc. Please wait for a moment”.

Pausing / Resuming

• Press the REC PAUSE button to pause a recording in progress.

• Press the REC PAUSE button again during pause to resume recording.

• You can switch stations by pressing the PROG/TRK (

/

) buttons while

recording pauses.


10


Page 10
Image 10
Samsung DVD-VR300E/XEV manual Basic Operation, Recording Formats, Recording the current Program you are watching

DVD-VR300E/XEV specifications

The Samsung DVD-VR300E/XEV is a versatile and innovative DVD recorder that offers a range of features designed for both casual users and avid enthusiasts. This model is a perfect blend of functionality, style, and performance, making it an ideal choice for anyone looking to preserve their favorite television programs and home videos.

One of the standout features of the DVD-VR300E/XEV is its integrated hard drive. With a substantial storage capacity, users can record and store numerous hours of video, making it easy to save and organize various content without the need for extensive external storage solutions. This built-in hard drive allows for convenient time-shifting capabilities, enabling users to pause, rewind, or record live television programs on demand.

The device supports a wide range of recording formats, including DVD-RAM, DVD-RW, and DVD-R. This flexibility ensures compatibility with various media types, allowing users to choose the format that best suits their needs. Additionally, the unit is equipped with progressive scan technology, which enhances picture quality significantly by providing smoother and sharper images, particularly for fast-moving scenes.

Samsung's DVD-VR300E/XEV also features an intuitive on-screen menu, making navigation and setup a user-friendly experience. The remote control included with the device simplifies the operation, allowing users to easily access all functions, from recording settings to playback options.

Another key technology incorporated into this model is its high-quality audio capabilities. The DVD-VR300E/XEV supports Dolby Digital and PCM audio formats, ensuring that viewers receive a rich and immersive sound experience to complement their video playback. This feature is particularly beneficial for movie enthusiasts and music lovers alike, as it enhances the overall viewing experience.

In terms of connectivity, the Samsung DVD-VR300E/XEV is equipped with multiple outputs, including HDMI, composite, and component video outputs. This range of options ensures compatibility with various television sets and home theater systems, allowing users to enjoy their content in the best possible quality.

With its sleek design and robust feature set, the Samsung DVD-VR300E/XEV stands out as a reliable and efficient DVD recorder, catering to the needs of modern consumers. Whether recording favorite shows, converting old videos to digital formats, or simply watching DVDs, this model delivers a seamless and enjoyable experience for all users.