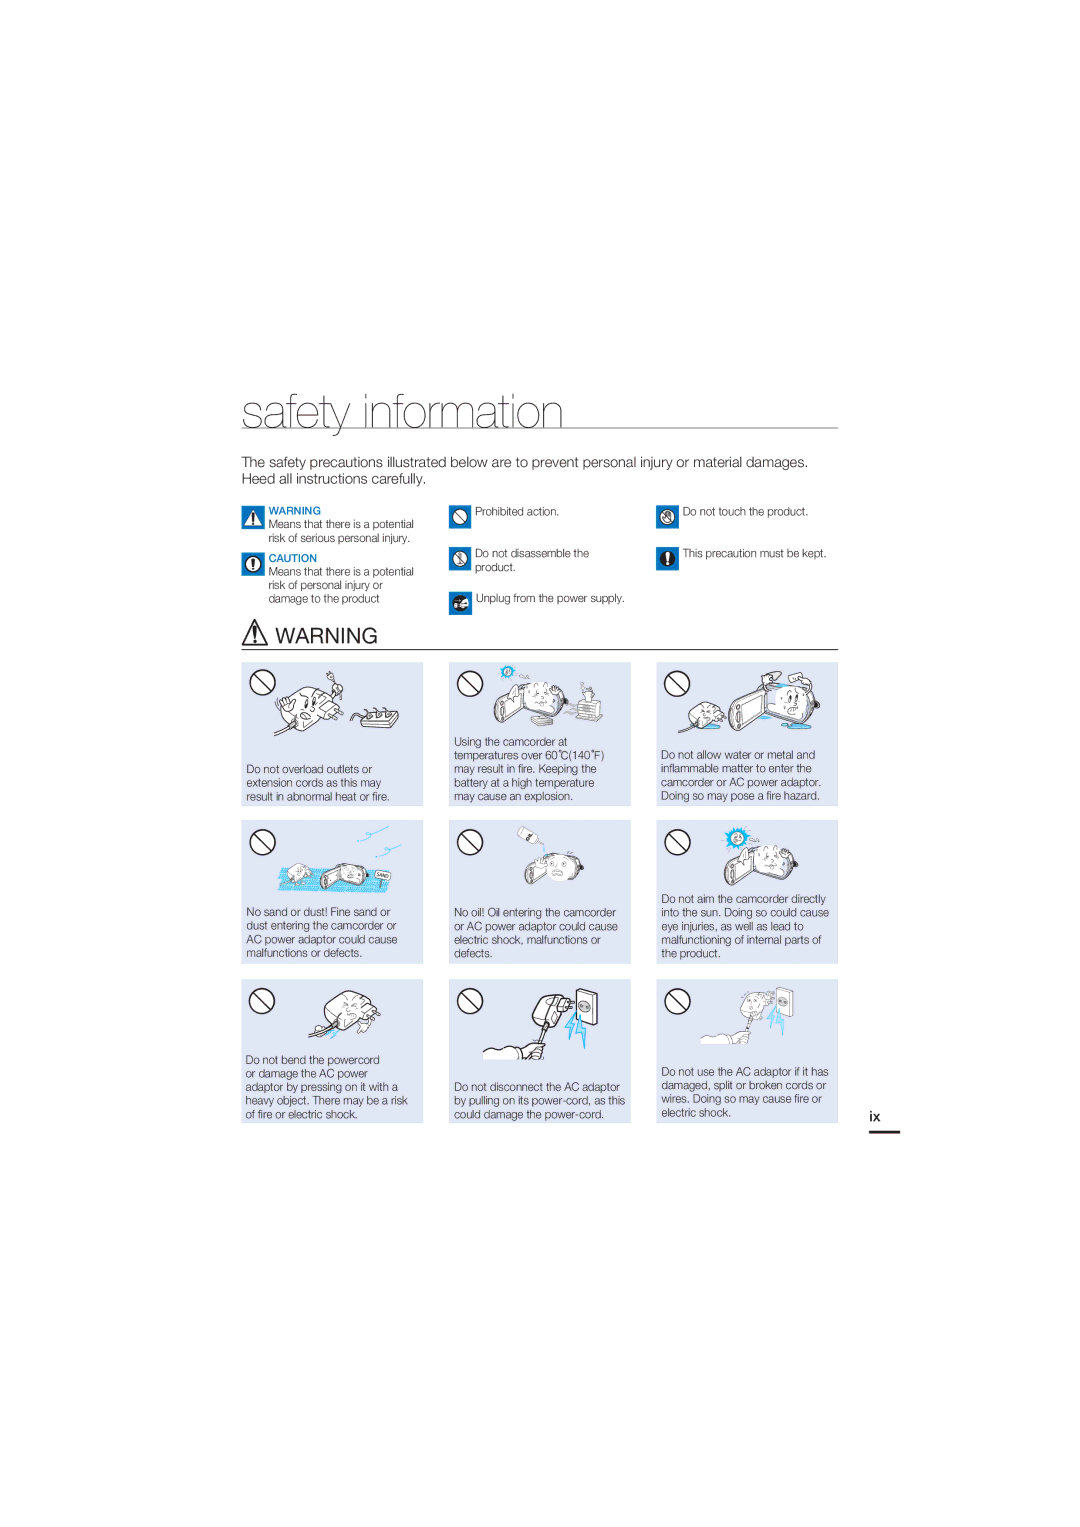
User Manual
High Definition Digital Camcorder
HMX-S10BN/HMX-S15BN/HMX-S16BN
SAFETY WARNINGS
PRECAUTIONS
before reading this user manual
Before using this camcorder
IMPORTANT INFORMATION ON USE
About this user manual
Notes regarding trademarks
before reading this user manual
important safety instructions
16. VENTILATION
important safety instructions
23. OVERLOADING
important safety instructions
FCC Warning
USER INSTALLER CAUTION
viii
safety information
Do not dispose of battery in a fire as it may explode
safety information
when not using the camcorder
Place the camcorder on a stable surface that is well ventilated
safety information
FIRST TIME SETTINGS
contents
QUICK START GUIDE
GETTING TO KNOW THE CAMCORDER
USING THE MENU ITEMS
contents
BASIC PLAYBACK
ADVANCED RECORDING
SYSTEM SETTING
EDITING VIDEO CLIPS
FILE MANAGEMENT
WIRELESS NETWORK CONNECTION AND
contents
CONFIGURATION HMX-S15/S16 ONLY
USING THE WIRELESS NETWORK HMX-S15/S16 ONLY
STEP1 Get ready
quick start guide
STEP2 Record with your camcorder
You can record videos in H.264 format
Recording videos
Recording photos
quick start guide
Viewing on a high definition TV
Viewing videos or photos on the LCD screen
STEP3 Play back videos or photos
STEP4 Save recorded videos or photos
Sharing the videos/photos onto YouTube/Flickr/ FaceBook
Importing and viewing videos/photos from the camcorder to your PC
STEP5 Delete videos or photos
quick start guide
Checking your accessories
getting to know the camcorder
WHATS INCLUDED WITH YOUR CAMCORDER
LOCATION OF CONTROLS
getting to know the camcorder
Front/Left
6 7 89
4 5 6
Rear/Right/Top/Bottom
2 1 0 9
1 Memory card cover 2 Memory card slot 3 MODE button / Mode indicator
getting to know the camcorder
USING THE REMOTE CONTROL
Installing the button type battery CR2025 in the remote control
IDENTIFYING THE SCREEN DISPLAYS
Video record mode
Indicator
Indicator
PRECHECK
Photo record mode
getting to know the camcorder
Video play mode
Top of the LCD screen
Bottom of the LCD screen
Photo play mode
Photo resolution
PRECHECK
To attach the battery
ATTACHING/DETACHING THE BATTERY
To detach the battery
getting started
CHARGING THE BATTERY
To charge the battery with the AC power adaptor
To charge the battery with the USB cable
Battery level display
CHECKING THE BATTERY STATE
Charging CHG indicator
To check the charging state
Battery type
Available running time for the battery
Using the AC power adaptor approx. 160 min
Using the USB cable approx. 390 min
Using an AC power source
About the battery
getting started
TURNING YOUR CAMCORDER ON/OFF
basic operation of the camcorder
Quick On STBY Mode in the STBY mode
SWITCHING TO THE POWER SAVING MODE
Sleep Mode in the play mode includes the thumbnail index view
basic operation of the camcorder
USING THE DISPLAY BUTTON
SETTING THE OPERATION MODES
Switching the information display mode
Full display mode
USING THE TOUCH PANEL
Touch
basic operation of the camcorder
SETTING THE TIME ZONE AND DATE/TIME FOR THE FIRST TIME
first time settings
Your camcorder turns on automatically when you open the LCD screen
1. Open the LCD screen to turn on the camcorder
SELECTING THE LANGUAGES
Supported languages
first time settings
SELECTING THE STORAGE MEDIA HMX-S15/S16 ONLY
getting ready to start recording
Submenu items
PRECHECK
To insert a memory card
INSERTING / EJECTING A MEMORY CARD NOT SUPPLIED
To eject a memory card
getting ready to start recording
Compatible memory cards
SELECTING A SUITABLE MEMORY CARD NOT SUPPLIED
SDHC Secure Digital High Capacity cards
Common cautions for memory cards
Handling a memory card
getting ready to start recording
Do not bend, drop, or subject the card to strong impacts
RECORDABLE TIME AND CAPACITY
Recordable time available for video
Recordable number of photos
ADJUSTING THE LCD SCREEN
ATTACHING THE GRIP BELT
getting ready to start recording
Adjusting the shooting angle
BASIC CAMCORDER POSITIONING
ATTACHING THE FERRITE CORE
basic recording
Using the external microphone not supplied
RECORDING VIDEOS
PRECHECK
Note that damaged data cannot be recovered
basic recording
To capture photos in video standby mode
CAPTURING PHOTOS DURING VIDEO RECORDING
To capture photos during video recording
RECORDING PHOTOS
4. To cancel Smart Auto mode, press the SMART AUTO button again
RECORDING WITH EASE FOR BEGINNERS SMART AUTO
basic recording
1. Press the SMART AUTO button
CAPTURING PHOTOS WHILE PLAYING BACK VIDEOS
To zoom in
ZOOMING
To zoom out
basic recording
SETTING THE ANTI-SHAKE OIS OPTICAL IMAGE STABILIZER
It typically occurs when The subject is in front of a window
USING BACK LIGHT COMPENSATION MODE
basic recording
The subject is outdoors and the background is overcast
Press the Flash button repeatedly to select the flash mode you want
USING THE FLASH
The selected flash mode is displayed
PRECHECK
Ex The manual dial set to Focus
USING THE MANUAL DIAL
You can adjust aperture, shutter, or exposure value in the same
basic recording
CHANGING THE PLAYBACK MODE
basic playback
To change thumbnail display type
PLAYING BACK VIDEOS
To play back videos
basic playback
To adjust the volume during video playback
Playback / Pause / Stop
Various playback operations
Search playback
Skip playback
VIEWING PHOTOS
Viewing a slide show
Zooming during photo playback
basic playback
using the menu items
Using the Menu tab
HANDLING MENUS AND QUICK MENUS
using the menu items
Using the Quick menu tab
PDVT
VUP BOVBM 5PVDI1PJOU
Video/photo record menu items
MENU ITEMS
Video/photo playback menu items
Display setting menu items
using the menu items
Default value
Other setting menu items
Connectivity setting menu items
QUICK MENU ITEMS
Video/photo recording menu items
using the menu items
advanced recording
iSCENE
Submenu items
Submenu items Videos
Resolution
Submenu items Photos
advanced recording
1 2 3 4 5 6 7 8 9 8 9
Slow Motion
1 2 3 4 5 6 7 8
Submenu items
advanced recording
White Balance
Submenu items
8IJUF#BMBODF
Submenu items
To set the white balance manually
advanced recording
Aperture
Submenu items
PRECHECK
Submenu items
Shutter
advanced recording
Submenu items
Super C.Nite
Focusing in a nearer subject
Focusing manually during recording
Focusing on a further subject
Focus
Using the touch point function
Face Detection
Submenu items
advanced recording
Magic Touch
Submenu items
PRECHECK
xvYCC
Metering
Submenu items
Submenu items
This mode reverses the colors, creating a negative image
Digital Effect
advanced recording
Submenu items
Submenu items
Fader
PRECHECK
Recording a video with Fade effect
Tele Macro
advanced recording
Submenu items
Submenu items
Submenu items
PRECHECK
PRECHECK
advanced recording
Zoom MIC
Submenu items
W Wide angle
MIC Level
Voice Reduction
Submenu items
Submenu items
Digital Zoom
Self Timer
advanced recording
Submenu items
After setting the Time Lapse REC mode, press the Recording
Time Lapse REC
Submenu items
Touch the “Interval” or “Duration” and drag up or down to set the
advanced recording
Example of Time Lapse Recording
Play Option
advanced playback
Background Music
Submenu items
advanced playback
Highlight
Submenu items
PRECHECK
VIEW
Story-Board Print
Slide Show Start
advanced playback
Slide Show Interval
Slide Show Music
If you change the genre, Instrument is set to “Random” automatically
For use of external sound sources, see page
File Info
Slide Show Effect
advanced playback
Submenu items
LCD Brightness
system setting
LCD Enhancer
Submenu items
Date/Time Display
Guideline
system setting
1. Touch the Menu tab Display setting “Guideline.”
TV Display
TV Type
1. Touch the Menu tab Display setting “TV Display.”
Submenu items
Auto LCD Off
HDMI TV Out
system setting
1. Touch the Menu tab Display setting “HDMI TV Out.”
PC Software
Remote
Submenu items
Submenu items
TV Connect Guide
USB Connect
system setting
Submenu items
Submenu items
Anynet+ HDMI-CEC
Storage Type HMX-S15/S16 only
Storage Info
Submenu items HMX-S15/S16 only
system setting
File No
Format
Submenu items
Internal Memory Formats the internal memory
Date/Time Set
Time Zone
system setting
Submenu items
Time Type
Date Type
Submenu items
Submenu items
Shutter Sound
Beep Sound
system setting
Submenu items
Auto Power Off
1. Touch the Menu tab Other setting “Auto Power Off”
Submenu items
Quick On STBY
system setting
Submenu items
REC Lamp
Manual Dial
Submenu items
Submenu items
Language
Default Set
system setting
Do not turn off the power while using this function
Demo
Using the Demo function
Submenu items
DELETING A SECTION OF A VIDEO PARTIAL DELETE
editing video clips
JWJEF
DIVIDING A VIDEO
COMBINING VIDEOS
editing video clips
1SPUFDU
file management
PROTECTION FROM ACCIDENTAL ERASURE
Submenu items
file management
DELETING FILES
Submenu items
4FMFDUJMFT
COPYING FILES HMX-S15/S16 ONLY
Submenu items
OK
AUTO CONNECTING TO A NETWORK
wireless network connection
and configuration HMX-S15/S16 only
Signal Strength
Data encryption settings by authentication type are below
wireless network connection
MANUAL NETWORK CONNECTION
and configuration HMX-S15/S16 only
Submenu items
DEVICE INFORMATION
using the wireless network HMX-S15/S16 only
PLAYING VIDEOS/PHOTOS ON THE TV SCREEN
PRECHECK
SHARING THE VIDEOS/PHOTOS
using the wireless network HMX-S15/S16 only
SETTING UP THE OPTIMAL NETWORK CONFIGURATION FOR DLNA STREAMING
2. The camcorder displays the available APs. Touch the AP you want
SAVING THE VIDEOS/PHOTOS TO A PC
TRANSFERRING VIDEOS AND PHOTOS BETWEEN OTHER DEVICES
To transfer your videos/photos to another camcorder
using the wireless network HMX-S15/S16 only
4. Enter the password and touch the OK tab
To receive videos/photos from another camcorder
1. Touch the Network “Device to Device.” 2. Touch “Receive.”
Search for the target camcorder
connecting to a TV
CONNECTING TO A HIGH DEFINITION TV WITH HDMI
Using a mini HDMI cable
Understanding the HDMI cable
What is Anynet+ function?
CONNECTING TO A REGULAR TV
Connecting an Audio/Video cable for the composite output
connecting to a TV
Image appearance depends on TV screen ratio
VIEWING ON A TV SCREEN
Recording ratio
Appearance on Wide 169 TV Appearance on 43 TV
DUBBING TO A VCR OR DVD/HDD RECORDER
dubbing videos
printing photos
To cancel the print setting
DIRECT PRINTING WITH A PICTBRIDGE PRINTER
To set the number of prints
printing photos
To set the date/time imprint
WHAT YOU CAN DO WITH A WINDOWS COMPUTER
using with a Windows computer
Main functions
System requirements
USING THE Intelli-studio PROGRAM
using with a Windows computer
Step 1. Connecting the USB cable
These are the default settings
Step 2. About the Intelli-studio main window
1 2 3 4 5
1. Menu items
Step 4. Editing videos or photos
Step 3. Playing back videos or photos
using with a Windows computer
1. Run the Intelli-studio program. page
1. Select the videos or photos you want to share
Step 5. Sharing the videos/photos online
USING AS A REMOVABLE STORAGE DEVICE
Viewing the contents of storage media
using with a Windows computer
Video file H.264 ➀
Structure of folders and files on the storage media
Photo file ➁
File format
WARNING INDICATORS AND MESSAGES
troubleshooting
device and may still have existing
Recording
The number of video files that can
troubleshooting
Editing videos
troubleshooting
Wireless Network
troubleshooting
SYMPTOMS AND SOLUTIONS
Symptom
Explanation/Solution
Symptom
Recording
illuminated by bright light, a vertical
Symptom
troubleshooting
Explanation/Solution
Symptom
Symptom
Adjusting the image during recording
Explanation/Solution
Symptom
Symptom
troubleshooting
Explanation/Solution
Symptom
Symptom
Connecting to a computer
Explanation/Solution
Cannot play a video file properly on
Symptom
troubleshooting
Because of the following settings
Overall operations
Using AllShare PC Software HMX-S15/S16 only
Environment configuration for use of AllShare PC Software
Using external sound sources
What is a Music Shake?
troubleshooting
VTJD4IBLF
Cautions when storing
MAINTENANCE
LCD screen
Lens
Power sources
USING YOUR CAMCORDER ABROAD
Viewing videos recorded with HD high definition image quality on a TV
On TV color systems
specifications
RF exposure statements
FCC ID A3LHMX-S16BN
warranty
SAMSUNG LIMITED WARRANTY
EXCLUSIONS WHAT IS NOT COVERED
RoHS compliant