P.SCAN (Progressive Scan) Function
Unlike regular Interlace Scan, in which two fields of picture information alternate to create the entire picture (odd scan lines, then even scan lines), Progressive Scan uses one field of information (all lines displayed in one pass) to create a clear and detailed picture without visible scan lines.
1 Press STOP() button.
If playing a disc, press the STOP () button twice so that <STOP>, appears on the display.
2 Press and hold P.SCAN button on the remote control for over 5 seconds.
Pressing and holding the button for over 5 seconds will select <Progressive Scan> and <Interlace Scan> alternately.
When you select P.SCAN, <P.SCAN> will appear on the display.
To set P.Scan mode for DivX discs, press the P.SCAN button on the remote control for more than 5 seconds with no disc in the unit ("NO DISC" on the display), then load the DivX disc and play.
What is Progressive (or Non-Interlaced) Scanning?
Interlaced Scan (1 FRAME = 2 FIELDS) | Progressive Scan (FULL FRAME) |
In | The progressive scanning method scans one full frame of |
fields (odd and even), where each field contains | video consecutively down the screen, line by line. |
every other horizontal line in the frame. | An entire image is drawn at one time, as opposed to the |
The odd field of alternating lines is displayed first, and | interlaced scanning process by which a video image is |
then the even field is displayed to fill in the alternating | drawn in a series of passes. |
gaps left by the odd field to form a single frame. | The progressive scanning method is desirable for dealing |
One frame, displayed every 1/25th of a second, contains | with moving objects. |
two interfaced fields, thus a total of 60 fields are displayed |
|
every 1/50th of a second. |
|
The interlaced scanning method is intended for capturing |
|
a still object. |
|
• This function works only on TVs equipped with component video inputs (Y, Pr, Pb) that support Progressive Video. (It does not work on TVs with conventional component inputs, i.e.,
• Depending on the capabilities of your TV, this function may not work.
Connecting Audio from External Components GB
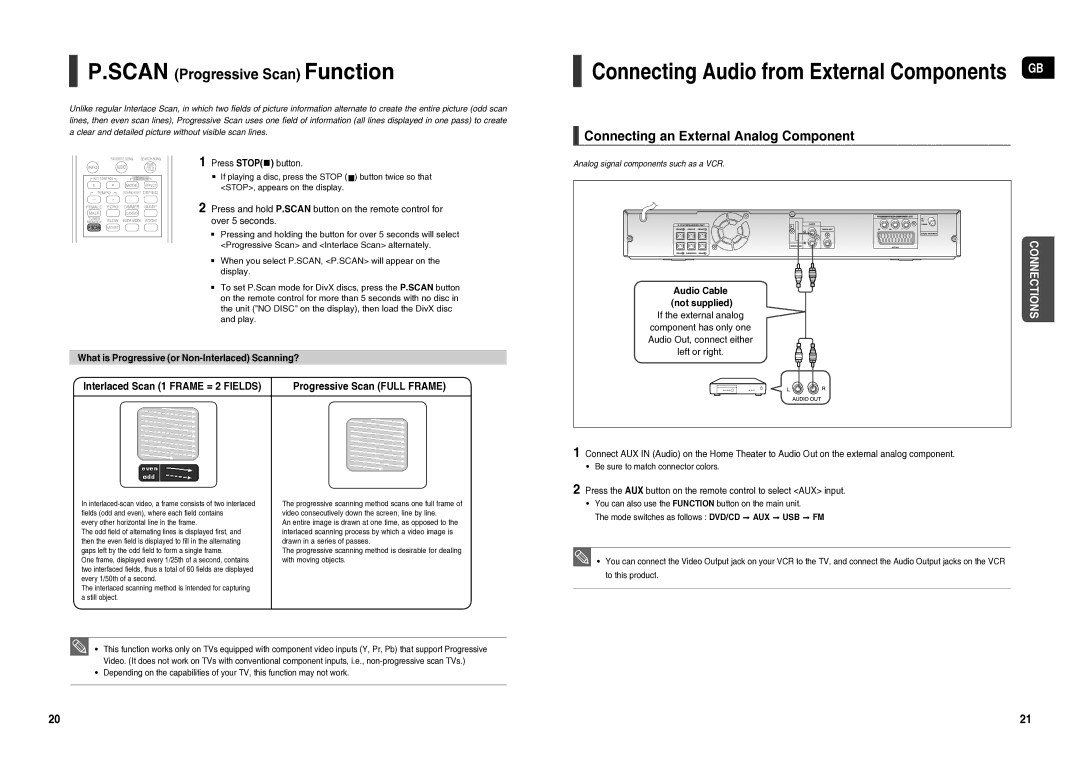
Connecting an External Analog Component
Analog signal components such as a VCR.
Audio Cable | CONNECTIONS |
(not supplied) | |
If the external analog | |
component has only one |
|
Audio Out, connect either |
|
left or right. |
|
1 Connect AUX IN (Audio) on the Home Theater to Audio Out on the external analog component.
• Be sure to match connector colors.
2 Press the AUX button on the remote control to select <AUX> input.
• You can also use the FUNCTION button on the main unit.
The mode switches as follows : DVD/CD AUX USB FM
• You can connect the Video Output jack on your VCR to the TV, and connect the Audio Output jacks on the VCR to this product.
20 | 21 |