Macrovision Statement
Setting Up your System
Safety Instructions
Instruction On Safety Operation of NotePC
Replacement Parts and Accessories
Care During Use
Laser Safety
Battery Disposal
Power Cord Requirements
Laser Safety Note
Requirements listed below are applicable to all countries
General Requirements
Regulatory Compliance Statements
Wireless Guidance
Regulatory Compliance Statements
United States of America
USA and Canada Safety Requirements and Notices
Use in specific environments
Antenna use
Use On Aircraft Caution
Unintentional Emitter per FCC Part
Intentional emitter per FCC Part
FCC Statement for Wireless LAN use
FCC Part
Page
Canada
Unintentional Emitter per ICES-003
Intentional Emitter per RSS
Page
European Union
European Union CE Marking and Compliance Notices
European Directives
Translated Statements of Compliance
General
Belgium
France
Page
Weee Symbol Information
Information Icons
Manual Documentation Conventions
Keyboard Conventions
Technical Information
CD-ROM Device Naming Convention
Software User Documentation
Touchpad Conventions
Windows Conventions
Front View
Introducing Your Computer
Right View
Left View
About Fingerprint Sensor
Bottom View
Back View
To turn on the computer
Turning the Computer On and Off
To turn off the computer
Click Turn Off Computer
Getting Started
United Kingdom
Using the Keyboard
United States
Using the Numeric Keypad
Fn Key Key Name Key Function Combinations Esc
Using Special Function Keys
Page
Touchpad On/Off
Using the Touchpad
Action Function Process
Scroll
Hot Keys
About the Wireless LAN Button
Changing the Hot Key Setting
Shows the operating status of the computer
Reading the Status Indicators
To save the battery charge
Adjusting LCD Brightness
Maintenance Instructions
Bad pixels in the LCD
Adjusting the Volume
To adjust using keyboard
To adjust using volume adjustment program
Understanding the Desktop
Introducing Windows
My Computer
Understanding the Start Menu
Click Start My Computer
Understanding a Window
Help and Support Center
Windows XP Tour
Click Start Help and Support
To insert a CD
Using the CD Drive
To eject a CD
To clean a CD or DVD title
Emergency Eject Hole
To play a DVD
To use the Windows Media Player
To play a video CD
Windows Media Player tour
To write data on a CD Option
For more information on creating an audio CD
For more information on writing CDs
Enjoying Home Theater S/PDIF Port
What is a home theater system?
Connect 5.1 channel speaker system to your computer
Configure digital sound output on the computer
Enable S/PDIF output on the DVD program
Restrictions when Using Memory Sticks / SD Cards
Using Memory Card Slot
To insert and use a memory card
You should insert the memory card upside down
To remove a memory card
To format a memory card
To protect the data in the memory card
To use a Memory Stick Duo
Using the Pcmcia Card Slot
Before using the Pcmcia slot, remove the slot protector
To insert a Pcmcia card
To remove a Pcmcia card
Using EasyBox
Learn about EasyBox
Or select Start All Programs Samsung EasyBox EasyBox
Using EasyBox
Configuring Firewall
Click Start All Programs Samsung EasyBox EasyBox
Click Start All Programs Samsung Samsung Smart Screen
Using Samsung Smart Screen
To return to Windows desktop
To change background or skin
Using Samsung Theme
To Update Samsung Software and Drivers
Using Samsung Update Plus
Using the Computer
Using AVStation premium
Using AVStation Premium
AVStation Premium Modes
AVStation Premium Screen Layout and Menus
Selecting the AVStation Premium Menus
Playing a Music File
Playing an Audio CD
Copying an audio CD to the Computer
Creating a Playlist
Burning an Audio CD
Select Tools Burn CD
Add
Viewing the Image List
Viewing and Editing a Picture
Viewing an Image through the Slide Show or Full Screen
Editing an Image
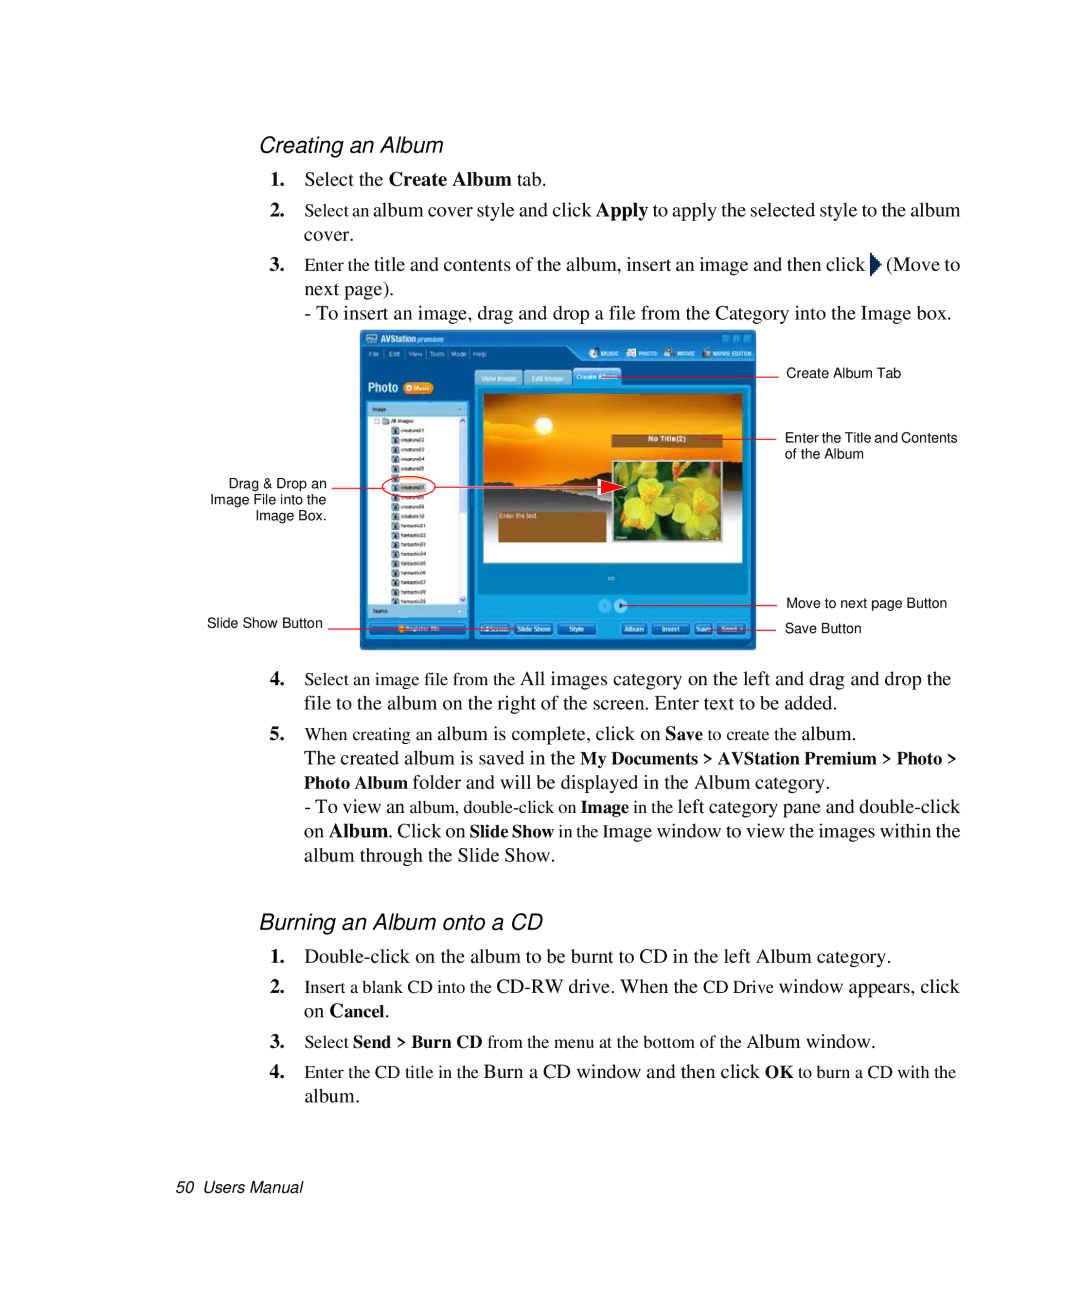
Burning an Album onto a CD
Creating an Album
Playing a Movie
Playing a DVD Title
Playing a VCD Title
Editing a Movie
Movie Editor Editing a Movie
Transition Tab
Registering a File
Play Mode Screen Layout
Using Play Mode
Playing a Music File
Photo Viewing a Picture
Playing an Audio CD
To Listen to All Tracks
Movie Playing a Movie
Using AVStation now
Using AVStation now
Launching AVStation now
Booting and using the computer when using AVStation now
Exiting AVStation now
AVStation now Menus
Selecting or Running a menu or an Item
To Move, Select and Run Menus
Returning to the Previous Screen
Media Play Control Button
Playing Multiple Tracks
Photo
Playing a DVD/VCD title
Using the DVD/VCD Play Control Button
Tips
Using Smart Parking Only For Some Models
Page
Before Start
Connecting with a Modem
Click Start Control Panel
Connecting Through a Wired LAN
To use Dhcp
To use a static IP
To use both Dhcp and static IP simultaneously
To configure network setting
Using Samsung Network Manager
To change network places
To configure the server
Click Click here to setup Internet Connection Share
To share an Internet connection
Server Client
To configure the client
Access Point AP
Connecting Through a Wireless LAN Option
What is an Access Point AP?
Connecting to an Access Point AP
Checking the connection status
Setting up a computer-to-computer network
Connecting to computer-to-computer networks peer-to-peer or
Wireless Networks tab, click Add
Page
Connecting to the configured computer
Page
Checking the connection status
Using the wireless LAN configuration program PROSet
Installing the wireless LAN configuration program PROSet
Security Settings
To connect to an Access Point
To create a computer-to-computer Ad Hoc network
What is a network name SSID?
Connecting to the Internet
Using the Atheros Client Utility
Installing the Atheros Client Utility Program
WEP Key Setting
What is a Network Name?
Sharing files or folders
Using Network Services
Configuring Sharing
Using Shared Files or Folders
Sharing Printers
If your computer is a member of another workgroup
Configuring Printer Sharing
Adding and Using a Shared Printer
Click Add a printer
Connecting to the Internet
Following functions are provided by the Bluetooth software
Using Bluetooth Devices Optional
Using the Internet via a mobile phone
Using a wireless keyboard and mouse
Using a wireless printer
Precautions
Using a Personal Area Network
Sharing data with a Palm Hand-held PC or a Pocket PC
Bios Caution
Using System Setup
Menu Function
Starting System Setup
Press Enter on Boot Device Priority item
Changing Booting Priority
Setting the Supervisor Password
Configuring the Password
Setting the User Password
On the Set Supervisor Password item, press Enter
Deactivating the Password
Activating the Booting Password
Configuring Resolution and Color Depth
When you have completed configuration, click Apply
Switching Display Devices Using the Shortcut Key
Using External Display DevicesATI Chipset model, p
Connecting to a TV
Connect to a DTV
Apply
Select YPbPr On/Off
Using Dual View to View Extended Screen
To move a window between display devices in Dual View mode
Deactivating Dual View Mode
Using External Display DevicesIntel Chipset mode, p
To switch display devices using shortcut key
To change the screen resolution and color quality
To change display devices easily
Basic Power Management Schemes
Using Power Management Options
Standby vs. Hibernation
Changing Devices
Hibernate Mode Power Management or Manual Method
If You Reinstall Windows
Standby Mode Power Management or Manual Method
Frequent Interruptions
Rest Key
Advanced Power Management Schemes
Ejecting and Attaching Battery
Using the Battery
To view on the battery
Monitoring the Battery Charge
To use the shortcut key to view
To view through the Control Panel
Click on Start All Programs Samsung Samsung Battery Manager
Using the Battery Manager
Using the battery
Battery Warning
Power Saving Effect
When Running a Game or Multimedia Application
Controlling the LCD Brightness
Calibration Notes
Battery Calibration
Removing the memory module
Upgrading Memory
Adding a memory module
Using the Security Lock Port
Tips for Using Your Computer
Handling Spills
Travelling with Your Computer
Air Travel
If you are travelling by air, follow these tips
Storing the Computer for Long Periods
Frequently Asked Questions Reinstalling Software
Questions and Answers
Check the Connections
Norton AntiVirus
Windows Related
Questions and Answers
Q1 The system does not shutdown properly
Q2 The system freezes during program operation
Q1 The LCD screen is too dark or too bright
Display Related
Troubleshooting
Q2 I cannot make a call using an extension line
Modem Related
Q1 I cannot hear the modem sound
Using an AT command
Configuring the Modem through the Control Panel
Q3 How do I use my modem when dialing from overseas?
Q1 Wake On LAN function
Wired LAN Related
Wireless LAN Related
Check the AP Settings
Troubleshooting
Page
Fixed IP is recommended for a small-size network
Page
Intel chipset models
Games and Programs Related
Q7 Running speed of a game is too slow or fast
Q5 Fn+F4/ Key combination does not work
Intel chipset models
Security Center
Troubleshooting
Page
Q2 The colors are too blurred
Hdtv Related
Intel chipset models
Restoring the System
Creating a Restore Point
Select Create a restore point, and click Next
Returning your computer to an earlier restore point
Date of the restore point is displayed in bold font
Undoing the last restoration
Running the system software CD
Reinstalling Software
Installing drivers and programs
Reinstalling Windows XP
Reinstalling Windows
When you have set a booting password
What is partition configuration?
Troubleshooting
If You Cannot Run Windows
Press any key to boot from CD
X20 Model with an Intel Graphics Chipset
System Specification
X20 Model with an ATI Graphics Chipset
X25 Model
X50 Model
IntelR PRO/Wireless 2200BG Network Connection
Wireless LAN Specification Optional
Product Specification
Radio Specifications
IntelR PRO/Wireless 2915ABG Network Connection
Airgo Networks True Mimo tm Wireless Adapter
WPA, *CCX
Atheros Wireless Network Adapter Device
Gigabytes
CD-ROM
Hour
Hertz
Pcmcia
Boot disk
Boot
AC adapter
Byte
CardBus
DMA direct memory access
Cmos memory
COM port
Address
Hard drive
IRQ interrupt request line
LCD liquid-crystal display
Resolution
RAM random access memory
PC Card
PC slot
TFT thin film transistor LCD
Shadow RAM
»ÃСÒȨҡ Macrovision
ÅÔ¢ÊÔ·¸Ôì2003 ʧǹÅÔ¢ÊÔ·¸Ôì·Ñé§ËÁ´
»ÃСÒÈ
¡ÒõԴµÑé§Ãкº
¤Óá¹Ð¹Óà¾×èͤÇÒÁ»ÅÍ´ÀÑÂ
¤Óá¹Ð¹ÓÊÓËÃѺ¡ÒÃãªéNotePC ÍÂèÒ§»ÅÍ´ÀÑÂ
¡ÒôÙáÅÃÐËÇèÒ§¡ÒÃãªé§Ò¹
¡ÒÃà»ÅÕè¹ÍÐäËÅèáÅÐÍØ»¡Ã³ìàÊÃÔÁ
ËéÒÁàËÂÕºÊÒÂä¿ËÃ×ÍËéÒÁäÁèãËéÁÕÊÔ觢ͧÇÒ§·ÑºÊÒÂä¿
¤ÇÒÁ»ÅÍ´ÀÑÂ㹡ÒÃãªéàÅà«ÍÃì
¡ÒáӨѴẵàµÍÃÕè
¤ÇÒÁµéͧ¡ÒÃà¡ÕèÂǡѺªØ´ÊÒÂä¿
¤ÇÒÁµéͧ¡Ò÷ÑèÇä»
¢éÒà¤Ã×èͧ¤ÍÁ¾ÔÇàµÍÃì
¤Óá¹Ð¹ÓÊÓËÃѺ¡ÒÃãªé§Ò¹ÃкºäÇÃìàÅÊ
ÃÒÂÅÐàÍÕ´à¡ÕèÂǡѺ¢éͺѧ¤ÑºµèÒ§æ
ÃÒÂÅÐàÍÕ´à¡ÕèÂǡѺ¢éͺѧ¤ÑºµèÒ§æ
¢éÍ¡Ó˹´áÅлÃСÒÈ´éÒ¹¤ÇÒÁ»ÅÍ´ÀÑ¢ͧÊËÃÑÍàÁÃÔ¡ÒáÅÐ᤹ҴÒ
»ÃÐà·ÈÊËÃÑÍàÁÃÔ¡Ò
Intentional Emitter ¢Í§ FCC Êèǹ
Unintentional Emitter ¢Í§ FCC Êèǹ
»ÃСÒÈ FCC SÊÓËÃѺ¡ÒÃãªé§Ò¹ Wireless LAN
FCC Êèǹ
ÍØ»¡Ã³ì¹Õéãªéá¨ç¤ Usoc µèÍ仹Õé RJ11C
Unintentional Emitter per ICES-003
¤¹Ò´Ò
Intentional Emitter per RSS
ÇèÒ´éÇ¡ÒÃÊè§ÊÑ−−ҳú¡Ç¹¢Í§ÇÔ·ÂصÒÁÁÒµÃÒ¹ÍصÊÒË¡ÃÃÁã¹á¤¹Ò´Ò
Page
»ÃСÒÈà¡ÕèÂǡѺà¤Ã×èͧËÁÒÂáÅÐÁÒµÃÒ¹ CE ¢Í§ÊËÀÒ¾ÂØâû
ÊËÀÒ¾ÂØâû
¤ÓÊÑ觢ͧÊËÀÒ¾ÂØâû
¢éÍÁÙŵèÍ仹ÕéãªéÊÓËÃѺà¤Ã×èͧ·ÕèÁÕ¡ÒõԴÅÒ¡ CE à·èÒ¹Ñé¹
Danish
»ÃСÒȤÇÒÁÊÍ´¤ÅéͧºÑºá»Å English
Dutch
Finnish
·ÑèÇä»
¢éͨӡѴ㹾×é¹·ÕèÊÓËÃѺ¡ÒÃãªéÇÔ·ÂØ802.11b/802.11g
MHz
ÀºÅàÂÕÂÁ
ÊÓËÃѺ¼ÅÔµÀѹ±ì·ÕèÁÕ¡ÒõԴµÑé§âÁà´çÁ·Õèä´éÃѺ¡ÒÃÃѺÃͧâ´Â EU
¢éÍÁÙÅâ·Ã¤Á¹Ò¤Á¢Í§¡ÅØèÁ»ÃÐà·ÈÂØâû
¡ÒèѴÃٻẺàÍ¡ÊÒÃ
Äͤ͹¢éÍÁÙÅ
¡ÒèѴàÃÕ§á»é¹¾ÔÁ¾ì
¡ÒáÓ˹´ª×èÍãËé¡ÑºÍØ»¡Ã³ì«Õ´ÕÃÍÁ
¤ÙèÁ×Í¡ÒÃãªé«Í¿µìáÇÃì
¡ÒÃãªé§Ò¹·Ñªá¾´
¡ÒÃãªé§Ò¹ÇÔ¹â´ÇÊì
ÁØÁÁͧ´éҹ˹éÒ
ÃÙé¨Ñ¡¡Ñºà¤Ã×èͧ¤ÍÁ¾ÔÇàµÍÃì¢Í§¤Ø³
¤ÙèÁ×Í¡ÒÃãªé§Ò¹¹ÕéãªéÊÓËÃѺÃØè¹ X20, X25 áÅÐ
¤Ã×èͧ¤ÍÁ¾ÔÇàµÍÃì¢Í§¤Ø³ â´Â¨Ð¢Ö鹡ѺÃØè¹·Õèãªé
ÁØÁÁͧ´éÒ¹«éÒÂ
ÁØÁÁͧ´éÒ¹¢ÇÒ
¡ÕèÂǡѺà«ç¹à«ÍÃìµÃǨÊͺÅÒ¹ÔéÇÁ×Í
¿áÊ´§¡Ò÷ӧҹ¢Í§ÃØè¹ X50 ¨ÐÍÂÙè·Õè´éÒ¹«éÒ¢ͧá¨ç¤äÁâ¤Ã⿹
ÁØÁÁͧ´éÒ¹ËÅѧ
¨ç¤ S/PDIF ¢Í§ÃØè¹ X50 ÍÂÙè·Õè´éÒ¹¢ÇҢͧ¾ÍÃìµ Power-In
ÁØÁÁͧ´éÒ¹ÅèÒ§
Samsung ·Õèã¡Åé·ÕèÊØ´
¡ÒÃà»Ô´à¤Ã×èͧ¤ÍÁ¾ÔÇàµÍÃì
¡ÒÃà»Ô´áÅлԴà¤Ã×èͧ¤ÍÁ¾ÔÇàµÍÃì
¡ÒûԴà¤Ã×èͧ¤ÍÁ¾ÔÇàµÍÃì
¤ÅÔ¡»ØèÁ start ·Õè·ÒÊ¡ìºÒÃì
·Ó¡ÒõÃǨÊͺ´ÔÊ¡ì
¡ÒÃãªéá»é¹¾ÔÁ¾ì
´éàËÁ×͹¡Ñº¡ÒÃãªéá»é¹¾ÔÁ¾ìÁÒµÃÒ¹
»ØèÁµèÒ§æ º¹á»é¹¾ÔÁ¾ìÍÒ¨¨Ñ´¡ÅØèÁËÅÑ¡æ ä´é´Ñ§¹Õé
ËÅÍ´ LED áÊ´§ Num Lock
¡ÒÃãªéá»é¹¾ÔÁ¾ìµÑÇàÅ¢
×èÍ»ØèÁ ¿Ñ§¡ìªÑ¹¢Í§»ØèÁ Esc
¡ÒÃãªé»ØèÁ¿Ñ§¡ìªÑ¹¾ÔàÈÉ
ÀÃÔèÁµé¹
¡ÒÃãªé·Ñªá¾´
¹ÕéàÃÕ¡ÇèҾ͹ìàµÍÃì«Öè§â´Â»¡µÔ¨ÐáÊ´§à»ç¹ÃÙ»ÅÙ¡Èà ËÃ×͵ÑÇ
»Ô´/»Ô´·Ñªá¾´
·ÔÈ·Ò§·Õèµéͧ¡ÒÃ
¤Ø³ÊÒÁÒöÊÑ觧ҹµèÒ§æ ä´éâ´Âãªé·Ñªá¾´ ´Ñ§¤Ó͸ԺÒµèÍ仹Õé
¿Ñ§¡ìªÑ¹ ¡Ãкǹ¡ÒÃ
»ØèÁÅÑ´
¡ÕèÂǡѺ»ØèÁ Wireless LAN
»ØèÁ AVStation now/AVStation now DVD ¨ÐÁÕãËéÁÒ㹺ҧÃØè¹
ËÅѧ¨Ò¡¤ÃÑé§ÅèÒÊØ´·ÕèÁÕ¡Òá´»ØèÁ
¤ÅÔ¡ OK à¾×èͺѹ·Ö¡¡ÒÃà»ÅÕè¹á»Å§
¡ÒÃà»ÅÕ蹡ÒõÑ駤èÒ»ØèÁÅÑ´
ÁÊ´§Ê¶Ò¹Ð¡Ò÷ӧҹ¢Í§¤ÍÁ¾ÔÇàµÍÃì
¤ÇÒÁËÁÒ¢ͧä¿áÊ´§Ê¶Ò¹Ð
¡ÒûÃÐËÂÑ´»ÃШØä¿¿éҢͧẵàµÍÃÕè
¡ÒûÃѺ¤ÇÒÁÊÇèÒ§¢Í§¨Í LCD
¡ÒÃà¡Ô´¨Ø´ºÍ´ã¹¨Í LCD
¤Óá¹Ð¹Ó㹡ÒôÙáÅà¤Ã×èͧ
¡ÒûÃѺâ´Âãªéá»é¹¾ÔÁ¾ì
¡ÒûÃѺ¤ÇÒÁ´Ñ§àÊÕ§
¡ÒûÃѺâ´Âãªéâ»Ãá¡ÃÁ»ÃѺ¤ÇÒÁ´Ñ§àÊÕ§
¡´»ØèÁ Fn+ ËÃ×Í Fn+ ¨Ò¡á»é¹¾ÔÁ¾ì
¢éÒ㨡Ò÷ӧҹ¡Ñºà´Ê¡ì·Í»
ÃÙé¨Ñ¡¡Ñº Windows
¤ÍÁ¾ÔÇàµÍÃìËÃ×ÍÍÔ¹àµÍÃìà¹çµä´éâ´Â¡ÒäÅÔ¡·Õè¤é¹ËÒ
¢éÒ㨡Ò÷ӧҹ¢Í§àÁ¹ÙStart
´Ã¿ì¤×ÍÍÐäÃ?
¢éÒ㨡Ò÷ӧҹ¢Í§ÇÔ¹â´Çì
¿Åà´ÍÃì¤×ÍÍÐäÃ?
¿Åì¤×ÍÍÐäÃ?
ÈÙ¹ÂìÇÔ¸ÕãªéáÅСÒÃʹѺʹع
Windows XP Tour
¤ÅÔ¡ Start Help and Support
¡ÒÃãÊèá¼è¹«Õ´Õ
¡ÒÃãªéä´Ã¿ì«Õ´ÕÃÍÁ
¡´»ØèÁ¹Óá¼è¹ÍÍ¡·Õè´éÒ¹¢ÇҢͧä´Ã¿ì«Õ´ÕÃÍÁ
´Ñ¹¶Ò´à¢éÒ¨¹ä´éÂÔ¹àÊÕ§¤ÅÔ¡
ªèͧ¹Óá¼è¹ÍÍ¡Ø¡àÔ¹
¡ÒùÓá¼è¹«Õ´ÕÍÍ¡
¡Ò÷ӤÇÒÁÊÐÍÒ´á¼è¹«Õ´ÕËÃ×Í´ÕÇÕ´Õ
¡ÒÃàÅè¹á¼è¹ DVD
¡ÒÃàÅè¹á¼è¹ÇÔ´ÕâÍ«Õ´Õ
¡ÒÃãªéâ»Ãá¡ÃÁ Windows Media Player
Windows Media Player tour
ÁÅéǤÅÔ¡ Help Help Item
¡ÒÃà¢Õ¹¢éÍÁÙÅŧ㹫մյÑÇàÅ×Í¡
¤ÅÔ¡ Start My Computer
¤ÅÔ¡ Write these files to CD ã¹ÇÔ¹â´Çì¢Í§ä´Ã¿ì«Õ´ÕÃÍÁ
ÊÓËÃѺ¢éÍÁÙÅà¾ÔèÁàµÔÁà¡ÕèÂǡѺ¡ÒÃÊÃéÒ§ÍÍ´ÔâÍ«Õ´Õ
ÊÓËÃѺ¢éÍÁÙÅà¾ÔèÁàµÔÁà¡ÕèÂǡѺ¡ÒÃà¢Õ¹á¼è¹«Õ´Õ
ÍÐää×ÍÃкºâÎÁà¸ÕÂàµÍÃì?
¾ÅÔ¹¡ÑºâÎÁà¸ÕÂàµÍÃìS/PDIF Port
30 ¤ÙèÁ×ͼÙéãªé
¢Ñé¹·Õè3. à»Ô´àÍÒµì¾Øµ S/PDIF ã¹â»Ãá¡ÃÁ DVD
¡ÒÃãÊèáÅÐãªéàÁâÁÃÕè¡ÒÃì´
¡ÒÃãªéÊÅç͵àÁâÁÃÕè¡ÒÃì´
¢éͨӡѴàÁ×èÍÁÕ¡ÒÃãªéMemory Sticks / SD Cards
ÊÍ´àÁâÁÃÕè¡ÒÃì´â´Â˧Ò¢Öé¹
Memory Stick
¡ÒùÓá¼è¹àÁâÁÃÕè¡ÒÃì´ÍÍ¡
¡Òûéͧ¡Ñ¹¢éÍÁÙÅã¹àÁâÁÃÕè¡ÒÃì´
¡ÒÿÍÃìáÁµá¼è¹àÁâÁÃÕè¡ÒÃì´
¤ÅÔ¡ Start à¾×èÍàÃÔèÁ·Ó¡ÒÿÍÃìáÁµ
¡ÒÃãªéMemory Stick Duo
¡ÒÃãÊè¡ÒÃì´ Pcmcia
¡ÒÃãªéÊÅç͵ Pcmcia
¡è͹ãªéÊÅç͵ Pcmcia ãËé»Å´ÍØ»¡Ã³ì»éͧ¡Ñ¹ÊÅç͵ÍÍ¡¡è͹
ÃÊè¡ÒÃì´ Pcmcia ŧã¹ÊÅç͵ Pcmcia ´éÒ¹¢éÒ§à¤Ã×èͧ¤ÍÁ¾ÔÇàµÍÃì
´ÑºàºÔŤÅÔ¡·Õèäͤ͹ Safely Removes Hardware º¹·ÒÊ¡ìºÒÃì
¡ÒùӡÒÃì´ Pcmcia ÍÍ¡
¡ÒÃãªéEasyBox
ÀÃÕ¹ÃÙéà¡ÕèÂǡѺ EasyBox
¡ÒÃãªéEasyBox
¤ÅÔ¡ Start All Programs Samsung EasyBox EasyBox
¡ÒáÓ˹´¤èҤ͹¿Ô¡¢Í§ä¿ÃìÇÍÅÅì
¤ÅÔ¡ Start All Programs Samsung Samsung Smart Screen
¡ÒÃãªéSamsung Smart Screen
¡ÒáÅѺä»Âѧà´Ê¡ì·Í»¢Í§ÇÔ¹â´Çì
¡ÒÃà»ÅÕè¹ҡËÅѧËÃ×Í skin
»ØèÁ»Ô´ »ØèÁÇÔ¸Õãªé
¡ÒÃãªéSamsung Theme
¡ÒÃÍѻവ«Í¿µìáÇÃìáÅÐä´ÃàÇÍÃì¢Í§ Samsung
¡ÒÃãªéSamsung Update Plus
¤ÍÁ¾ÔÇàµÍÃì¢Í§¤Ø³µéͧàª×èÍÁµè͡ѺÍÔ¹àµÍÃìà¹çµ
¤ÅÔ¡àÅ×Í¡ Agree à¾×èÍãªé«Í¿µìáÇÃì¹Õé
¡ÒÃáÊ´§ÃÒ¡ÒÃÍѻവÍѵâ¹ÁѵÔ
¡ÒÃãªéAVStation Premium
¡ÒÃãªéAVStation premium
ÂËÁ´µèÒ§æ ¢Í§ AVStation Premium
AVStation premium ÁÕã¹à¤Ã×èͧºÒ§ÃØè¹
Movie Editor ´éÇ¡ÒÃãªéàÁ¹Ù¹Õé¤Ø³ÊÒÁÒöá¡éä¢ä¿ÅìÀҾ¹µÃìä´é
¡ÒèѴàÃÕ§˹éÒ¨ÍáÅÐàÁ¹Ù¢Í§ AVStation Premium
¡ÒÃàÅ×Í¡àÁ¹ÙµèÒ§æ ¢Í§ AVStation Premium
¡ÒÃàÅè¹ä¿Åìà¾Å§
¡ÒÃàÅè¹ÍÍ´ÔâÍ«Õ´Õ
ÀÅ×Í¡ Copy from CD ÀÅ×Í¡á·Ã礵èÒ§æ ·Õèµéͧ¡ÒäѴÅÍ¡
¡ÒäѴÅÍ¡ÍÍ´ÔâÍ«Õ´Õä»Âѧà¤Ã×èͧ¤ÍÁ¾ÔÇàµÍÃì
¡ÒÃÊÃéÒ§à¾ÅÂìÅÔʵì
¡ÒÃàºÔÃì¹ÍÍ´ÔâÍ«Õ´Õ
ÀÅ×Í¡ Tools Burn CD
ÀÅ×Í¡ Burn Audio CD áÅéǤÅÔ¡ Next
¤ÅÔ¡ on Photo ã¹á¶º Menu Selection
¡ÒÃàÃÕ¡´ÙáÅÐá¡éä¢ÃÙ»
¡ÒÃàÃÕ¡´ÙÅÔʵì¢Í§ÀÒ¾
ÀÅ×Í¡ View Image List ¨Ò¡àÁ¹Ù·ÕèÊèǹÅèÒ§¢Í§Ë¹éҨͫÙÁÀÒ¾
¡ÒÃàºÔÃì¹ÍÑźÑéÁä»Âѧá¼è¹«Õ´Õ
¡ÒÃÊÃéÒ§ÍÑźÑéÁ
ÀÅ×Í¡á·çº Create Album
ÀÅ×Í¡ Send Burn CD ¨Ò¡àÁ¹Ù·Õè´éÒ¹ÅèÒ§¢Í§ÇÔ¹â´ÇìAlbum
¡ÒÃàÅè¹ÀҾ¹µÃì
ÃÊèá¼è¹ DVD ŧã¹ä´Ã¿ìDVD
¡ÒÃàÅè¹á¼è¹ VCD
¡ÒõѴµèÍÀҾ¹µÃì
Movie Editor µÑ´µèÍÀҾ¹µì
ΜÓá˹觢ͧ Transition Effect
¡ÒÃÃÕ¨ÔÊàµÍÃìä¿Åì
ÃٻẺ˹éÒ¨Í Play Mode
¡ÒÃãªéPlay Mode
¡ÒÃàÅè¹ä¿Åìà¾Å§
´ÑºàºÔŤÅÔ¡·ÕèPHOTO ã¹Ë¹éÒ¨Íáá¢Í§ Play Mode
¡ÒÃàÅè¹ÍÍ´ÔâÍ«Õ´Õ
¡Òÿѧá·Ã礷Ñé§ËÁ´
Movie ¡ÒÃàÅè¹ÀҾ¹µÃì
¡ÒÃãªéAVStation now
¡ÒÃãªéAVStation now
¡ÒÃà»Ô´ãªéAVStation now
AVStation now ÁÕà¾ÒÐã¹à¤Ã×èͧºÒ§ÃØè¹
ÀÁ¹ÙµèÒ§æ ¢Í§ AVStation now
¡ÒÃÍÍ¡¨Ò¡ AVStation now
¡ÒúٵáÅÐãªéà¤Ã×èͧ¤ÍÁ¾ÔÇàµÍÃ좳ÐãªéAVStation now
AVStation now »ÃСͺ´éÇÂàÁ¹ÙµèÒ§æ 3 àÁ¹Ù´Ñ§¹Õé
¡ÒÃàÅ×Í¡ËÃ×ÍÃѹ àÁ¹ÙËÃ×ÍÃÒ¡ÒÃ
¡ÒÃàÅè¹ Move ãËéàÅ×Í¡àÁ¹ÙRun
¡ÒÃÂé͹¡ÅѺä»Âѧ˹éҨ͡è͹˹éÒ
»ØèÁ¤Çº¤ØÁ Media Play
ÀÅ×Í¡àÁ¹ÙPHOTO áÅéÇàÅ×è͹价Õè¡ÅØèÁ All Photo
Photo
¡ÒÃãªé»ØèÁ¤Çº¤ØÁ¡ÒÃàÅè¹ DVD/VCD
¡ÒÃàÅè¹á¼è¹ DVD/VCD
¨é§ãËé·ÃÒº
¤Óá¹Ð¹Ó
62 ¤ÙèÁ×ͼÙéãªé
¡ÒÃãªé¤Ø³ÊÁºÑµÔSmart Parking à¾ÒÐÃØè¹
ÀÁ×èÍ Smart Parking µÃǨÊͺÎÒÃì´´ÔÊ¡ì
¡ÒÃàª×èÍÁµèÍâ´ÂãªéâÁà´çÁ
¡è͹àÃÔèÁ
ÀµÃÕÂÁÊÒÂâ·ÃÈѾ·ì·ÕèäÁèãªéẺ´Ô¨ÔµÍÅ
¡ÒÃàª×èÍÁµèͼèÒ¹Ãкº LAN
ΜèÍÊÒ LAN à¢éҡѺ¾ÍÃìµ LAN ¢Í§¤ÍÁ¾ÔÇàµÍÃì
¤ÅÔ¡¢ÇÒ·Õèäͤ͹ Local Area ConnectionáÅéǤÅÔ¡ Properties
¡ÒÃãªéIP µÒµÑÇ
¡ÒÃãªéDHCP
¡ÒÃãªé§Ò¹ Samsung Network Manager
¡ÒáÓ˹´¤èҤ͹¿Ô¡¢Í§à¹çµàÇÔÃì¡
¤Ø³¨Ðä´éÃѺä;ÕÍÂèÒ§§èÒ´ÒÂ
¤Ø³ÊÒÁÒöà»ÅÕ蹤èÒà¹çµàÇÔÃì¡ä´éâ´Â
¡ÒÃà»ÅÕè¹à¹çµàÇÔÃì¡
¤ÅÔ¡ Close à¾×èͻԴä´ÍÐÅçÍ¡ºçÍ¡«ì
¤ÅÔ¡ Change àÅ×Í¡äͤ͹ʶҹ·ÕèáÅéǤÅÔ¡ Change
¤ÅÔ¡·ÕèClick here to setup Internet Connection Share
¡ÒÃáªÃì¡ÒÃàª×èÍÁµèÍÍÔ¹àµÍÃìà¹çµ
¡ÒáÓ˹´¤èҤ͹¿Ô¡à«ÔÃì¿àÇÍÃì
¡ÒáÓ˹´¤èҤ͹¿Ô¡ä¤Åà͹µì
Access Point AP ¤×ÍÍÐäÃ?
¡ÒÃàª×èÍÁµèͼèÒ¹Ãкº Wireless LAN µÑÇàÅ×Í¡
¡ÒÃì´ Mimo äÁèÁÕâ»Ãá¡ÃÁ LAN äÃéÊÒÂà¾ÔèÁàµÔÁÍÕ¡
¡ÒÃàª×èÍÁµèÍäÇÃìàÅÊà¹çµàÇÔÃì¡ÊÒÁÒöáºè§ÍÍ¡à»ç¹Êͧ¡ÅØèÁãË−æè
¤ÍÁ¾ÔÇàµÍÃìä»Âѧ¤ÍÁ¾ÔÇàµÍÃì ad hoc
¡ÒÃàª×èÍÁµèÍä»Âѧ Access Point AP
¡ÒõÃǨÊͺʶҹСÒÃàª×èÍÁµèÍ
ÀÅ×Í¡ AP àªè¹ Test à¾×èÍàª×èÍÁµèÍáÅéǤÅÔ¡ Connect
¤Ø³ÊÒÁÒöàª×èÍÁµèÍä´éâ´Â¡Ò÷ӵÒÁ¢Ñ鹵͹µèÍ仹Õé
¢Ñé¹·Õè1. µÑ駤èÒà¹çµàÇÔÃ졤ÍÁ¾ÔÇàµÍÃìä»Âѧ¤ÍÁ¾ÔÇàµÍÃì
76 ¤ÙèÁ×ͼÙéãªé
·Õèá·çº Wireless Network ¤ÅÔ¡ Add
¡ÒÃàª×èÍÁµè͡ѺÍÔ¹àµÍÃìà¹çµ
¢Ñé¹·Õè2. ¡ÒÃàª×èÍÁµè͡Ѻà¤Ã×èͧ·Õèä´éÃѺ¡ÒáÓ˹´¤èÒáÅéÇ
¡ÒõԴµÑé§ wireless network àÊÃç¨ÊÁºÙóìáÅéÇ
»é͹ cryptographic key 㹿ÔÅ´ìNetwork key áÅéǤÅÔ¡ Connect
80 ¤ÙèÁ×ͼÙéãªé
¢Ñé¹·Õè2. ¡ÒÃãªéâ»Ãá¡ÃÁ¡Ó˹´¤èÒ wireless LAN PROSet
¢Ñé¹·Õè1. ¡ÒõԴµÑé§â»Ãá¡ÃÁ¡Ó˹´¤èÒ wireless LAN PROSet
¡ÒÃàª×èÍÁµè͡Ѻ Access Point
ËÃ×Í Intel 802.11ABG
»é͹¢éÍÁÙÅ Profile Name áÅéǤÅÔ¡ Next
ËÒ¡à¹çµàÇÔÃì¡·Õèµéͧ¡ÒÃäÁè»ÃÒ¡¯¢Öé¹ ãËé¤ÅÔ¡ Refresh
¡ÒáÓ˹´¤èÒÃÑ¡ÉÒ¤ÇÒÁ»ÅÍ´ÀÑÂ
¨Ð»ÃÒ¡¯ÇÔ¹â´ÇìDone ¢Öé¹ ¤ÅÔ¡ OK
¹â»Ãä¿ÅìãËé¤ÅÔ¡ Add
Network name Ssid ¤×ÍÍÐäÃ?
ÂËÁ´¡Ò÷ӧҹ
¢Ñ鹵͹·Õè1. ¡ÒõԴµÑé§â»Ãá¡ÃÁ Atheros Client Utility
802.11BG
¢Ñ鹵͹·Õè2. ¡ÒÃãªéAtheros Client Utility
¹¡ÒÃàª×èÍÁµè͡Ѻ¨Ø´àª×èÍÁµèÍ
ËÁÒÂà˵ءÒõÃǨÊͺÊÔ·¸Ôì¢Í§à¤Ã×Í¢èÒ »ÃÐàÀ·¡ÒÃà¢éÒÃËÑÊ
¡ÒõÑ駤èÒ WEP Key
¹¡ÒÃÊÃéÒ§à¤Ã×Í¢èÒÂẺà¤Ã×èͧµèÍà¤Ã×èͧ Ad Hoc
Infrastructure àÅ×Í¡µÑÇàÅ×Í¡¹Õéà¾×èÍàª×èÍÁµè͡Ѻ¨Ø´àª×èÍÁµèÍ
ËÁÒÂà˵ت×èÍà¤Ã×Í¢èÒ¤×ÍÍÐäÃ?
¡ÒÃáªÃìä¿ÅìËÃ×Íâ¿Åà´ÍÃì
¡ÒÃãªé§Ò¹à¹çµàÇÔÃì¡
ÀÅ×Í¡ Just enable file sharing, áÅéǤÅÔ¡ OK
¢Ñé¹·Õè1. ¡Ó˹´¤èҤ͹¿Ô¡¢Í§¡ÒÃáªÃì
¡ÒáÓ˹´¤èҤ͹¿Ô¡¢Í§¡ÒÃáªÃìä¿ÅìáÅÐâ¿Åà´ÍÃìàÊÃç¨ÊÁºÙóìáÅéÇ
¢Ñé¹·Õè2. ¡ÒÃãªéä¿ÅìËÃ×Íâ¿Åà´ÍÃì·ÕèÁÕ¡ÒÃáªÃì
¡ÒÃáªÃìà¤Ã×èͧ¾ÔÁ¾ì
¹¡Ã³Õ·Õè¤ÍÁ¾ÔÇàµÍÃì¢Í§¤Ø³ÍÂÙèã¹àÇÔÃì¡¡ÃØê»Í×è¹
¡ÒÃáªÃìà¤Ã×èͧ¾ÔÁ¾ìãËé·ÓµÒÁ¢Ñ鹵͹µèÒ§æ µèÍ仹Õé
¢Ñé¹·Õè1. ¡Ó˹´¤èҤ͹¿Ô¡¢Í§¡ÒÃáªÃìà¤Ã×èͧ¾ÔÁ¾ì
¢Ñé¹·Õè2. ¡ÒÃà¾ÔèÁáÅÐãªéà¤Ã×èͧ¾ÔÁ¾ì·ÕèÁÕ¡ÒÃáªÃì
¤ÅÔ¡ Add a printer
¤ÅÔ¡ Finish
«Í¿µìáÇÃìºÅٷٸÁտѧ¡ìªÑ¹µèÍ仹Õé
¡ÒÃãªéÍØ»¡Ã³ºÅٷٸ µÑÇàÅ×Í¡à¾ÔèÁàµÔÁ
¡ÒÃãªéPersonal Area Network
¢éͤÇÃÃÐÇѧ
¡ÒÃãªé¡ÒõÑ駤èÒÃкº
¢éͤÇÃÃÐÇѧà¡ÕèÂǡѺ Bios
ÀÅ×è͹à¤ÍÃìà«ÍÃì¢Öé¹áÅÐŧÃÐËÇèÒ§¿ÔÅ´ì
ÀÃÔèÁ¡ÒõÑ駤èÒÃкº System Setup
¡ÒÃà»ÅÕè¹ÅӴѺ¡Òúٵ
¡´»ØèÁ Enter ·ÕèÃÒ¡Òà Boot Device Priority
¡ÒáÓ˹´¤èÒÃËÑʼèÒ¹
¹ÃÒ¡Òà Set Supervisor Password ãËé¡´»ØèÁ Enter
¡ÒõÑ駤èÒÃËÑʼèÒ¹¢Í§ Supervisor
¡ÒõÑ駤èÒÃËÑʼèÒ¹¢Í§ User
¡ÒáàÅÔ¡¡ÒÃãªéÃËÑʼèÒ¹
¡ÒÃãªé§Ò¹ÃËÑʼèҹ㹡Òúٵ
¡é䢤èÒã¹á·çº Settings ¢Í§ä´ÍÐÅçÍ¡ºçÍ¡«ìDisplay Properties
¡ÒáÓ˹´¤èҤ͹¿Ô¡¤ÇÒÁÅÐàÍÕ´áÅÐÃдѺÊÕ
¤Ø³ÀÒ¾ÊÕ·ÕèÊÙ§¢Ö鹨ÐáÊ´§¨Ó¹Ç¹ÊÕä´éÁÒ¡¢Ö鹺¹Ë¹éÒ¨Í
ËÅѧ¨Ò¡¡Ó˹´¤èÒµèÒ§æ áÅéÇ ãËé¤ÅÔ¡ Apply
¡ÒÃÊÅѺÍØ»¡Ã³ìáÊ´§¼Åâ´Âãªéªç͵¤Ñ·
¡ÒÃãªéÍØ»¡Ã³ìáÊ´§¼ÅÀÒ¹͡ ÃØè¹·ÕèãªéªÔ»à«çµ ATI ¹
¡ÒÃàª×èÍÁµèÍâ·Ã·Ñȹì
Àª×èÍÁµè͡Ѻ DTV
ÀÅ×Í¡ YPbPr On/Off
LCD CRT LCD+CRT àÁ×èÍÁÕ¡Òá´»ØèÁFn+F4
LCD CRT TV LCD+CRT LCD+TV LCD àÁ×èÍ¡´»ØèÁ Fn+F4
¡ÒÃãªéDual View à¾×èÍ´Ù¨ÍÀҾẺ¢ÂÒÂ
¡ÒûԴâËÁ´ Dual View
¡ÒÃÂéÒÂÇÔ¹â´ÇìÃÐËÇèÒ§ÍØ»¡Ã³ìáÊ´§¼Åã¹âËÁ´ Dual View
¨Ð¶Ù¡ÂéÒÂä»ÂѧÍØ»¡Ã³ìáÊ´§¼Å·ÕèÊͧ
ªÔ»à«çµÃØè¹ 910GML äÁèÃͧÃѺàÍÒµì¾Øµ Hdtv
¡ÒÃãªéÍØ»¡Ã³ìáÊ´§¼ÅÀÒ¹͡ âËÁ´ªÔ»à«çµ Intel ¹
¡ÒÃÊÅѺÍØ»¡Ã³ìáÊ´§¼Åâ´Âãªéªç͵¤Ñ·
¡ÒÃà»ÅÕè¹ÍØ»¡Ã³ì¡ÒÃáÊ´§¼ÅÍÂèÒ§§èÒÂæ
¡ÒÃà»ÅÕ蹤ÇÒÁÅÐàÍÕ´¢Í§Ë¹éÒ¨ÍáÅФسÀÒ¾ÊÕ
ÃٻẺ¡ÒèѴ¡ÒþÅѧ§Ò¹¾×é¹Ò¹ Basic Power Management Schemes
¡ÒÃãªéµÑÇàÅ×Í¡¡ÒÃãªé¾Åѧ§Ò¹ Power Management
Standby vs. Hibernation
¡ÒÃà»ÅÕè¹ÍØ»¡Ã³ì
ÂËÁ´ Hibernate Power Management ËÃ×ÍÇÔ¸Õ¡ÒÃẺ¡Ó˹´àͧ
ËÒ¡¤Ø³µÔ´µÑé§ Windows ãËÁè
ÂËÁ´ Standby Power Management ËÃ×ÍÇÔ¸Õ¡ÒÃẺ¡Ó˹´àͧ
¡ÒÃËÂØ´·Ó§Ò¹ºèÍÂæ
¤ÅÔ¡ OK à¾×èÍ¡Ó˹´µÑÇàÅ×Í¡¡ÒèѴ¡ÒþÅѧ§Ò¹áÅлԴÇÔ¹â´Çìä»
110 ¤ÙèÁ×ͼÙéãªé
¡ÒÃãªéẵàµÍÃÕè
¡ÒöʹáÅÐãÊèẵàµÍÃÕè
»Ã´ÍèÒ¹¤Óá¹Ð¹Óà¡ÕèÂǡѺẵàµÍÃÕè¡è͹ãªé§Ò¹
¡ÒÃãªé»ØèÁªç͵¤Ñ·à¾×èÍàÃÕ¡´Ù
¡ÒõÃǨÊͺ»ÃШآͧẵàµÍÃÕè
¡ÒÃàÃÕ¡´ÙẵàµÍÃÕè
¡ÒÃàÃÕ¡´Ù¼èÒ¹ Control Panel
¤Óàµ×͹à¡ÕèÂǡѺ¡ÒÃãªéẵàµÍÃÕè
¡ÒÃãªéBattery Manager
ÁÅеԴµÑé§áºµàµÍÃÕèãËÁè·ÕèÁÕ»ÃШØàµçÁ
´Ñ§¹Ñé¹àÇÅÒ㹡ÒÃãªé§Ò¹ÂèÍÁ¨ÐÊÑé¹Å§´éÇÂ
¡ÒäǺ¤ØÁ¤ÇÒÁÊÇèÒ§¢Í§¨Í LCD
¼ÅÅѾ¸ì¡ÒûÃÐËÂÑ´¾Åѧ§Ò¹
ÀÁ×èÍàÅè¹à¡ÁËÃ×Íãªéá;¾ÅÔपѹÁÑŵÔÁÕà´ÕÂ
¡ÒõÃǨÊͺẵàµÍÃÕè
êé»ØèÁÅÙ¡Èà äÎäŵì·ÕèSmart Battery Calibration ã¹àÁ¹ÙBoot
ÃËé·ÓµÒÁ¢Ñ鹵͹µèÍ仹Õé
ËÁÒÂà˵Øà¡ÕèÂǡѺ¡ÒõÃǨÊͺ
¡ÒÃÍÑ»à¡Ã´Ë¹èǤÇÒÁ¨Ó
¡ÒöʹâÁ´ÙÅ˹èǤÇÒÁ¨Ó
¡ÒÃà¾ÔèÁâÁ´ÙÅ˹èǤÇÒÁ¨Ó
»Ô´áÅÐÂÖ´ªèͧãÊè˹èǤÇÒÁ¨Óâ´Âãªé䢤ǧ¢Ñ¹ãËéá¹è¹
ΜÃǨ´ÙãËéá¹èã¨ÇèÒ´éÒ¹ºÒ¡¢Í§âÁ´ÙÅ˹èǤÇÒÁ¨ÓµÃ§¡Ñº¢Í§«çͤà¡çµ
ΜèÍÊÒÂà¤àºÔÅÅçͤà¾×èÍÂÖ´à¤Ã×èͧ
¡ÒÃãªé¾ÍÃìµÅçͤà¾×èÍÃÑ¡ÉÒ¤ÇÒÁ»ÅÍ´ÀÑÂ
·ÓµÒÁ¤Óá¹Ð¹ÓáÅФÓàµ×͹㹤ÙèÁ×Í¡ÒÃãªé¤ÍÁ¾ÔÇàµÍÃì
¤Åç´ÅѺ㹡ÒÃãªéà¤Ã×èͧ¤ÍÁ¾ÔÇàµÍÃì
¡ÒèѴ¡ÒÃàÁ×èͧ͢àËÅÇË¡ãÊè
¡ÒÃà´Ô¹·Ò§â´Â¹Óà¤Ã×èͧ¤ÍÁ¾ÔÇàµÍÃìä»´éÇÂ
¡ÒÃà´Ô¹·Ò§â´Âà¤Ã×èͧºÔ¹
ËÒ¡¤Ø³à´Ô¹·Ò§â´Âà¤Ã×èͧºÔ¹ ãËé·ÓµÒÁà¤Åç´ÅѺµèÍ仹Õé
¡ÒÃà¡çº¤ÍÁ¾ÔÇàµÍÃìäÇéà»ç¹àÇÅÒ¹Ò¹
ΜÃǨÊͺ¡ÒÃàª×èÍÁµè͵èÒ§æ
¤Ó¶ÒÁáÅФӵͺ
»Ãá¡ÃÁ Norton AntiVirus
ÇÔ¸ÕãªéáÅСÒÃʹѺʹع¢Í§ Windows
¡ÕèÂǡѺ Windows
¤Ó¶ÒÁáÅФӵͺ
Q1 à¤Ã×èͧäÁèshutdown
Q2 à¤Ã×èͧáΧ¤ìÃÐËÇèÒ§¡ÒÃãªéâ»Ãá¡ÃÁ
¡ÕèÂǡѺ¨ÍáÊ´§¼Å
ÁÅÐà»ÅÕè¹ÃдѺ PowerPlay
Q1 ¨Í LCD ÊÇèÒ§ËÃ×ÍÁ×´à¡Ô¹ä»
Q4 㹡óյèÍ仹Õé¨Í¡ÃоÃÔºËÃ×ÍáÊ´§ÊÑ−−ҳú¡Ç¹ÍÂÙèªèǧÊÑé¹æ
¡ÒÃá¡é䢻Ñ−ËÒ
Q1 ѹäÁèä´éÂÔ¹àÊÕ§âÁà´çÁ
¡ÕèÂǡѺâÁà´çÁ
Q2 ѹäÁèÊÒÁÒöâ·ÃÍÍ¡ä´éâ´ÂãªéÊÒµèÍ
¡ÒÃãªé¤ÓÊÑè§ AT
¡ÒáÓ˹´¤èҤ͹¿Ô¡¢Í§âÁà´çÁ¼èÒ¹·Ò§ Control Panel
ËÅѧ¨Ò¡¡Ó˹´¤èҤ͹¿Ô¡áÅéÇ ãËé¤ÅÔ¡ OK
Q3 ѹ¨ÐãªéâÁà´çÁä´éÍÂèÒ§äÃàÁ×è͹Óà¤Ã×èͧä»ãªéã¹µèÒ§»ÃÐà·È?
Wireless LAN ãËéà»ç¹o DisableÕÕ to use Wake On LAN function
¡ÕèÂǡѺÃкº LAN
Q1 ¿Ñ§¡ìªÑ¹ Wake On LAN
¡ÕèÂǡѺ Wireless LAN
Q2 ÃдѺÊÑ−−Ò³´ÕÁÒ¡ áµèѹäÁèÊÒÁÒöàª×èÍÁµèÍà¹çµàÇÔÃì¡ä´é
Q3 ѹäÁèÊÒÁÒöáªÃì¡ÒÃàª×èÍÁµèÍÍÔ¹àµÍÃìà¹çµä´é
A6 µÃǨÊͺ¡ÒáÓ˹´¤èÒ network key encryption key
ΜÃǨÊͺ¡ÒõÑ駤èҢͧ AP
Available
¹Ð¹ÓãËéãªéstatic IP
A3 µÃǨÊͺä´ÃàÇÍÃì¢Í§ÍØ»¡Ã³ì
·ÕèÍÂÙèã¹à¹çµàÇÔÃì¡à´ÕÂǡѹä´é
¼Ùé¼ÅÔµ
ÁÅéÇÅͧãËÁèÍÕ¡¤ÃÑé§
¡ÒÃá¡é䢻Ñ−ËÒ
Q2 ѹàÃÕ¡ãªéâ»Ãá¡ÃÁà¡ÁËÅѧ¨Ò¡µÔ´µÑé§ áµèäÁèÊÒÁÒöãªé§Ò¹ä´é
¡ÕèÂǡѺà¡ÁÊìáÅÐâ»Ãá¡ÃÁµèÒ§æ
Q3 à¡ÁÃѹã¹áººË¹éҨ͢¹Ò´àÅç¡ ÊÓËÃѺÃØè¹·ÕèãªéªÔ»à«çµ ATI
ÊÓËÃѺÃØè¹·ÕèãªéªÔ»à«çµ Intel
Q7 ¤ÇÒÁàÃçÇ㹡Ò÷ӧҹ¢Í§à¡ÁªéÒä»ËÃ×ÍàÃçÇà¡Ô¹ä»
»ÅÕ蹡ÒõÑ駤èÒ Power Schemes ãËéà»ç¹ Always On
Q9 ÀÒ¾ºÒ§Êèǹ¢Í§à¡ÁäÁèÁÕ¡ÒÃáÊ´§¼Å ËÃ×ÍáÊ´§à»ç¹ÊÕ´Ó
Q11 ˹éÒ¨Íà¡Ô´¡ÒáÃеء㹺ҧà¡ÁÃØè¹·ÕèãªéªÔ»à«çµ ATI
Intel
Black Hawk Down, Medal of Honor, Battlefield 1942 ÏÅÏ
A3 ¡ÒÃáÊ´§ÇÔ¹â´Çì»çÍ»ÍÑ»¨Ò¡ä«µì¹Ñé¹æ à·èÒ¹Ñé¹
Security Center
·Õèá·çº General ¢Í§ Windows Firewall ãËéàÅ×Í¡ on recommended
TrendMicro
¡ÕèÂǡѺ Hdtv
Q1 ã¹ component TV ¨ÐäÁèÊÒÁÒöáÊ´§ DOS Mode àµçÁ¨Íä´é
ªÔ»à«çµ 910GML äÁèÃͧÃѺ¡ÒÃáÊ´§¼Å·Ò§ Hdtv
Q2 ÊÕàºÅÍæ à¡Ô¹ä»
¤ÅÔ¡»ØèÁ Apply
´Â¢Ñ鹵͹㹡ÒÃÊÃéÒ§ restore point ´éǵ¹àͧÁմѧ¹Õé
¡ÒÃÊÃéÒ§ Restore Point
¡Òä׹ʶҹÐÃкº
¤Óá¹Ð¹Ó¹ÕéÊÓËÃѺà¤Ã×èͧ·ÕèÃѹ Window XP à·èÒ¹Ñé¹
¡Ò÷ÓãËé¤ÍÁ¾ÔÇàµÍÃì¢Í§¤Ø³¡ÅѺä»ãªéʶҹСè͹ restore point
ÀÅ×Í¡ Create a restore point áÅéǤÅÔ¡ Next
ÀÅ×Í¡ Restore my computer to an earlier time áÅéǤÅÔ¡ Next
¡ÒáàÅÔ¡¡Òä׹¤èÒÅèÒÊØ´
Çѹ·Õè¢Í§ restore point áÊ´§à»ç¹ÍÑ¡ÉõÑÇ˹Ò
¢Ñ鹵͹㹡ÒáàÅÔ¡¡Òä׹¤èÒÁմѧ¹Õé
ÀÅ×Í¡ Undo my last restoration áÅéǤÅÔ¡ Next
¡ÒÃÃѹá¼è¹«Õ´Õsystem software
¡ÒõԴµÑ駫ͿµìáÇÃìãËÁè
ËÅѧ¨Ò¡àÊÃç¨áÅéÇ Ãкº¨ÐÃÕʵÒÃì·
¡ÒõԴµÑé§ä´ÃàÇÍÃìáÅÐâ»Ãá¡ÃÁµèÒ§æ
ÀÁ×èͤسä´é¡Ó˹´ÃËÑʼèÒ¹ÊÓËÃѺ¡Òúٵà¤Ã×èͧ
¡ÒõԴµÑé§ Windows XP ãËÁè
ËÒ¡äÁèµéͧ¡ÒÃà»ÅÕè¹á»Å§¡ÒÃáºè§¾ÒÃì·ÔªÑ¹ ãËé¡´ Enter
ÀÁ×èÍÁÕ¡ÒÃàÅ×Í¡ Quick Installation
ÍÐää×Í¡ÒáÓ˹´¤èҤ͹¿Ô¡¾ÒÃì·ÔªÑ¹?
ÀÅ×Í¡â¿Åà´ÍÃìÊÓËÃѺµÔ´µÑé§Ãкº»¯ÔºÑµÔ¡Òà Windows
¡ÒÃá¡é䢻Ñ−ËÒ
»é͹ ª×èͤÍÁ¾ÔÇàµÍÃìáÅÐÃËÑʼèÒ¹ administrator áÅéǤÅÔ¡ Next
ËÒ¡¤Ø³äÁèÊÒÁÒöÃѹ Windows ä´é
ÃØè¹ X20 ·ÕèÁÕªÔ»à«çµ Intel Graphics
¢éÍÁÙŨÓà¾ÒТͧÃкº
¹Õè¤×ͼÅÔµÀѳ±ì·Õè¡ÓÅѧ¾Ñ²¹ÒáÅШШÓ˹èÒÂã¹Í¹Ò¤µÍѹã¡Åé¹Õé
ÃØè¹ X20 ·ÕèÁÕªÔ»à«çµ ATI Graphics
ÃØè¹
Wired LANBroadcom NetLink Gigabit Ethernet
IntelR PRO/Wireless 2200BG Network Connection
¢éÍÁÙŨÓà¾ÒТͧ Wireless LAN µÑÇàÅ×Í¡à¾ÔèÁàµÔÁ
¢éÍÁÙŨÓà¾ÒТͧ¼ÅÔµÀѳ±ì
¢éÍÁÙŨÓà¾ÒÐà¡ÕèÂǡѺÊÑ−−Ò³ÇÔ·ÂØ
ÍسËÀÙÁÔ 0C ~ 70C
ÄÇÃìàÅÊÍÐá´»àµÍÃìAirgo Networks True MIMOtm
¢¹Ò´ ¡ÇéÒ§ X ÊÙ§ 59.75 X 44.70 ÁÁ
Advanced Power Management
Advanced Configuration and Power management Interface
Direct memory access
Display power-management signaling
Random-access memory
Power-on self-test
¡ÔâÅ亵ì
¡ÔâÅ¡ÃÑÁ
ºÙµ
ÍÐá´»àµÍÃì AC
ºÙµ´ÔÊ¡ì
ĺµì
¾ÍÃìµ COM
¹èǤÇÒÁ¨Ó Cmos
¤ÍÁá¾ç¤´ÔÊ¡ì
¹èǤÇÒÁ¨Ó Conventional
ÀÁ¡ÐºÔµ
MB àÁ¡Ð亵ì
Ãкº»¯ÔºÑµÔ¡ÒÃ
¾Õ«Õ¡ÒÃì´
«¤àµÍÃì