Inbyggd ugn
Innehåll
Säkerhetsinstruktioner
Följande symboler används i denna bruksanvisning
Använda denna manual
Viktiga säkerhetsföreskrifter
Säkerhetsinstruktioner
VAR Försiktig
Autofunktion för energibesparing
SäkerhetsinstruktionerInstallation
Installation
Vad som medföljer
Strömanslutning
Montering i skåp
Att ventilera värme och cirkulera luften
Under diskho mm Minst Minst 460 x minst
Lukt av ny ugn
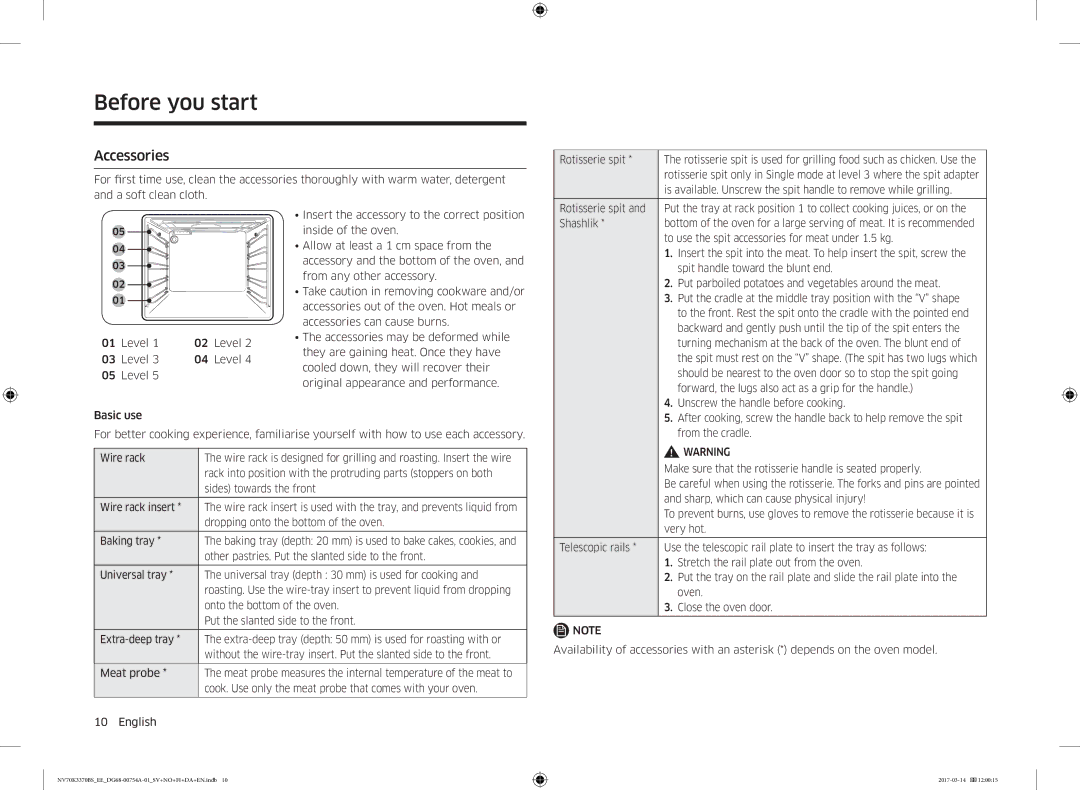
Innan du börjar
Första inställningarna
Smart säkerhetsmekanism
Se till att grillspettets handtag sitter ordentligt
Tillbehör
Grillspettets handtag för att avlägsna under grillning
Spetsiga och vassa vilket kan orsaka fysiska skador
Användning
Manöverpanel
Standardinställningar
OBS
1700
Tillagningsläge
40-250 190
Eko-varmluftlägets uppvärmningssätt har använts för att
Fastställa energiklassen i enlighet med EN60350-1
Det övre värmesystemet genererar värme som fördelas jämnt
Automatisk tillagning
Rengöring
Timer
Ljud på/av
Smart tillagning
Manuell tillagning
Kyld pizza
Mat Tillbehör Nivå Uppvärmningstyp
Äppelpaj
Stekning Mat Tillbehör Nivå Uppvärmningstyp
Burgare
Bröd Rostat bröd
Nötkött Stek
15-20
80-100 Universalplåt Ankbröst
80-100 Universalplåt Fläskstek
80-100 Universalplåt Lammstek
200-220 20-30 0,8 kg Universalplåt Krispiga fiskfiléer
Automatiska tillagningsprogram
Mat Vikt kg Tillbehör Nivå
Programmet och för in gallret efter att ljudsignalen för
Ljudsignalen för förvärmning hörs 0,6
Skölj och rensa kycklingen. Pensla kycklingen med olja och
Testrätter
Vitt bröd
Vänd efter halva tiden Svenska
Underhåll
För att sätta ihop luckan. Kontrollera rätt
Plats för glasrutorna med bilden ovan
Skydd Gummiskydd höger och vänster Glasruta
Byte
Felsökning
Kontrollpunkter
Felsökning
Bilaga
Informationskoder
Produktdatablad
70 70 19
Only for Premium HA Only for Dealers
02-201-24-18
030-6227
Innebygd ovn
Innhold
Bruke denne håndboken
Følgende symboler er brukt i denne brukerhåndboken
Sikkerhetsinstruksjoner
Viktige sikkerhetsforholdsregler
Sikkerhetsinstruksjoner
Forsiktig
Automatisk energisparingsfunksjon
SikkerhetsinstruksjonerInstallasjon
Installasjon
Pakkens innhold
Strømtilkobling
Kabinettmontering
Ventilere varme og sirkulere luften
Nedsenket kabinett mm Min Min x min
Lukt av ny ovn
Før du begynner
Innledende innstillinger
Smart sikkerhetsmekanisme
Tilbehør
Vanlige innstillinger
Bruk
Kontrollpanel
Tilberedningstid Trykk for å angi tilberedningstid Tidtaker
Bruk
Angi avstengningstid
Tilberedningsmodus
Modusen til baking og steking på flere riller samtidig
Det bakre varmeelementet genererer varme, og
Konveksjonsviften fordeler varmen jevnt i ovnen. Bruk denne
Oppvarmingsmodusen Økokonveksjon brukes til å fastslå
Automatisk tilberedning
Modus Temperaturområde C Anbefalt temperatur C 40-250 190
Det nedre varmeelementet genererer varme, og
Rengjøring
Vri modusvelgeren for å velge Norsk
Tidtaker
Lyd på/av
Smart matlaging
Manuell matlaging
Kald pizza
Mat Tilbehør Rille Oppvarmingstype Temp. C Tid min Eplepai
160-170 65-75
180-200 Steking Mat
200 Storfe Biff
Brød Toast
240-250 Toast med ost
230-250 15-20
70-90
Svinestek
Lammestek
160-180 15-25 0,5 kg
Programmer for automatisk tilberedning
Og cherrytomater. Pensle med olivenolje, urter og krydder
Rensk og rengjør fisken og legg den hel på risten. Tilsett
Skyll og tilbered skiver av squash, aubergine, paprika, løk
Plasser den frosne pizzaen på midterste rille. Start
Testretter
Vedlikehold
Gummiskinner fra døren
Utskiftning
Feilsøking
Ferdig, men kjøleviften
Problem Årsak Tiltak Tilberedningen er
Reduseres temperaturen
Døren må ikke åpnes ofte
Vedlegg
Informasjonskoder
Produktdataark
Belgium
Kalusteuuni
Sisällysluettelo
Oppaassa käytetään seuraavia merkkejä
Oppaan käyttäminen
Turvallisuusohjeet
Tärkeitä turvallisuusohjeita
Turvallisuusohjeet
Huomio
Automaattinen virransäästötoiminto
TurvallisuusohjeetAsentaminen
Asentaminen
Pakkauksen sisältö
Yleispelti Syvä pelti
Sähkökytkentä
Keltainen ja Vihreä 10 a ≤ Mm2 16 a ≤
Paistin- ja lihavarras Teleskooppiohjain Paistomittari
Asentaminen kaapistoon
Uuden uunin haju
Ennen kuin aloitat
Alkuasetukset
Älykäs turvamekanismi
Lisätarvikkeet
Toiminnot
Käyttöpaneeli
Yleiset asetukset
Toiminnot
Aseta viivekäynnistysaika
14.00 15.00 16.00 17.00 18.00
Valmistustila
Ekokiertoilmatilan energiatehokkuusluokka on määritelty
Käynnistyvät ja auttavat ruskistamaan ruoan, esimerkiksi
Automaattiohjelma
On 220 C. Tämän jälkeen ylävastus ja kiertoilmapuhallin
Lihan. Ruskistamisen jälkeen lihaa kypsennetään alhaisessa
Puhdistamiseen höyryllä
Puhdistaminen
Tämä toiminto on tarkoitettu pienen likamäärän
Pyrolyysipuhdistus tarkoittaa termistä puhdistamista
Ajastin
Ääni käyttöön / pois käytöstä
Älykkäät valmistustoiminnot
Manuaalinen valmistus
Kylmä pizza
Ruoka Lisätarvike Taso Lämmitystapa Lämpöt Aika
Omenapiirakka Ritilä
Paistaminen Ruoka
200 Naudanliha Pihvi Ritilä + yleispelti
Leipä Paahtoleipä Ritilä
Juustopaahtoleipä
Hampurilaispihvit Ritilä + yleispelti
Tunneissa
Automaattiohjelmat
Yrttejä ja mausteita. Asettele tasaisesti pellille 0,8
Nro Ruoka Paino kg Lisätarvike Taso 0,6 Ritilä + yleispelti
Huuhtele ja valmistele siivutettu kesäkurpitsa, munakoiso
Halkaise suuret perunat à 200 g pituussuunnassa kahtia
Käännä, kun valmistusajasta on kulunut 2/3 . Paistaminen
Koekeittiössä testatut ruoat
Lämpöt Aika
Käännä valmistuksen puolivälissä Suomi
Huolto
Säännöllisesti
Yllä olevasta kuvasta
Suojus Ohjainkumit oikea ja vasen Lasi
Jos havaitset vuodon vedenkeräimessä, ota
Vaihtaminen
Sivuohjainten irrottaminen vaihtelee malleittain
Vianmääritys
Tarkistettavat kohdat
Vianmääritys
Liite
Näyttökoodit
Laitteen tekniset tiedot
Kysymykset JA Kommentit MAA Soita TAI KÄY Osoitteessa
Indbygget ovn
Indhold
Sikkerhedsvejledning
Følgende symboler anvendes i denne brugervejledning
Brug af denne brugervejledning
Vigtige sikkerhedsforanstaltninger
Sikkerhedsvejledning
Forsigtig
SikkerhedsvejledningInstallation
Funktionen til automatisk energibesparelse
Medfølgende dele
10 a ≤ Mm2 16 a ≤
Strømtilslutning
Mærkestrøm a Minimum
Grillspyd og kødholder * Teleskopskinne * Stegetermometer
Montering i skab
For at ventilere varme og cirkulere luften
Skab under vask mm Min Min x min
Luft fra ny ovn
Før du går i gang
Startindstillinger
Smart sikkerhedsmekanisme
Grillspyd til kød, der vejer mindre end 1,5 kg
Grillspyd og
Kødholder
Bedre at kunne indsætte grillspyddet
Brug
Betjeningspanel
Almindelige indstillinger
Brug
Forsigtig
Tilstand
Det øverste varmeelement genererer varme, som fordeles
Øko-varmluft sørger for, at energieffektivitetsklassen er
Overensstemmelse med EN60350-1
Jævnt af varmluftsblæseren. Brug denne tilstand til
Denne funktion kan anvendes til almindelig bagning og
Øverste varmeelement og varmluftsblæseren for at brune
Fisk 30-250 200 Konventionel
Stegning af næsten alle typer retter
Rengøring
Lyd Til/Fra
Smart tilberedning
Manuel tilberedning
Kold pizza
Mad Tilbehør Trin Opvarmningstype Temp. C Tid min
Æbletærte
180-200 Stegning Mad
Burgere
Ostetoasts
Oksekød Steak
Svinekød Koteletter
Andebryst Rist + 70-90
Flæskesteg Rist + 80-100
Lammesteg Rist + 80-100
190-210 20-30 0,5 kg Fiskefiletter, bagte
Programmer til automatisk tilberedning
Skyl og rens fisken, og anbring den hoved-til-hale på
Mad Vægt kg Tilbehør Trin 1,1
Vend, når ovnen bipper 0,6
Skindets overflade
Testmåltider
Vedligeholdelse
Gummistyr fra lågen
Udskiftning
Fejlfnding
Kontrolpunkter
Fejlfindin
Tillæg
Belgium
Built-in Oven
Contents
Important safety precautions
Safety instructions
Using this manual
English
Safety instructions
Safety instructions
SafetyInstallationinstructions
Auto energy saving function
What’s included
Power connection
Cabinet mount
Before you start
Initial settings
Smart safety mechanism
New oven smell
Accessories
Common settings
Operations
Control panel
Operations
Operations
Cooking mode
Increases, but the cooking results remain the same. Note
That this mode does not require preheating
ECO Convection mode of heating used to determine
Energy efficiency class is in accordance with EN60350-1
Auto cook
Cleaning
Sound On/Off
Cooking smart
Manual cooking
Accessory
Cooking smart
Cooking smart
Auto cook programmes
Cooking smart
Test Dishes
Maintenance
Maintenance
Replacement
Troubleshooting
Checkpoints
Troubleshooting
Product data sheet
Appendix
Information codes
Samsung
0800 726 78 64 0800-SAMSUNG Samsung