Owner’s Instructions
PDP-TELEVISION
ON-SCREEN MENUS
Picture In Picture PIP
Warranty
Avoid operating the TV at temperatures below 5C41F
Installation
User Instructions
Power Cord
Checking Parts
Owner’s Instructions
S-VIDEO Cable
Contents
Contentscontinued
Symbols
Front of the TV
Control Panel
Rear Panel
Control Panel continued
The performance of the remote control may be affected by bright light
Infrared Remote Control
Find that the remote control is no longer operating correctly
Inserting the Batteries in the Remote Control
Assembling the Stand-Base
Purchase the television
Installation Notes
Installing the Display on the Wall Attachment Panel
Wall Bracket Assembly
Components
Wall Bracket Angle Adjustment
Installing the Display on the Wall Attachment Panel continued
To mount the product on the wall bracket
Connecting a Satellite Receiver or Decoder
Connecting to an Aerial or Cable Television Network
Using a SCART cable
Using a coaxial cable
The mains lead is attached to the rear of your television
Switching Your Television On and Off
Change channels and adjust the volume
Familiarizing Yourself with the Remote Control
their functions
The following settings are available
Plug & Play Feature
Choosing Your Language
Plug & Play Feature continued
To activate Plug & Play on the menu, follow the instructions below
Storing Channels Automatically
Storing ChannelsManually
When storing channels manually, you can choose
Whether or not to store each of the channels found
AUTO - PAL - SECAM - NTSC
Channel mode
Storing ChannelsManually continued
Skipping Unwanted Channels
This operation allows you to change the programme numbers of
Sorting the Stored Channels
Adjust
Assigning Names to Channels
Programme
Locking the Channel
LNA setting is to be made for each channel
Using the LNA Low Noise Amplifier Feature
If the picture is noisy with the LNA set to On, select Off
Fine Tuning Channel Reception
Changing the Picture Standard
Displaying Information
The information displayed varies according to the selected source
Dynamic - Standard - Movie - Custom
Cool2 - Cool1 - Normal - Warm1 - Warm2
Customizing the Picture Settings
Standard, Movie, or Custom
Cool1, Normal, Warm1, or Warm2
Coarse
Setting the Picture PC Mode
Setting the Picture PC Mode continued
Selecting the Picture Size
Positioning and Sizing the screen using Zoom
PC to HDMI Mode
Freezing the Current Picture
Viewing the DNIe Demonstration
Press the ENTER button
Blue
Setting the My Colour Control Easy Control
Green
Pink
This setting can be adjusted to suit your personal preferences
Setting the My Colour Control Detail Control
Blue Screen
Setting the Blue Screen
Using the Colour Weakness Enhancement Feature
Energy Saving
Using the Energy Saving Feature
TV - Ext.1 - Ext.2 - AV - S-Video
Viewing the Picture in Picture PIP
Viewing the Picture in Picture PIP continued
Table of PIP Settings
Easy functions of the remote control
Ext.2, AV, or S-Video
Feature
Using the Digital NR Noise Reduction Feature
Horizontal Dot
Preventing Screen Burn-in
Vertical Line
Time
Reducing the Effects of Screen Burn
Changing the Sound Standard
S.MODE Sound Mode button on the remote control
Standard - Music - Movie - Speech - Custom
You can select these options by simply pressing the
Adjusting the Volume Automatically
Customizing the Sound Settings
100 Hz 300 Hz 1k Hz
3k Hz 10k Hz
Off - 3D Mono - Stereo
Setting the TruSurround XT
You can hear melody sound when the television is powered on or off
Setting the Melody Sound
Selecting the Internal Mute
Type of broadcast
Selecting the Sound Mode depending on the model
On-screen indication
NICAM Mono ↔ Mono
You can also set these by pressing the numeric buttons directly
Setting and Displaying the Current Time
Setting the Sleep Timer
You can set the on or off timers so that the television will
Switching the Television On and Off Automatically
Switch off automatically at the time you select
Auto Power Off
Switching the Television On and Off Automatically continued
TV, Ext.1, Ext.2, AV, S-Video, Component, PC, or
Viewing an External Signal Source
VCR, DVD, D-VHS, Cable STB, HD STB, Satellite
STB, AV Receiver, DVD Receiver, Game, Camcorder
Ext.2 Variable TV, Ext.1, Ext.2, AV, S-Video, or Monitor Out
Redirecting an Input to the External Output
Television programme times News bulletins and weather forecasts
Teletext Feature
Sports results Travel information
The teletext pages are organized according to six categories
You can display Teletext information at any time on your television
Displaying the Teletext Information
To display
Selecting Display Options
Press the
Selecting a Teletext Page
Input/Output Specification
Connecting to External Input/Output
Rear of the TV
Rear of the TV
Connecting to the AV Output
Connecting to the S-Video Input
Connecting to the RCA Input
Rear of the TV
Rear of the TV
Connecting to the PC Input
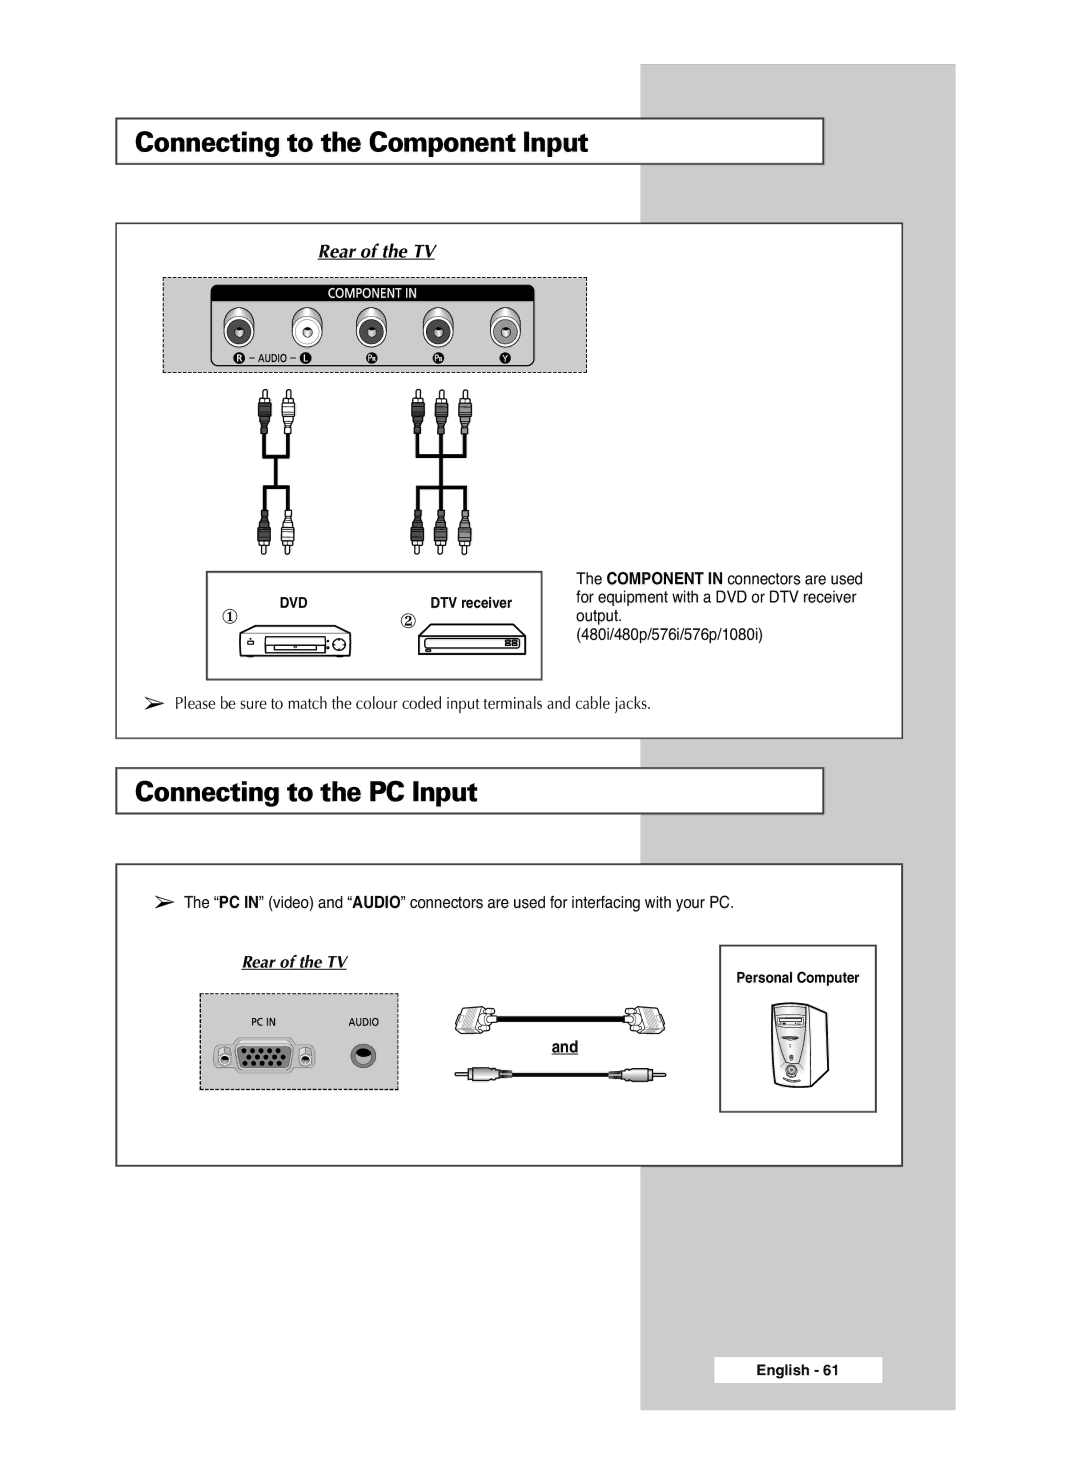
Connecting to the Component Input
Rear of the TV
Rear of the TV
Connecting to the HDMI/DVI Compatible
Connecting to the HDMI Input
Rear of the TV
Rear of the TV
Connecting the Home Theater System
Connecting Home Theater System
Rear of the TV
To Display the DVD Home Theater
Setting up Your PC Software Windows only
Input Mode PC
Your TV comes equipped with a universal remote control. In
Programming the Remote Control for Other Components
addition to controlling the TV, the universal remote control can
The remote control might not be compatible with all
VCR Remote Control Codes Cable Box CATV Remote Control Codes
Programming the Remote Control for Other Components continued
DVD Remote Control Codes
Check that you have pressed the power button On/Off and the
Troubleshooting Before Contacting Service Personnel
Check whether the volume MUTE button on the remote control
Clean the upper edge of the remote control transmission window
English
Memo
English
Memo
English
Memo
Correct Disposal of This Product
AFTER SALES SERVICE
BN68-00827G-01