Infrared Remote Control
ENG
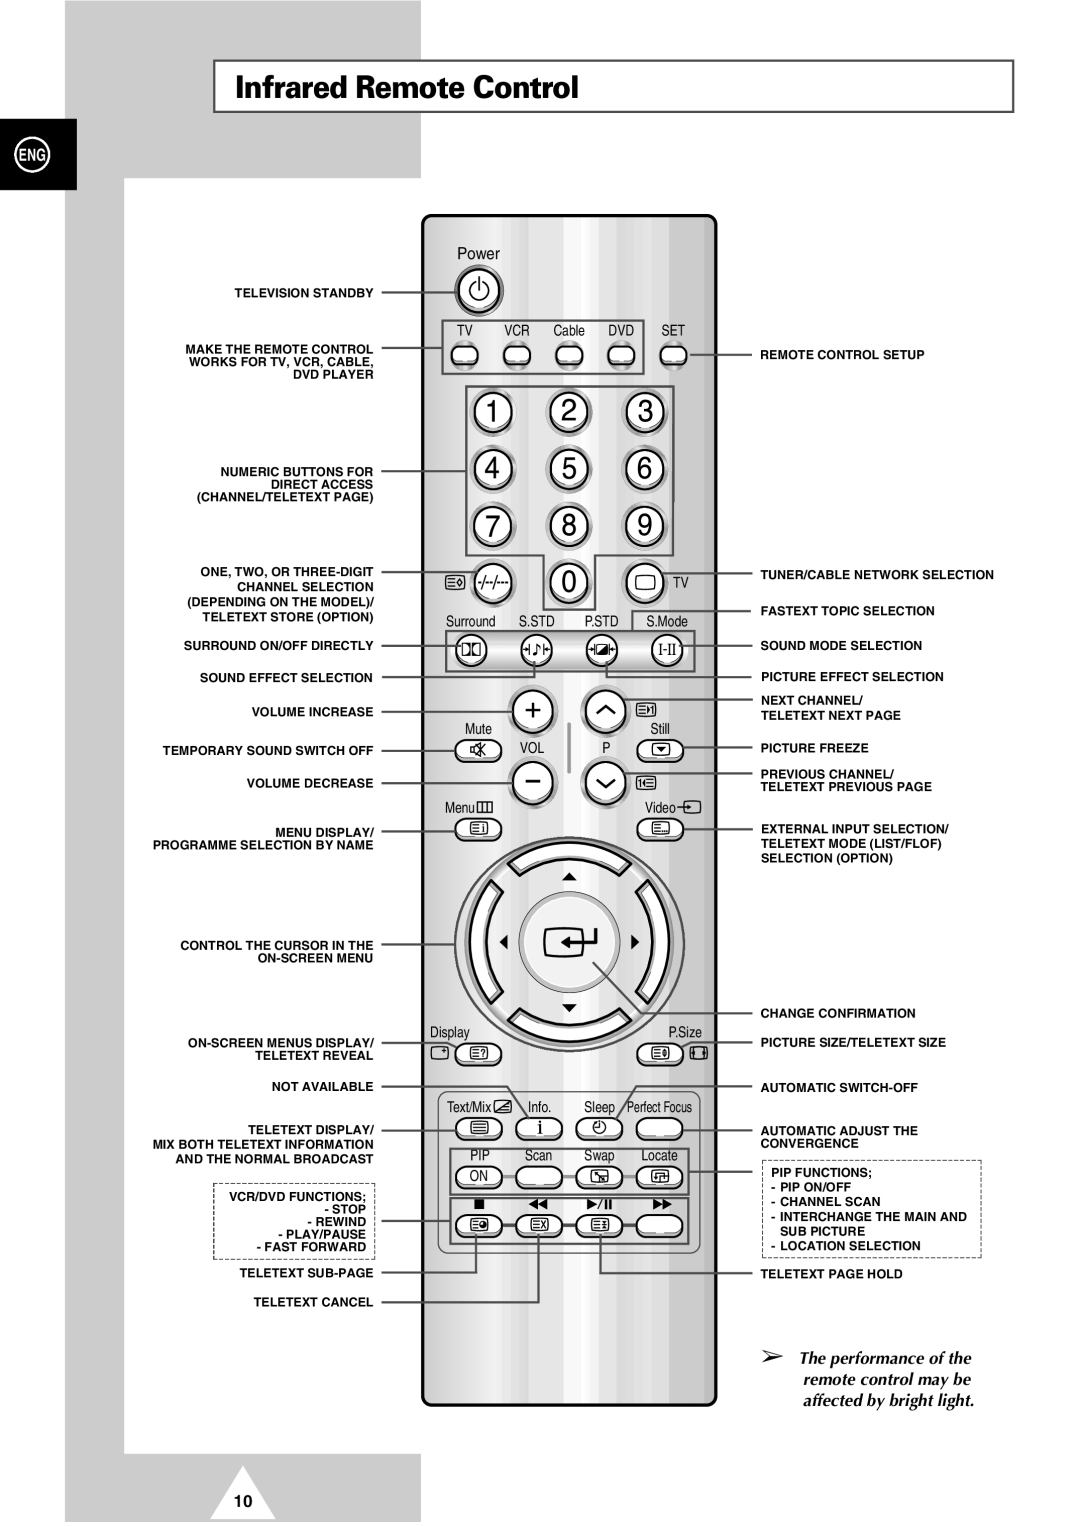
TELEVISION STANDBY
MAKE THE REMOTE CONTROL WORKS FOR TV, VCR, CABLE, DVD PLAYER
NUMERIC BUTTONS FOR DIRECT ACCESS (CHANNEL/TELETEXT PAGE)
ONE, TWO, OR
SURROUND ON/OFF DIRECTLY
SOUND EFFECT SELECTION
VOLUME INCREASE
TEMPORARY SOUND SWITCH OFF
VOLUME DECREASE
MENU DISPLAY/ PROGRAMME SELECTION BY NAME
CONTROL THE CURSOR IN THE
NOT AVAILABLE
TELETEXT DISPLAY/ MIX BOTH TELETEXT INFORMATION AND THE NORMAL BROADCAST
VCR/DVD FUNCTIONS; - STOP - REWIND
- PLAY/PAUSE
-FAST FORWARD TELETEXT
TELETEXT CANCEL
Power
| TV | VCR Cable DVD |
| SET | ||
|
|
|
|
|
|
|
|
|
|
|
|
|
|
|
|
|
|
|
|
|
|
|
|
|
|
|
|
|
|
|
|
|
|
|
TV
| Surround | S.STD | P.STD |
|
|
| S.Mode | |||||||||
|
|
|
|
|
|
|
|
|
|
|
|
|
|
|
|
|
|
|
|
|
|
|
|
|
|
|
|
|
|
|
|
|
|
|
|
|
|
|
|
|
|
|
|
|
|
|
|
|
|
|
|
|
|
|
|
|
|
|
|
|
|
|
|
|
|
|
|
|
|
|
|
|
|
|
|
|
|
|
|
|
|
|
|
|
|
|
|
|
|
|
|
|
|
|
|
|
|
|
|
|
|
|
|
|
|
|
|
|
|
|
|
|
|
|
|
|
|
|
|
|
|
|
|
|
|
|
|
|
|
|
|
|
|
|
|
Mute | Still |
VOL | P |
Menu | Video |
Display |
| P.Size |
Text/Mix | Info. | Sleep Perfect Focus |
PIP | Scan | Swap | Locate |
ON |
|
|
|
REMOTE CONTROL SETUP
TUNER/CABLE NETWORK SELECTION
FASTEXT TOPIC SELECTION
SOUND MODE SELECTION
PICTURE EFFECT SELECTION
NEXT CHANNEL/
TELETEXT NEXT PAGE
PICTURE FREEZE
PREVIOUS CHANNEL/
TELETEXT PREVIOUS PAGE
EXTERNAL INPUT SELECTION/ TELETEXT MODE (LIST/FLOF) SELECTION (OPTION)
CHANGE CONFIRMATION
PICTURE SIZE/TELETEXT SIZE
AUTOMATIC
AUTOMATIC ADJUST THE
CONVERGENCE
PIP FUNCTIONS;
-PIP ON/OFF
-CHANNEL SCAN
-INTERCHANGE THE MAIN AND SUB PICTURE
-LOCATION SELECTION
TELETEXT PAGE HOLD
➢The performance of the remote control may be affected by bright light.
10