Owner’s Instructions
SP42W4/42W5 SP43J9/43T6/43T7/43T8/43W6 SP47Q7/47W1/47W3 SP48T6
SP54J9/54T6/54T7/54T8 SP55W3/55W9 SP62J9/62T6/62T8 SP65W3
COLOUR TELEVISION
Important Warranty Information Regarding Television Format Viewing
Do not expose the television to any liquids
Safety Instructions
Do not step on or twist the power cord
Do not drop the remote control
Contents continued
Symbols
Press
Contents
Remote Control Sensor
Control Panels depending on the model
Volume Increase
Temporary Sound Switch Off
Standby & Timer Indicator
Sound Switch Off
Power On/Off
Volume Decrease
SP54T8/55W9/62T8
Using a Display Deck depending on the model
You can display a VCR or DVD Player, etc. by using the display deck
SP47W3/55W3/65W3
Center Speaker Connectors Option
Connection Panels depending on the model
Rear Speaker Connectors
75Ω Coaxial Connector for Aerial or Cable Network
Power
Infrared Remote Control
The performance of the remote control may be affected by bright light
Purchase the television
Inserting the Batteries in the Remote Control
Connecting to an Aerial or Cable Television Network
Find that the remote control is no longer operating correctly
Placing Your Television in Standby Mode
Switching Your Television On and Off
The mains lead is attached to the rear of your television
Set up the television using the on-screen menu system
Becoming Familiar with the Remote Control
The remote control is used mainly to
Change channels and adjust the volume
Plug and Play Feature
If you want to reset this feature
Plug and Play Feature
Choosing Your Language
Viewing the Demonstration
Adjusting Convergence
Storing Channels Automatically
Sorting the Stored Channels
AUTO - PAL - SECAM - NT4.43 - NT3.58
Storing Channels Manually
When storing channels manually, you can choose
Whether or not to store each of the channels found
Channel mode
Storing Channels Manually continued
Skipping Unwanted Channels
Fine Tuning Channel Reception
Changing the Picture Standard
Freezing the Current Picture
DYNAMIC - STANDARD - MOVIE - CUSTOM
Setting the Blue Screen Mode
Adjusting the Picture Settings
NORMAL, WARM1, WARM2
SCAN MODE AUTO, NATURAL, DIGITAL, PROG.Progressive
Extra Picture Settings
SCAN MODE
DIGITAL NR
Depending on the model, the following picture sizes are available
Selecting the Picture Size depending on the model
Wide169Model
Normal43Model
CUSTOM - STANDARD - MUSIC - SPEECH - MOVIE
Changing the Sound Standard
The sound settings can be adjusted to suit your personal preferences
Adjusting the Sound Settings
Rear of the TV
Setting the Dolby Pro Logic depending on the model
Volume of the centre and rear speakers
Prologic delay time for the rear speakers between 15 and 30 ms
MELODY
Extra Sound Settings
AUTO VOLUME
“Dolby’ and the double-D symbol are trademarks of Dolby Laboratories
Selecting the Sound Mode depending on the model
Setting the Sleep Timer
Three times
Setting and Displaying the Current Time
display the channel information
Once
You can set the On/Off timers so that the television will
Switching the Television On and Off Automatically
Switch off automatically at the time you select
TV - AV1 - AV2 - AV3 - AV4 - S-VHS1 - S-VHS2
Viewing the Picture In Picture PIP
LARGE - SMALL - MULTI - 3 PIP DOUBLE - LARGE - SMALL - MULTI - 3 PIP
Buttons
Easy functions of remote control
Feature
Viewing the Picture In Picture PIP
Television programme times
Teletext Feature
Displaying the Teletext Information
This information is divided into numbered pages see diagram
Selecting Display Options
Selecting a Teletext Page
Storing Teletext Pages
Rear of the TV
Connecting to the External Input/Outputs
Rear of the TV
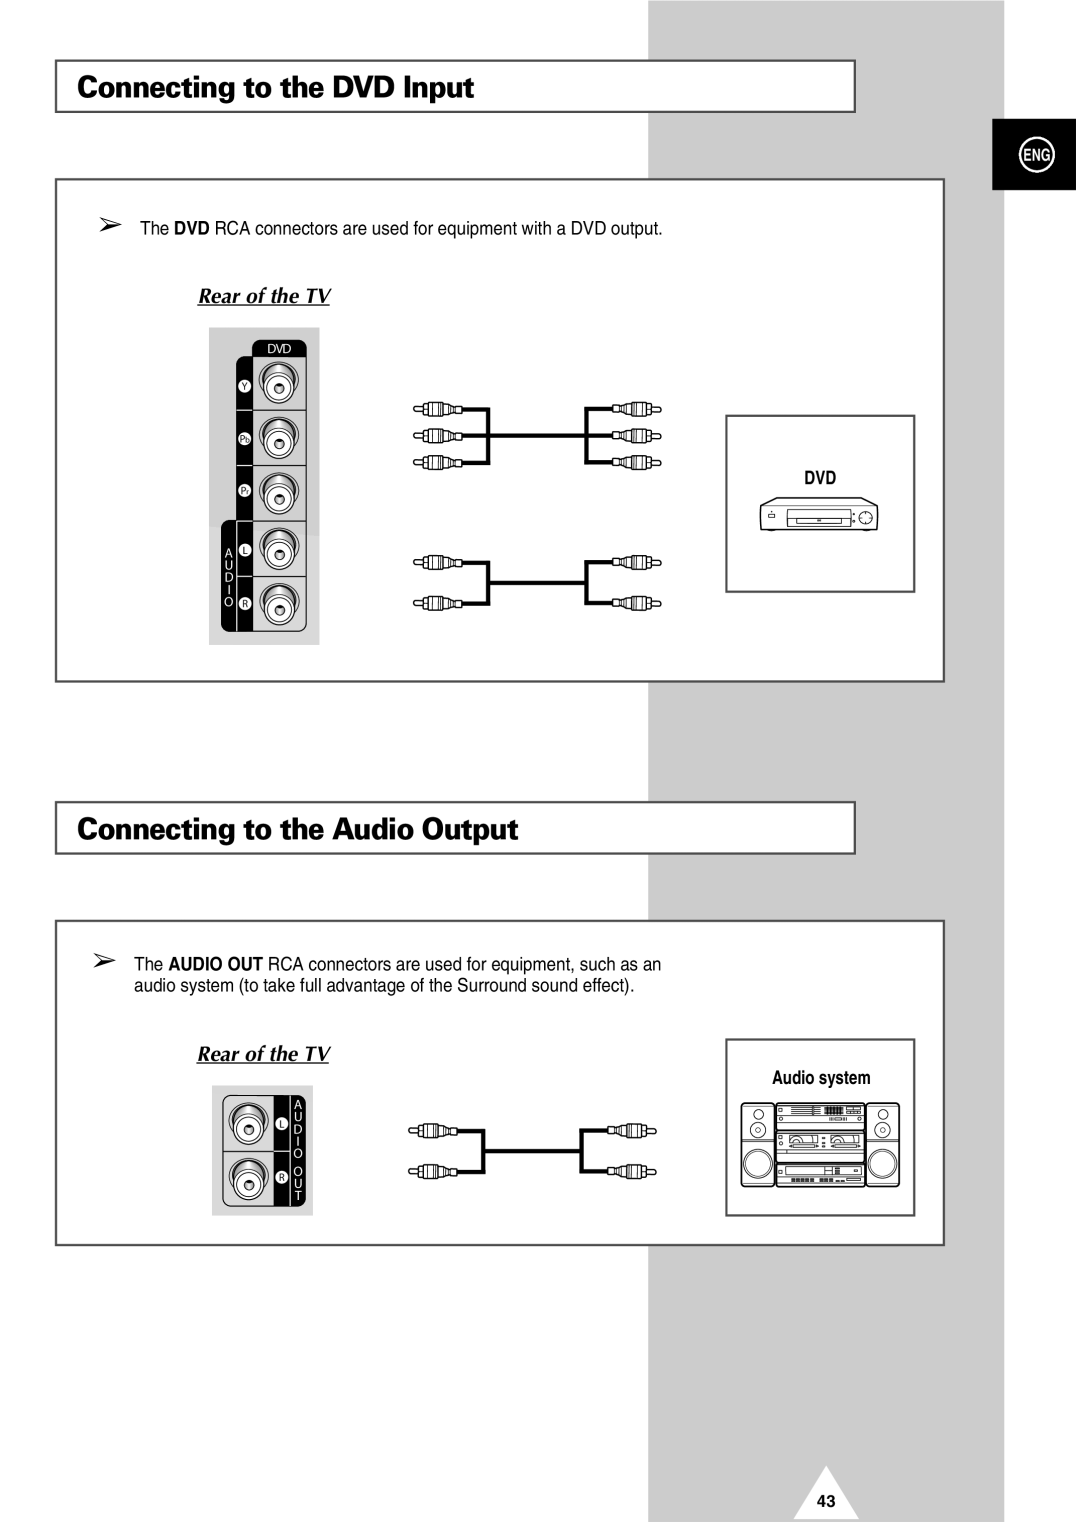
Connecting to the DVD Input
Connecting to the Audio Output
Rear of the TV
Side of the TV
Connecting to the RCA Input depending on the model
Connecting to the S-Video Input depending on the model
Front of the TV
Rear of the TV
Connecting Additional Speakers depending on the model
Viewing Pictures From External Sources
To take advantage of the surround sound system
Programming the Remote Control for Other Components
88, 0, 61, 28, 44, 29, 81, 48, 49, 90, 92
Programming the Remote Control for Other Components
TV Remote Control Codes
1, 8, 88, 61, 6, 90, 50, 12, 98, 92, 100, 82
17, 18, 19, 22, 24, 29, 32, 36, 43, 50
Programming the Remote Control for Other Components
VCR Remote Control Codes
11, 15, 17, 18, 21, 24, 28, 36, 52
Cable Box CATV Remote Control Codes
Programming the Remote Control for Other Components
DVD Remote Control Codes
PinSignal
SCART Connector Wiring AV1
Check that the mains lead has been connected to a wall socket
Troubleshooting Before Contacting Service Personnel
Check whether the volume Mute button on the remote control has
Clean the upper edge of the remote control transmission window
ELECTRONICS
AFTER SALES SERVICE
BP68-00027B-00 ENG