instructions
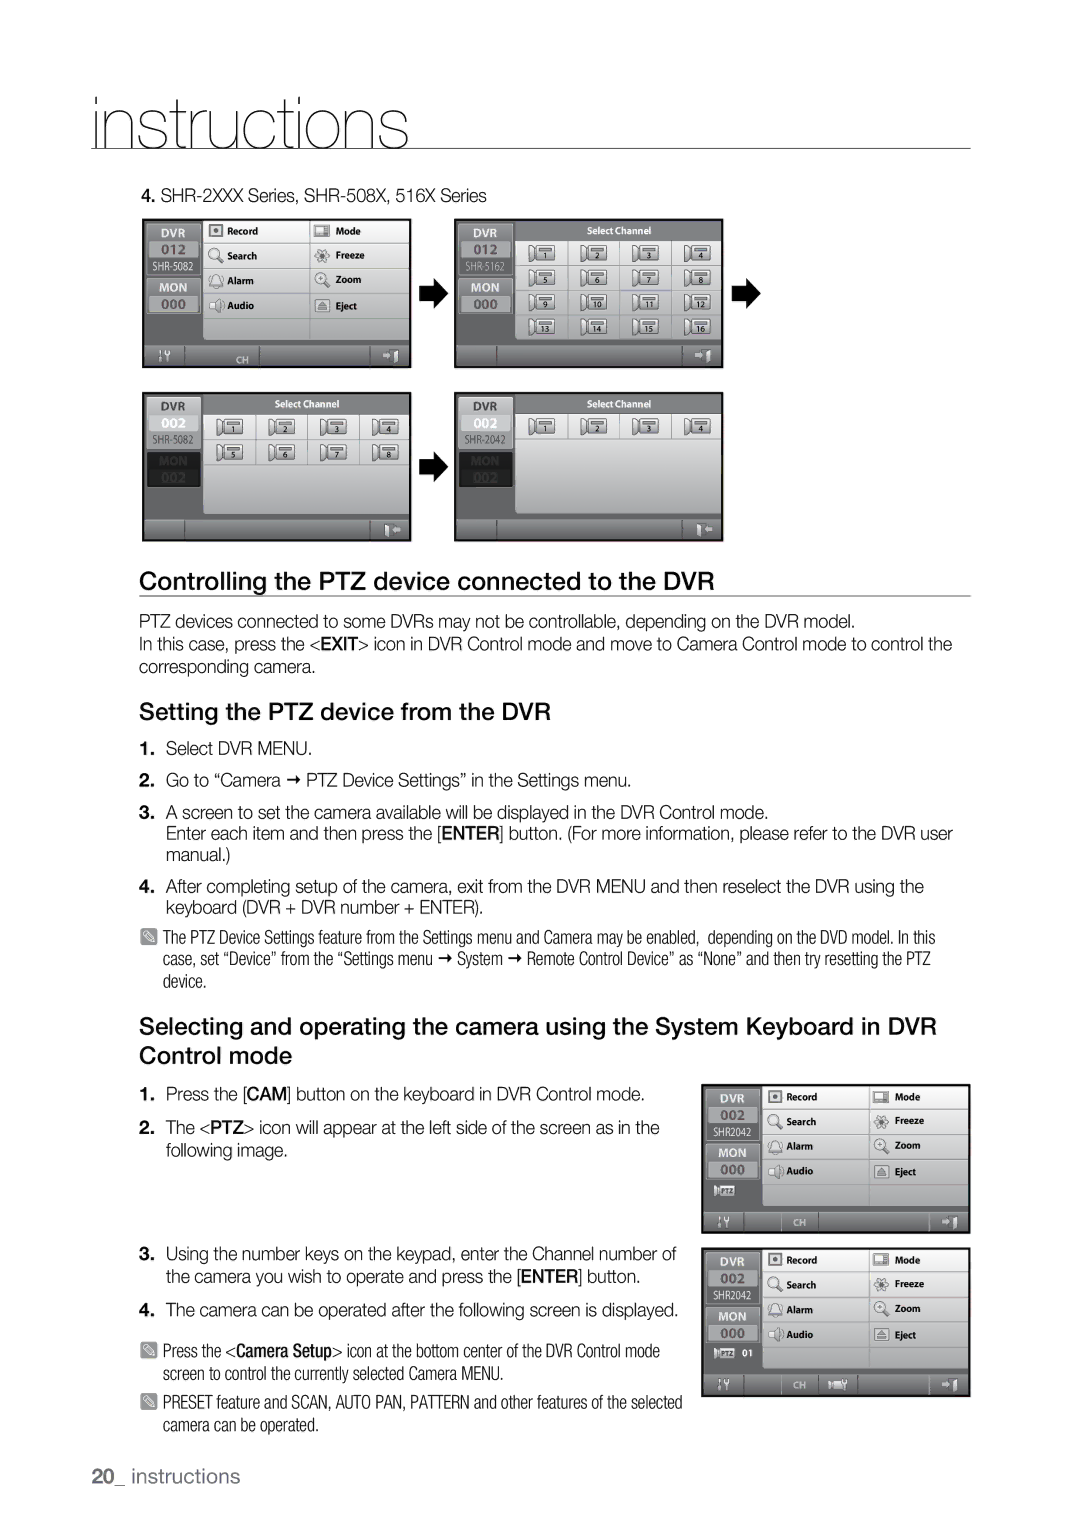
4.SHR-2XXX Series, SHR-508X, 516X Series
DVR | Record |
|
| Mode | DVR |
|
| Select Channel | ||||||
|
|
|
| |||||||||||
|
|
|
| |||||||||||
012 | Search |
|
| Freeze | 012 |
|
|
|
|
|
|
|
|
|
|
|
|
|
|
|
|
|
|
|
| ||||
|
|
|
|
|
|
|
|
|
|
| ||||
Alarm |
|
| Zoom |
|
|
|
|
|
|
|
|
| ||
|
|
|
|
|
|
|
|
|
|
| ||||
MON |
|
| MON |
|
|
|
|
|
|
|
|
| ||
|
|
|
|
|
|
|
|
|
|
|
|
| ||
000 | Audio |
|
| Eject | 000 |
|
|
|
|
|
|
|
|
|
|
|
|
|
|
|
|
|
|
|
| ||||
|
|
|
|
|
|
|
|
|
|
| ||||
|
|
|
|
|
|
|
|
|
|
|
|
|
|
|
DVR |
|
| Select Channel | DVR |
|
| Select Channel | ||||||||||||||||
002 |
|
|
|
|
|
|
|
|
| 002 |
|
|
|
|
|
|
|
|
| ||||
|
|
|
|
|
|
|
|
|
|
|
|
|
|
|
|
|
| ||||||
|
|
|
|
|
|
|
|
|
|
|
|
|
|
|
|
|
| ||||||
|
|
|
|
|
|
|
|
|
|
|
|
|
|
|
|
|
| ||||||
MON |
|
|
|
|
|
|
|
|
| MON |
|
|
|
|
|
|
|
|
| ||||
|
|
|
|
|
|
|
|
|
|
|
|
|
|
|
|
|
|
|
|
|
|
|
|
002002 |
|
|
|
|
|
|
|
|
| 002002 |
|
|
|
|
|
|
|
|
| ||||
Controlling the PTZ device connected to the DVR
PTZ devices connected to some DVRs may not be controllable, depending on the DVR model.
In this case, press the <EXIT> icon in DVR Control mode and move to Camera Control mode to control the corresponding camera.
Setting the PTZ device from the DVR
1.Select DVR MENU.
2.Go to “Camera PTZ Device Settings” in the Settings menu.
3.A screen to set the camera available will be displayed in the DVR Control mode.
Enter each item and then press the [ENTER] button. (For more information, please refer to the DVR user manual.)
4.After completing setup of the camera, exit from the DVR MENU and then reselect the DVR using the keyboard (DVR + DVR number + ENTER).
M The PTZ Device Settings feature from the Settings menu and Camera may be enabled, depending on the DVD model. In this case, set “Device” from the “Settings menu System Remote Control Device” as “None” and then try resetting the PTZ device.
Selecting and operating the camera using the System Keyboard in DVR Control mode
1.Press the [CAM] button on the keyboard in DVR Control mode.
2.The <PTZ> icon will appear at the left side of the screen as in the following image.
3.Using the number keys on the keypad, enter the Channel number of the camera you wish to operate and press the [ENTER] button.
4.The camera can be operated after the following screen is displayed.
M Press the <Camera Setup> icon at the bottom center of the DVR Control mode screen to control the currently selected Camera MENU.
M PRESET feature and SCAN, AUTO PAN, PATTERN and other features of the selected camera can be operated.
DVR | Record |
|
| Mode |
|
| |||
002 | Search |
|
| Freeze |
SHR2042 |
|
| ||
|
|
| Zoom | |
MON | Alarm |
|
| |
|
|
|
| |
000 | Audio |
|
| Eject |
DVR | Record |
|
| Mode |
|
| |||
002 | Search |
|
| Freeze |
SHR2042 |
|
| ||
|
|
| Zoom | |
MON | Alarm |
|
| |
|
|
|
| |
000 | Audio |
|
| Eject |
|
| |||
01 |
|
|
|
|
20_ instructions
