LED TV
Digital TV Notice
Precautions When Displaying a Still Image
Contents
Speakers
Viewing the Control Panel
M4 X L12
Accessories
AV Cable Component Cable
Product colour and shape may vary depending on the model
Viewing the Connection Panel
Kensington Lock
ANT
EXT
EXT RGB
Component
PC/DVI Audio
Common Interface Slot
Connector for service only
@ EX-LINK
English �
Viewing the Remote Control
Numeric Buttons Press to change the channel
Teletext Functions
Normal Remote Control
Installing Batteries in the Remote Control
Viewing the menus
Placing Your Television in Standby Mode
Operation the OSD On Screen Display
Exit
If you want to reset this feature
Plug & Play Feature
Plug & Play feature is only available in the TV mode
Message Выбор языка экранного меню. is displayed
Channel Menu
Channel
Country
Auto Store
Channel Mode
Default Guide → Mini Guide / Full Guide
Cable Search Option depending on the country
Full Guide / Mini Guide
Fine Tune
Using the Full / Mini Guide
Then
Managing Channels
Channel List Option Menu in Programmed
Picture
Configuring the Picture Menu
Mode
Advanced Settings
Picture Options
Film Mode → Off / Auto1 / Auto2
Picture Reset → Reset Picture Mode / Cancel
Blue Only Mode → Off / On
Setting Up Your PC Software Based on Windows XP
Using Your TV as a Computer PC Display
Display Modes
Sub and HDMI/DVI Input
Auto Adjustment
Setting up the TV with your PC
Screen
Sound
Configuring the Sound Menu
Sound Reset → Reset All / Reset Sound Mode / Cancel
Selecting the Sound Mode
Audio Type Dual 1 Default
Speaker Select
Configuring the Setup Menu
Setup
Parental Lock → Parental Rating
Digital Text → Disable / Enable UK only
Subtitle
Teletext Language
Setting the Time
Timer 1 / Timer 2 / Timer
Input Menu
Input / Support
Support Menu
HD Connection Guide
Software Upgrade
Contact Samsung
Using the Remote Control Button in Media Play Menu
Connecting a USB Device
Entere
Entering the Media Play USB Menu
Media Play Function
Removing a USB Memory Device Safely
Press the ENTEREbutton
Photo List Option Menu
Viewing a Slide Show
Viewing a Photo or Slide Show
Playing current group
To perform a Slide Show with only the selected files
Slide Show Option Menu
Music List Option Menu
Playing a music file
Playing a Music
Playing the music group
Playing the selected music files
Music Play Option Menu Repeat Mode → On / Off
Using the Setup Menu
Music Play option Menu
Press the MEDIA.P button
What is Anynet+?
Connecting Anynet+ Devices
ANYNET+
To connect to a TV
Switching between Anynet+ Devices
Setting Up Anynet+
Setup
Anynet+ Menu
Recording
TV Remote Control Buttons Available in Anynet+ Mode
Listening through a Receiver Home Theatre
Device Type Operating Status Available Buttons
Problem Possible Solution
Troubleshooting for Anynet+
Recommendations
Teletext Feature
Colour buttons red/green/yellow/ blue
0mode
Teletext pages are organized according to six categories
Installing the Stand
Installing the Wall Mount Kit
Disconnecting the Stand
Anti-Theft Kensington Lock
Separate the stand from the TV
To install a wall-mount, use the Holder-Ring
Preparing before installing Wall-Mount
Assembling the Cables
Stand Type
When installing the product with a stand
Securing the Installation Space
When installing the product with a wall-mount
Securing the TV to the Wall
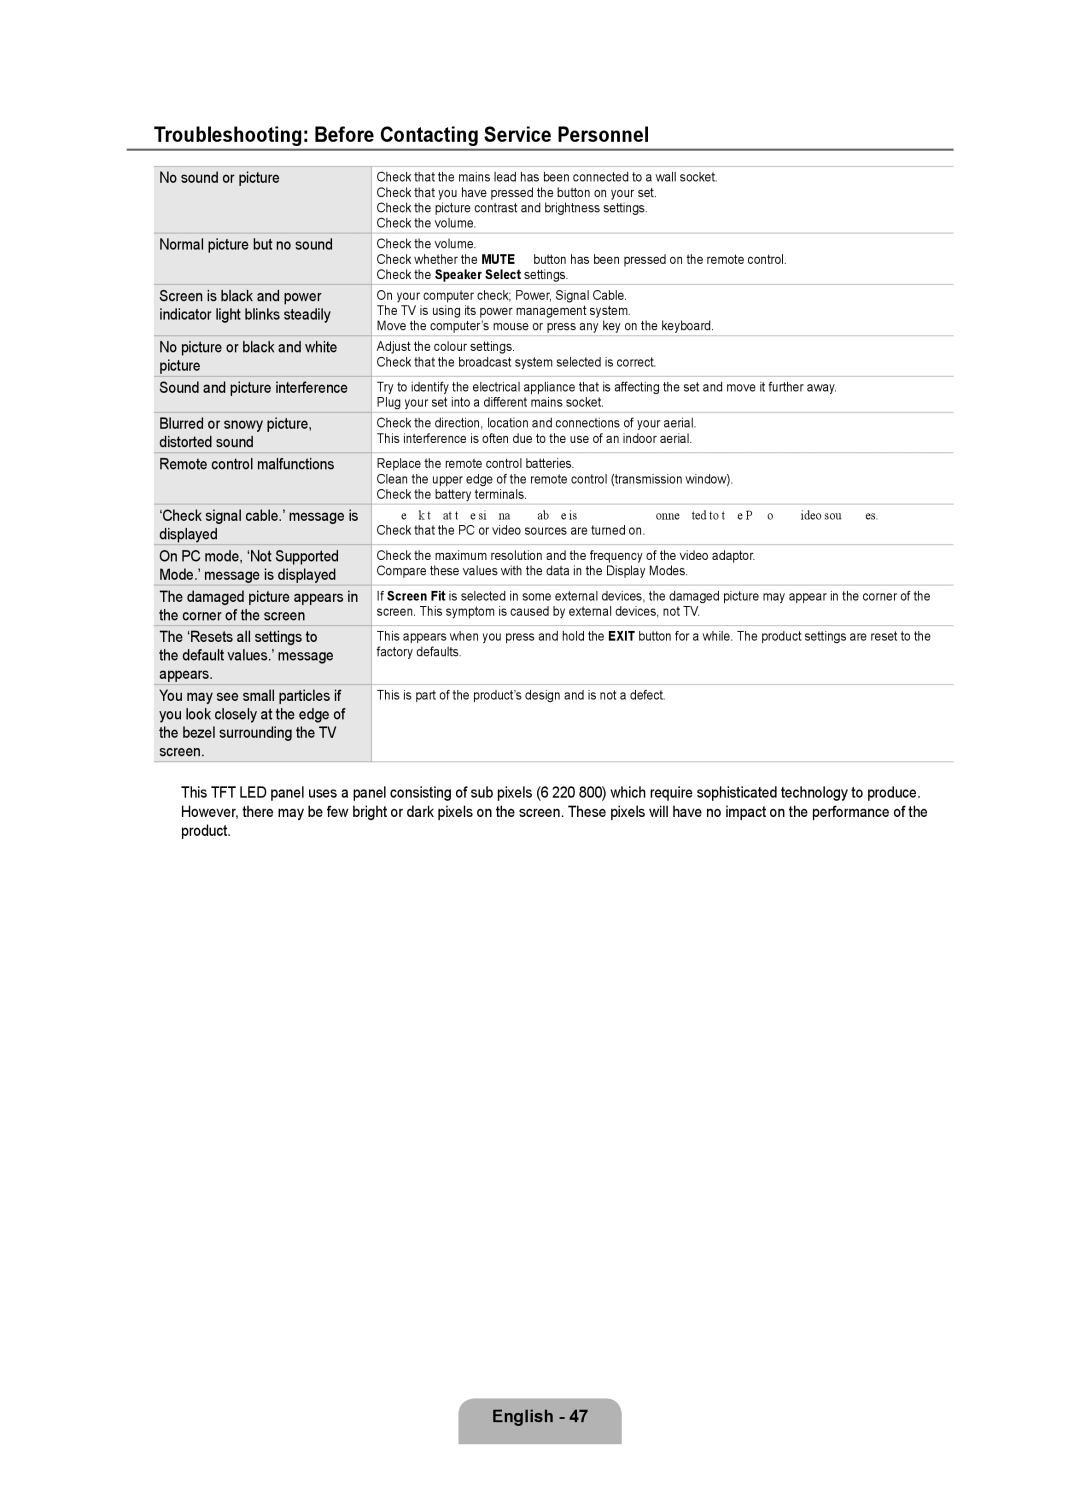
Troubleshooting Before Contacting Service Personnel
Specifications
Preamble
Version 3, 29 June
Terms and Conditions
Conveying Verbatim Copies
Conveying Non-Source Forms
Page
Page
Revised Versions of this License
How to Apply These Terms to Your New Programs
Limitation of Liability
Interpretation of Sections 15
GNU Lesser General Public License Lgpl
Conveying Verbatim Copies
Conveying Non-Source Forms
Page
Page
END of Terms and Conditions
Original SSLeay License
OpenSSL License
Примечание относительно цифрового телевещания
Символ
Лицензия
Русский
Громкоговорители
Панель управления
Крышка нижняя
Принадлежности
Размер AAA
Ткань для очистки
Замок Kensington
Соединительная панель
Аудио Л/П
Вход
AV in Video / L-AUDiO-R
Разъем используется только для техобслуживания
Русский �
Пульт дистанционного управления
Цифровые Кнопки
Цветные Кнопки
Обычный пульт дистанционного управления
Установка батарей в пульт дистанционного управления
Перевод телевизора в режим ожидания
Просмотр меню
Использование экранного дисплея
Menu
Сброс настроек этой функции
Функция Plug & Play
Отобразится сообщение Выбор языка экранного меню
ENTEREдля подтверждения выбора
Страна
Меню Канал
Автонастройка
Ручная настройка
Полн. руков. / Мини гид
Параметр поиска кабеля в зависимости от страны
Гид по умолч. → Мини гид / Полн. руков
Список каналов
Использование полного руководства / мини-руководства
Точная настройка
Требуемая операция Необходимые действия
Управление каналами
Меню параметров списка каналов в меню Запрограммированный
Режим
Настройка меню изображений
Подсветка / Контраст / Яркость / Четкость / Цвет / ТонЗ/К
Дополнительные параметры
Параметры изображения
Режим фильм → Выкл. / Авто1 / Авто2
Сброс настроек изображения → Сброс настроек / Отмена
Только синий экран → Выкл. / Вкл
Режимы экрана
Использование телевизора в качестве экрана компьютера
Вход D-Sub и HDMI/DVI
Автоподстройка
Настройка подключения телевизора к компьютеру
Экран
Настройка меню звука
Выбрать громкогов
Выбор режима звука
Тип звука Двойной 1/2 По умолчанию
Двойной
Меню настройки
Настройка
Субтитры
Родит. блокировка → Родит. ограничения
Язык телетекста
Предпочтение
Установка времени
Таймер 1 / Таймер 2 / Таймер
Меню Вход
Входной СИГНАЛ/ПОДДЕРЖКА
Меню Поддержка
Руководство по соединению c ТВЧ
Обновл. ПО
Обращение в Samsung
Функция
Подключение устройства USB
Вход в меню Media Play USB
Функция Media Play
Безопасное отключение запоминающего устройства USB
Отображение на экране
Меню параметров списка фотографий
Просмотр слайд-шоу
Просмотр фотографии или слайд-шоу
Воспроизведение текущей группы
Показ слайд-шоу, состоящего только из выбранных файлов
Меню параметров слайд-шоу
Меню параметров списка музыки
Воспроизведение музыкального файла
Воспроизведение музыки
Воспроизведение музыкальной группы
Воспроизведение выбранных музыкальных файлов
Music Repeat Mode → Вкл / Выкл
Использование меню Setup
Меню параметров воспроизведения музыки
Время заставки → 2 часа / 4 часа / 8 часа
Что такое Anynet+?
Подключение устройств Anynet+
Подключение к телевизору
Подключение к домашнему кинотеатру
Установка
Настройка Anynet+
Меню Anynet+
HDMI-CEC
Прослушивание через ресивер домашний кинотеатр
Запись
Тип устройства Рабочее состояние Доступные кнопки
Mute
Неисправность Способ устранения
Поиск и устранение неисправностей Anynet+
Функций Media Play, Plug & Play и т.д
Anynet+ Установка
Функция телетекста
Рекомендации
Часть
Установка подставки
Нажмите кнопку TV для выхода из режима телетекста
Установка с помощью набора для настенного монтажа
Отсоединение подставки
Замок Kensington для защиты от краж
Тип подставки
Компоновка кабелей
Производителей
Крепление телевизора на стене
Выбор пространства для установки
Установка на подставку
Настенное крепление устройства
Изображение
Отсутствует звук или
Звук отсутствует
Экран остается черным, а
Характеристики
Запобіжні заходи під час відтворення нерухомого зображення
Примітка щодо цифрового мовлення
Позначення
Ліцензія
Українська
Гучномовці
Огляд панелі керування
Ганчірка для очищення
Приладдя
Ауіо/відеокабель Компонентний кабель
Використовується для підключення антени чи кабелю
Замок Кенсінгтон
AV in Video / L-AUDIO-R
Вхідний
Hdmi in 1DVI
Вставте модуль стандартного інтерфейсу у гніздо
Гніздо Common Interface
Роз’єм лише для обслуговування
Українська �
Огляд пульта дистанційного керування
Кнопки З Цифрами
Кольорові Кнопки
Звичайний пульт дистанційного керування
Встановлення батарей у пульт дистанційного керування
Закрийте кришку
Переведення телевізора в режим очікування
Перегляд меню
Робота екранного меню відображення на екрані
Як скинути параметри цієї функції
Функція Plug & Play
Зявиться повідомлення Выбор языка экранного меню
Меню налаштування каналів
Каналами
Режим поиска → Полная / Сеть / Быстрый N Быстрый
Режим каналов
Параметр поиска кабеля залежно від країни
Режими каналів
Канали будуть перемикатися у межах списку вибраних каналів
Щоб Потрібно…
Користування коротким і повним довідником
Натискайте червону кнопку
Відображає усі наявні канали
Управління каналами
Відображає всі вибрані канали
Відображає всі поточні збережені програми
Изменение номера канала лише цифрові канали
Изменить название канала лише аналогові канали
Сортировка лише аналогові канали
Налаштування меню зображення
Зображенням
Зображення оптимальної якості за звичайних умов
Зручне для перегляду зображення оптимальної якості
XvYCC → Выкл. / Вкл
Автоконтраст → Выкл / Низкий / Средний / Высокий
Разм
Оттенок → Хол. / Норм. / Теплый1 / Теплый2 / Теплый3
Motion Plus значення Выкл
Сброс настроек изображения → Сброс реж. изобр. / Отмена
Режими відображення
Використання телевізора як монітора для компютера
Вхідний сигнал D-Sub та HDMI/DVI
Налаштування телевізора для роботи з ПК
Налаштування меню звуку
Звуком
Увімкнення або вимкнення функції звукового опису
Регулювання гучності звукового опису
Выбранный громкоговоритель
Вибір режиму звуку
Сброс звука → Сброс.все / Сброс реж. звука / Отмена
Dual 1 За замовчуванням
Параметри меню налаштування
Код до 0-0-0-0 Power вимк. → Mute → 8 → 2 → 4 → Power увімк
Можна вибрати мову меню
PIN-код за замовчуванням для нових телевізорів
Що встановлюються в меню Preference
Увімкнення або вимкнення субтитрів
Вибравши в меню пункт Инструменты → Экон. энергии
Налаштування часу
Встановити поточний час можна вручну або автоматично
Антенна коли для пункту Источн. встановлено значення TB
Источн.→ ТВ / USB
Канал коли для пункту Источн. встановлено значення ТВ
Содержание коли для пункту Источн. встановлено значення USB
Меню підтримки
Меню вхідного сигналу
DVI PC
Информ. о сигнале лише для цифрових каналів
Руководство по соединению ВЧ
Альтернативное ПО резервна копія
Альтернативное ПО
ENTERE, щоб вибрати Media Play USB
Підєднання пристрою USB
Дія
Вхід у меню Media Play USB
Функція Media Play
Безпечне виймання запамятовуючого пристрою USB
Відображення на екрані
Слайд-шоу
Меню параметрів перегляду списку фотографій
Отменить все якщо вибрано щонайменше один файл
Натисніть кнопку MEDIA.P
Показ слайдів
Перегляд фотографій або показу слайдів
Відображення файлів із поточної групи
Кнопки керування показом слайдів
Поворот
Меню параметрів режиму показу слайдів
Інший спосіб
Фоновая музыка → Выкл. / Вкл
Меню параметрів відтворення музичних файлів
Відтворення музичного файлу
Відтворення музики
Відтворення групи музичних файлів
Відтворення вибраних музичних файлів
Використання меню налаштування
Меню параметрів відтворення музики
Під’єднання пристроїв Anynet+
ПРО ANYNET+
Що таке Anynet+?
Під’єднання до телевізора
Перемикання між пристроями Anynet+
Налаштування режиму Anynet+
Настройка
Прослуховування звуку через приймач домашній кінотеатр
Запис
Кнопки пульта ДК телевізора, доступні у режимі Anynet+
Тип пристрою Робочий стан Доступні кнопки
Проблема Можливе вирішення
Усунення несправностей у режимі Anynet+
Media Play, Plug & Play тощо
Функція телетексту
Рекомендації
Частина
Встановлення підставки
Номер вибраної сторінки
Номер поточної сторінки або результати пошуку Дата і час
Встановлення комплекту настінного кріплення
Відєднання підставки
Замок Кенсінгтон для захисту від крадіжок
Тип підставки
Підєднання кабелів
Виробникa
Кріплення телевізора на настінному кронштейні
Забезпечення безпеки у місці встановлення
Вентиляції
Користувача через падіння виробу
Зображення нормальне, але
Немає звуку або зображення
Звуку немає
Екран темний, індикатор
Технічні характеристики
Цю сторінку навмисно залишено порожньою
Эта страница намеренно Оставлена пустой