3RECORD SET

Setting series recording

Use the following procedure to perform series recording when this digital video recorder is connected to other digital video recorders.

If series recording is set and normal recording area or alarm recording area remaining memory runs out, recording can be continued on a another digital video recorder. In doing so, recording to recording area with remaining memory is stopped.

Connect multiple digital video recorders and use series recording to record and save more video.

Connecting

1 Connecting series connection terminals.

Connect the series output terminal of the first recorder to the series input terminal of the second recorder, and from the series output terminal of the second recorder to the series input terminal of the third recorder and so on, in the order that you want to record.

To setup an overwriting series connection, connect the series output terminal of the last recorder to the series input terminal of the first.

SERIES

SERIES

SERIES

SERIES

IN OUT

N OUT


I

C

C


zUse a connection cable less than 3 m in length.

zFor an overwriting series connection, when the last digital video recorder runs out of memory, the first takes over recording.

2 Connecting VIDEO terminals.

Connect camera to the VIDEO IN terminal of the first recorder. Connect the VIDEO OUT terminal of the first recorder to the VIDEO IN terminal of the second recorder. Be sure to connect to the same channel. Connect to other digital video recorders in the following order using the VIDEO OUT terminal.

3 Connecting audio input terminals.

For audio recording, connect audio devices such as amps and microphones to the various digital audio recorder audio input terminals or microphone input terminals.

zAn audio device cannot be connected from the audio output terminal on one digital video recorder to the audio input terminal on the next as for video. Connect devices to each recorder directly.

4 Connecting alarm input and external timer input terminals.

For recording using external alarms or external timers, connect a sensor or timer device to the digital video recorder.

Connect to the external device with a cable, and connect the first recorder to the second recorder with another cable. Connect the cable from the first recorder to the second recorder terminal and then from the second recorder connect the cable to the third recorder and so on.

Settings

1 Set “OVERWRITE” for “NORMAL RECORDING AREA” and “ALARM RECORDING AREA” to “OFF”.

<RECORDING CONDITIONS SET> NORMAL RECORDING AREA

OVERWRITE : OFF ALARM RECORDING AREA

OVERWRITE : OFF

REMAINING DISK WARNING

: 1%

SERIES REC

: OFF

AUTO DELETE

: OFF

2 Set “SERIES RECORDING” to “ON”.

<RECORDING CONDITIONS SET> NORMAL RECORDING AREA

OVERWRITE : OFF ALARM RECORDING AREA

OVERWRITE : OFF

REMAINING DISK WARNING

: 1%

SERIES REC

: ON

AUTO DELETE

: OFF

English

69

Page 70
Image 70
Sanyo DSR-3709P manual Setting series recording

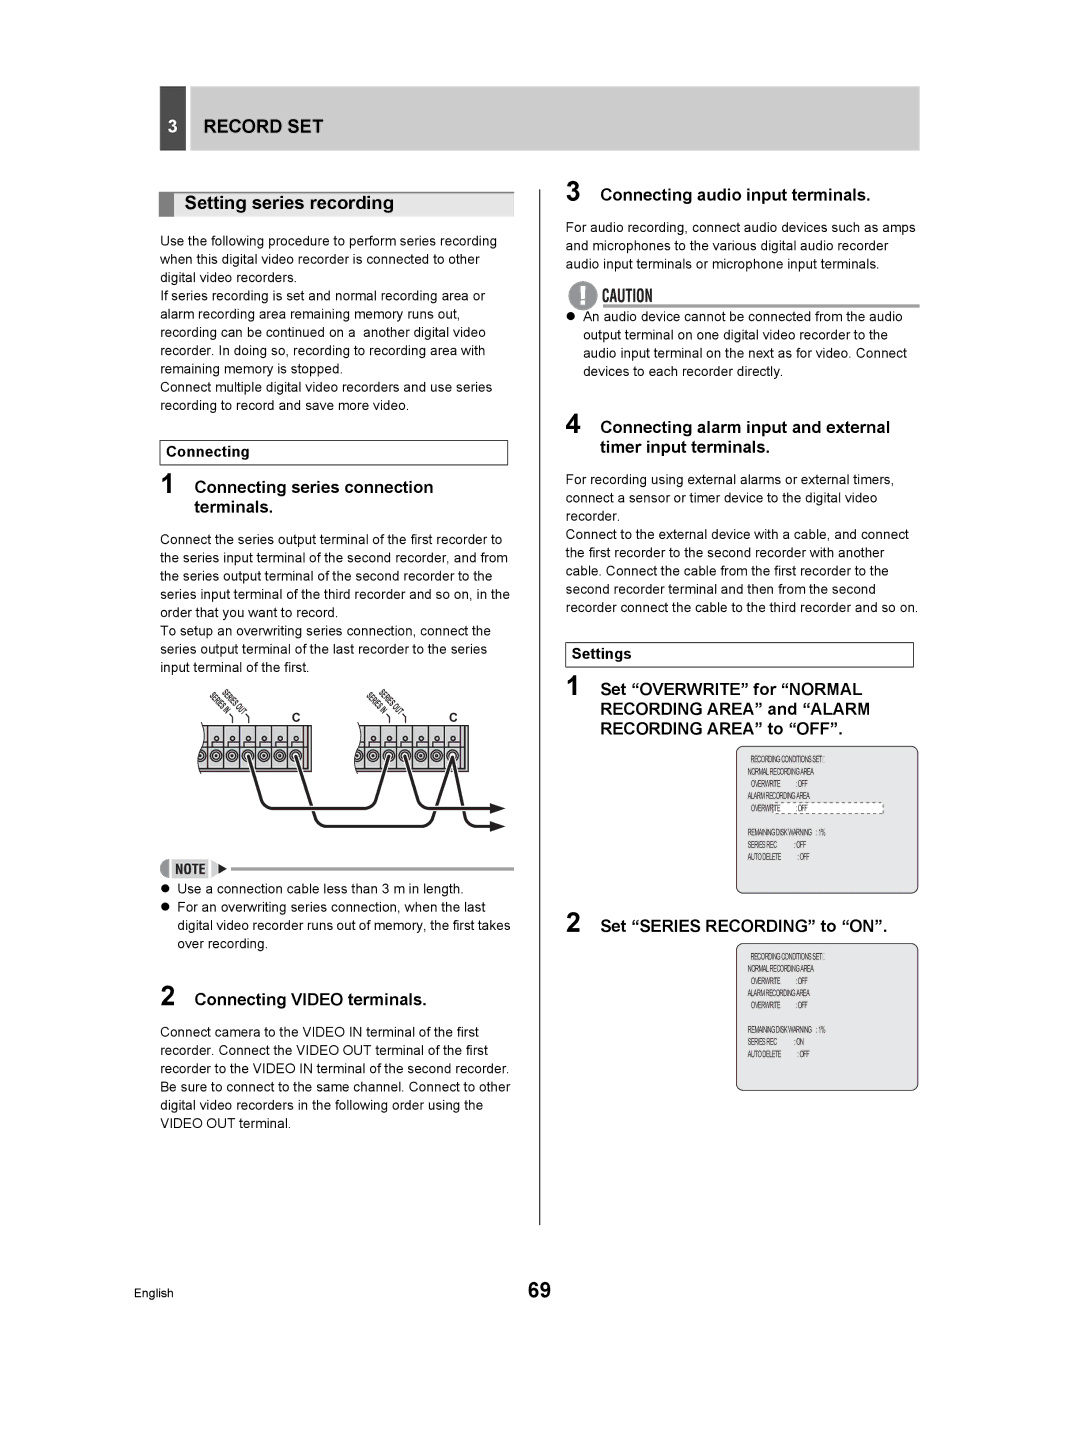
DSR-3709P specifications

The Sanyo DSR-3709P is a versatile and advanced digital video recorder (DVR) that is designed for professional video surveillance applications. Known for its reliability and enhanced functionalities, this device is widely utilized across various sectors, including retail, transportation, and security.

One of the standout features of the DSR-3709P is its exceptional video recording capabilities. It supports high-resolution video recording, ensuring that every frame captures clear and detailed imagery. This is particularly beneficial for security applications, where identifying individuals and monitoring events in real-time is crucial. The unit can handle multiple camera inputs, allowing for extensive coverage and monitoring of different areas within a facility.

The DSR-3709P incorporates advanced compression technologies, such as H.264, which enables high-quality video storage while minimizing bandwidth usage. This means users can save significant amounts of storage space without compromising the integrity of recorded footage. The device also offers various recording modes, including continuous, scheduled, and motion-detection recording. This flexibility ensures that users can customize their recording settings based on specific security needs and scenarios.

Another notable characteristic of the Sanyo DSR-3709P is its user-friendly interface, which simplifies operation for both novice and experienced users. The DVR features an intuitive menu system, allowing for quick access to settings and playback options. Additionally, it supports remote viewing capabilities, enabling users to monitor live feeds and access recorded footage from anywhere with an internet connection. This is particularly advantageous for business owners who need to keep an eye on their properties when they are not on-site.

The device is built with robust security features, including user authentication and authorization protocols. This ensures that only authorized personnel can access the system, safeguarding sensitive footage from unauthorized viewing. Additionally, the DSR-3709P is equipped to support various backup options, including USB and network storage, allowing for secure archiving of important data.

In terms of connectivity, the DSR-3709P is designed to integrate seamlessly with other security systems, offering compatibility with a variety of cameras and monitoring devices. This adaptability makes it a valuable addition to existing security infrastructures.

Overall, the Sanyo DSR-3709P is a powerful digital video recorder that combines advanced features with user-friendly design, making it an ideal solution for enhancing security and surveillance efforts across multiple industries.