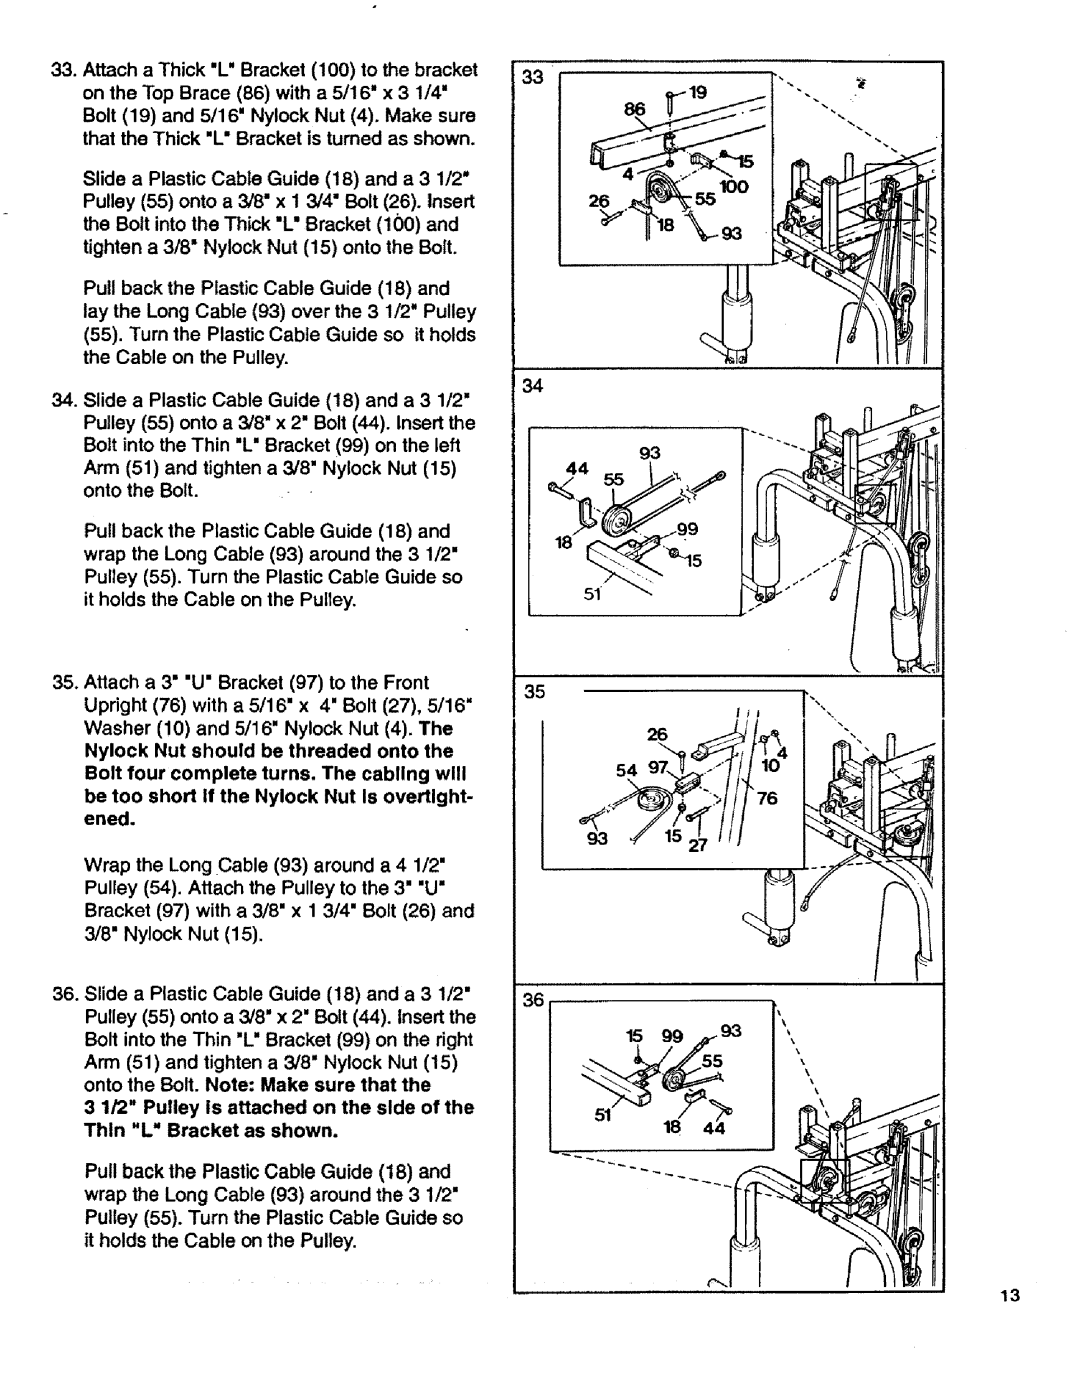
33.Attach a Thick "L" Bracket (100) to the bracket on the Top Brace (86) with a 5/16" x 3 1/4"
Bolt (19) and 5/16' Nylock Nut (4). Make sure that the Thick "L" Bracket is turned as shown.
Slide a Plastic Cable Guide (18) and a 3 1/2" Pulley (55) onto a 3/8" x I 3/4" Bolt (26). Insert the Bolt into the Thick "L" Bracket (100) and tighten a 3/8" Nylock Nut (15) onto the Bolt.
Pull back the Plastic Cable Guide (18) and lay the Long Cable (93) over the 3 1/2" Pulley (55). Turn the Plastic Cable Guide so it holds the Cable on the Pulley.
34.Slide a Plastic Cable Guide (18) and a 3 1/2" Pulley (55) onto a 3/8" x 2" Bolt (44). Insert the Bolt into the Thin "L" Bracket (99) on the left Arm (51) and tighten a 3/8" Nylock Nut (15) onto the Bolt.
Pull back the Plastic Cable Guide (18) and wrap the Long Cable (93) around the 3 1/2"
Pulley (55). Turn the Plastic Cable Guide so it holds the Cable on the Pulley.
35.Attach a 3" "U" Bracket (97) to the Front Upright (76) with a 5/16' x 4" Bolt (27), 5/16" Washer (10) and 5/16' Nylock Nut (4). The Nylock Nut should be threaded onto the Bolt four complete turns. The cabling will be too short If the Nylock Nut Is overtlght- ened.
Wrap the Long Cable (93) around a 4 1/2" Pulley (54). Attach the Pulley to the 3" "U"
Bracket (97) with a 3/8" x 1 3/4" Bolt (26) and 3/8" Nylock Nut (15).
33
55
34
93
35
54 97.
93
\
36. Slide | a Plastic Cable | Guide | (18) and | a 3 | 1/2" | 36 |
Pulley | (55) onto a 3/8" | x 2" | Bolt (44). | Insert | the |
|
Bolt into the Thin "L" Bracket (99) on the right | 15 99 _93 |
| |
Arm (51) and tighten a 3/8" Nylock Nut (15) |
|
onto the Bolt. Note: Make sure that the |
|
3 1/2" Pulley is attached on the side of the |
|
Thin "L" Bracket as shown. |
|
Pull back the Plastic Cable Guide (18) and wrap the Long Cable (93) around the 3 1/2" Pulley (55). Turn the Plastic Cable Guide so it holds the Cable on the Pulley,
\
\
\
\
\
\
13
