SERVICE AND ADJUSTMENTS

WARNING: TO AVOID SERIOUS INJURY, BEFORE PERFORMING ANY SERVICE OR ADJUSTMENTS:

1.Depress clutch/brake pedal fully and set parking brake.

3.Place attachment clutch in “DISENGAGED” position.

4.Turn ignition key to “STOP” and remove key.

5.Make sure the blades and all moving parts have completely stopped.

6.Disconnect spark plug wire from spark plug and place wire where it cannot come in contact with plug.

REVISIÓN DE LA PRESIÓN DE LAS LLANTAS

Las llantas en su unidad fueron infladas de- masiado en la fábrica por razones de envío. La presión de las llantas correctas es importante para obtener el mejor rendimiento en el corte.

Reduzca la presión de los neumáticos a la PSI que se indica en estos.

REVISIÓN DE LA NIVELACIÓN DEL CONJUNTO

Para obtener los mejores resultados en el corte, la caja de la segadora tiene que estar nivelada en la forma adecuada. Vea “PARA NIVELAR

LISTA DE REVISIÓN

Antes de operar y de disfrutar de su tractor nuevo, le deseamos que reciba el mejor rendimiento y la mayor satisfaccion de este producto de calidad. Haga el favor de revisar la lista a continuacion:

Se han completado todas las instrucciones de

montaje.

No quedan partes sueltas en la caja de cartón.

La batería está preparada y cargada en forma

adecuada.

El asiento ha sido ajustado en forma cómoda

TO REMOVE MOWER

1.Place attachment clutch in “DISEN- GAGED” position.

2.Lower attachment lift lever to its lowest position.

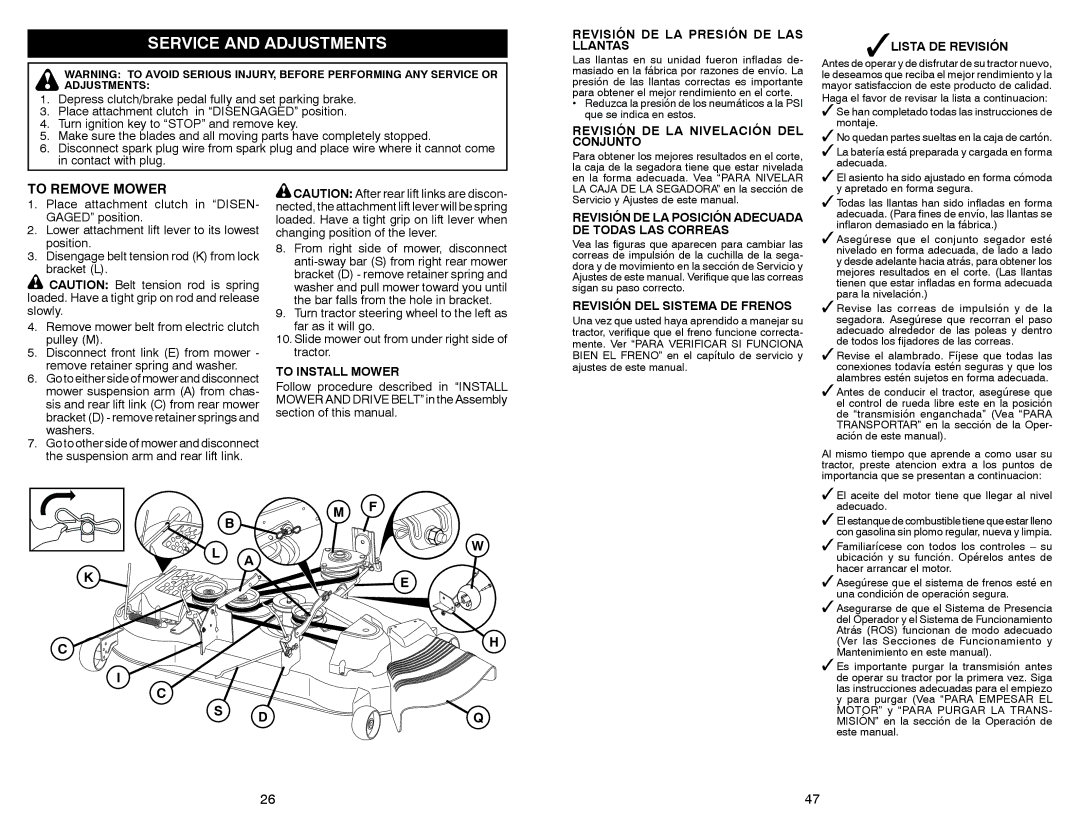
3.Disengage belt tension rod (K) from lock bracket (L).

CAUTION: Belt tension rod is spring loaded. Have a tight grip on rod and release slowly.

4.Remove mower belt from electric clutch pulley (M).

5.Disconnect front link (E) from mower - remove retainer spring and washer.

6.Go to either side of mower and disconnect mower suspension arm (A) from chas- sis and rear lift link (C) from rear mower bracket (D) - remove retainer springs and washers.

7.Go to other side of mower and disconnect the suspension arm and rear lift link.

CAUTION: After rear lift links are discon- nected, the attachment lift lever will be spring loaded. Have a tight grip on lift lever when changing position of the lever.

8.From right side of mower, disconnect anti-sway bar (S) from right rear mower bracket (D) - remove retainer spring and washer and pull mower toward you until the bar falls from the hole in bracket.

9.Turn tractor steering wheel to the left as far as it will go.

10.Slide mower out from under right side of tractor.

TO INSTALL MOWER

Follow procedure described in “INSTALL MOWER AND DRIVE BELT” in the Assembly section of this manual.

LA CAJA DE LA SEGADORA” en la sección de Servicio y Ajustes de este manual.

REVISIÓN DE LA POSICIÓN ADECUADA DE TODAS LAS CORREAS

Vea las figuras que aparecen para cambiar las correas de impulsión de la cuchilla de la sega- dora y de movimiento en la sección de Servicio y Ajustes de este manual. Verifique que las correas sigan su paso correcto.

REVISIÓN DEL SISTEMA DE FRENOS

Una vez que usted haya aprendido a manejar su tractor, verifique que el freno funcione correcta- mente. Ver “PARA VERIFICAR SI FUNCIONA BIEN EL FRENO” en el capítulo de servicio y ajustes de este manual.

y apretado en forma segura.

Todas las llantas han sido infladas en forma

adecuada. (Para fines de envío, las llantas se

inflaron demasiado en la fábrica.)

Asegúrese que el conjunto segador esté

nivelado en forma adecuada, de lado a lado

y desde adelante hacia atrás, para obtener los

mejores resultados en el corte. (Las llantas

tienen que estar infladas en forma adecuada

para la nivelación.)

Revise las correas de impulsión y de la

segadora. Asegúrese que recorran el paso

adecuado alrededor de las poleas y dentro

de todos los fijadores de las correas.

Revise el alambrado. Fíjese que todas las

conexiones todavía estén seguras y que los

alambres estén sujetos en forma adecuada.

Antes de conducir el tractor, asegúrese que

el control de rueda libre este en la posición

de “transmisión enganchada” (Vea “PARA

TRANSPORTAR” en la sección de la Oper-

ación de este manual).

Al mismo tiempo que aprende a como usar su tractor, preste atencion extra a los puntos de importancia que se presentan a continuacion:

K

C

I

C

M F B

L A W E

H

S DQ

El aceite del motor tiene que llegar al nivel adecuado.

El estanque de combustible tiene que estar lleno con gasolina sin plomo regular, nueva y limpia.

Familiarícese con todos los controles – su ubicación y su función. Opérelos antes de hacer arrancar el motor.

Asegúrese que el sistema de frenos esté en una condición de operación segura.

Asegurarse de que el Sistema de Presencia del Operador y el Sistema de Funcionamiento Atrás (ROS) funcionan de modo adecuado (Ver las Secciones de Funcionamiento y Mantenimiento en este manual).

Es importante purgar la transmisión antes de operar su tractor por la primera vez. Siga las instrucciones adecuadas para el empiezo y para purgar (Vea “PARA EMPESAR EL MOTOR” y “PARA PURGAR LA TRANS- MISIÓN” en la sección de la Operación de este manual.

26

47

Page 26
Image 26
Sears 917.28861 owner manual Service and Adjustments, To Remove Mower

917.28861 specifications

The Sears 917.28861 is a well-respected lawn tractor that has garnered attention for its robust features and reliable performance. This model is often recognized for its practicality, making it suitable for a wide range of lawn care tasks.

One of the standout features of the Sears 917.28861 is its powerful engine. Equipped with a reliable gas-powered engine, this lawn tractor provides ample horsepower to tackle various terrains and grass types. The engine is designed for efficiency, ensuring that users can maintain their lawns without excessive fuel consumption.

The cutting deck is another prominent characteristic of the 917.28861. Typically featuring a wide cutting width, this design allows users to cover larger areas in less time. The adjustable cutting heights provide flexibility to cater to different grass lengths and types. This feature ensures that lawns can be maintained according to individual preferences while promoting healthy grass growth.

The ergonomics of the 917.28861 are noteworthy as well. With an adjustable seat and user-friendly dashboard controls, operators can navigate and operate the tractor comfortably. The steering design allows for ease of maneuverability, especially in tight spaces like gardens or around flower beds.

A significant aspect of this model is its durability. Built with high-quality materials, the Sears 917.28861 is designed to withstand the rigors of regular use. This level of construction not only extends the lifespan of the tractor but also reduces the need for frequent repairs or part replacements, making it a cost-effective choice for homeowners.

Another key feature is the transmission system. The 917.28861 often includes a hydrostatic transmission, allowing for smooth and responsive speed adjustments. This technology provides a seamless driving experience, enabling users to control their pace without the hassle of shifting gears manually.

Additionally, the model may come with various attachments, enhancing versatility. Users can easily attach tools for tasks such as mulching, bagging, or even snow removal, making the Sears 917.28861 a multifunctional machine that can adapt to seasonal needs.

In summary, the Sears 917.28861 stands out for its powerful engine, durable construction, adjustable cutting capabilities, and user-friendly design. Whether tackling a small yard or a larger property, this lawn tractor is designed to simplify lawn care tasks while delivering consistent and reliable performance. Its combination of features and technologies makes it a valuable addition to any homeowner’s landscaping equipment lineup.