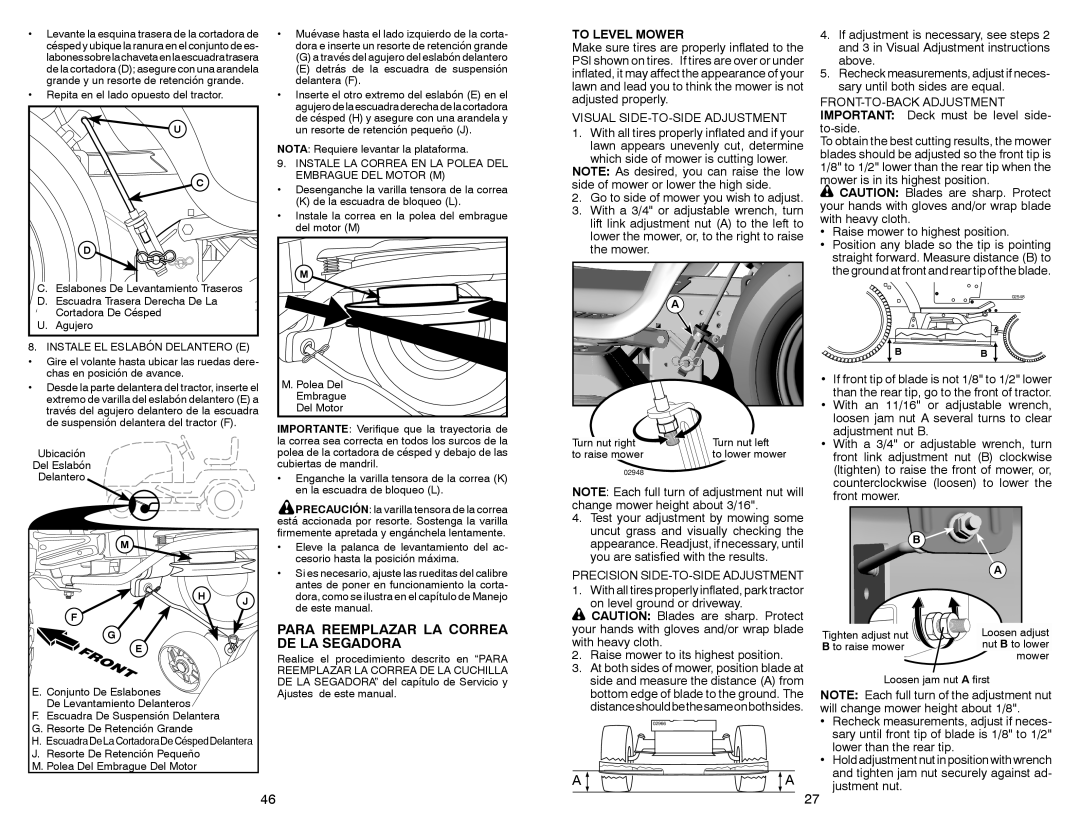
Levante la esquina trasera de la cortadora de césped y ubique la ranura en el conjunto de es- labonessobrelachavetaenlaescuadratrasera de la cortadora (D); asegure con una arandela grande y un resorte de retención grande.

Repita en el lado opuesto del tractor.

U

C

D

C. Eslabones De Levantamiento Traseros

D. Escuadra Trasera Derecha De La

Cortadora De Césped

U. Agujero

8. INSTALE EL ESLABÓN DELANTERO (E)

Gire el volante hasta ubicar las ruedas dere- chas en posición de avance.

Desde la parte delantera del tractor, inserte el extremo de varilla del eslabón delantero (E) a través del agujero delantero de la escuadra de suspensión delantera del tractor (F).

Ubicación


Del Eslabón


Delantero


M


H

J


F


G


E


E. Conjunto De Eslabones


De Levantamiento Delanteros


F. Escuadra De Suspensión Delantera


G. Resorte De Retención Grande


H. EscuadraDeLaCortadoraDeCéspedDelantera

J. Resorte De Retención Pequeño


M. Polea Del Embrague Del Motor


Muévase hasta el lado izquierdo de la corta- dora e inserte un resorte de retención grande

(G)a través del agujero del eslabón delantero

(E)detrás de la escuadra de suspensión delantera (F).

Inserte el otro extremo del eslabón (E) en el agujero de la escuadra derecha de la cortadora de césped (H) y asegure con una arandela y un resorte de retención pequeño (J).

NOTA: Requiere levantar la plataforma.

9.INSTALE LA CORREA EN LA POLEA DEL EMBRAGUE DEL MOTOR (M)

Desenganche la varilla tensora de la correa

(K) de la escuadra de bloqueo (L).

Instale la correa en la polea del embrague del motor (M)

M

M. Polea Del

Embrague

Del Motor

IMPORTANTE: Verifique que la trayectoria de la correa sea correcta en todos los surcos de la polea de la cortadora de césped y debajo de las cubiertas de mandril.

Enganche la varilla tensora de la correa (K) en la escuadra de bloqueo (L).

PRECAUCIÓN: la varilla tensora de la correa está accionada por resorte. Sostenga la varilla firmemente apretada y engánchela lentamente.

Eleve la palanca de levantamiento del ac- cesorio hasta la posición máxima.

Si es necesario, ajuste las rueditas del calibre antes de poner en funcionamiento la corta- dora, como se ilustra en el capítulo de Manejo de este manual.

PARA REEMPLAZAR LA CORREA DE LA SEGADORA

Realice el procedimiento descrito en “PARA

REEMPLAZAR LA CORREA DE LA CUCHILLA DE LA SEGADORA” del capítulo de Servicio y Ajustes de este manual.

TO LEVEL MOWER

Make sure tires are properly inflated to the PSI shown on tires. If tires are over or under inflated, it may affect the appearance of your lawn and lead you to think the mower is not adjusted properly.

VISUAL SIDE-TO-SIDE ADJUSTMENT

1.With all tires properly inflated and if your lawn appears unevenly cut, determine which side of mower is cutting lower.

NOTE: As desired, you can raise the low side of mower or lower the high side.

2.Go to side of mower you wish to adjust.

3.With a 3/4" or adjustable wrench, turn lift link adjustment nut (A) to the left to lower the mower, or, to the right to raise the mower.

A

Turn nut right

Turn nut left

to raise mower

to lower mower

02948

NOTE: Each full turn of adjustment nut will change mower height about 3/16".

4.Test your adjustment by mowing some uncut grass and visually checking the appearance. Readjust, if necessary, until you are satisfied with the results.

PRECISION SIDE-TO-SIDE ADJUSTMENT

1. With all tires properly inflated, park tractor on level ground or driveway. CAUTION: Blades are sharp. Protect

your hands with gloves and/or wrap blade with heavy cloth.

2.Raise mower to its highest position.

3.At both sides of mower, position blade at side and measure the distance (A) from bottom edge of blade to the ground. The distanceshouldbethesameonbothsides.

02966

A A

4.If adjustment is necessary, see steps 2 and 3 in Visual Adjustment instructions above.

5.Recheck measurements, adjust if neces- sary until both sides are equal.

FRONT-TO-BACK ADJUSTMENT IMPORTANT: Deck must be level side- to-side.

To obtain the best cutting results, the mower blades should be adjusted so the front tip is 1/8" to 1/2" lower than the rear tip when the mower is in its highest position.

CAUTION: Blades are sharp. Protect your hands with gloves and/or wrap blade with heavy cloth.

Raise mower to highest position.

Position any blade so the tip is pointing straight forward. Measure distance (B) to the ground at front and rear tip of the blade.

02548

BB

If front tip of blade is not 1/8" to 1/2" lower than the rear tip, go to the front of tractor.

With an 11/16" or adjustable wrench, loosen jam nut A several turns to clear adjustment nut B.

With a 3/4" or adjustable wrench, turn front link adjustment nut (B) clockwise (ltighten) to raise the front of mower, or, counterclockwise (loosen) to lower the front mower.


B


A

Tighten adjust nut

Loosen adjust

B to raise mower

nut B to lower

02950

mower


Loosen jam nut A first

NOTE: Each full turn of the adjustment nut will change mower height about 1/8".

Recheck measurements, adjust if neces- sary until front tip of blade is 1/8" to 1/2" lower than the rear tip.

Hold adjustment nut in position with wrench and tighten jam nut securely against ad- justment nut.

46

27

Page 27
Image 27
Sears 917.28861 owner manual Para Reemplazar LA Correa DE LA Segadora, To Level Mower, Visual SIDE-TO-SIDE Adjustment

917.28861 specifications

The Sears 917.28861 is a well-respected lawn tractor that has garnered attention for its robust features and reliable performance. This model is often recognized for its practicality, making it suitable for a wide range of lawn care tasks.

One of the standout features of the Sears 917.28861 is its powerful engine. Equipped with a reliable gas-powered engine, this lawn tractor provides ample horsepower to tackle various terrains and grass types. The engine is designed for efficiency, ensuring that users can maintain their lawns without excessive fuel consumption.

The cutting deck is another prominent characteristic of the 917.28861. Typically featuring a wide cutting width, this design allows users to cover larger areas in less time. The adjustable cutting heights provide flexibility to cater to different grass lengths and types. This feature ensures that lawns can be maintained according to individual preferences while promoting healthy grass growth.

The ergonomics of the 917.28861 are noteworthy as well. With an adjustable seat and user-friendly dashboard controls, operators can navigate and operate the tractor comfortably. The steering design allows for ease of maneuverability, especially in tight spaces like gardens or around flower beds.

A significant aspect of this model is its durability. Built with high-quality materials, the Sears 917.28861 is designed to withstand the rigors of regular use. This level of construction not only extends the lifespan of the tractor but also reduces the need for frequent repairs or part replacements, making it a cost-effective choice for homeowners.

Another key feature is the transmission system. The 917.28861 often includes a hydrostatic transmission, allowing for smooth and responsive speed adjustments. This technology provides a seamless driving experience, enabling users to control their pace without the hassle of shifting gears manually.

Additionally, the model may come with various attachments, enhancing versatility. Users can easily attach tools for tasks such as mulching, bagging, or even snow removal, making the Sears 917.28861 a multifunctional machine that can adapt to seasonal needs.

In summary, the Sears 917.28861 stands out for its powerful engine, durable construction, adjustable cutting capabilities, and user-friendly design. Whether tackling a small yard or a larger property, this lawn tractor is designed to simplify lawn care tasks while delivering consistent and reliable performance. Its combination of features and technologies makes it a valuable addition to any homeowner’s landscaping equipment lineup.