Other useful features
USB media/Home network
USB media/Home network
In both modes, you can enjoy viewing photos, listening to music and watching videos from external USB devices (USB Memory, USB card reader (Mass Storage Class), USB HDD) or Home network server.
NOTE
•To connect a Home network server, refer to Network setup (Page 57).
•This function may not work properly for some USB storage devices.
•The corresponding file format is different between “USB media” and “Home network”.
•“Wide mode” is fixed during “Photo mode”. During “Video mode”, you can select “Auto” or “Original”.
•Depending on the Home network server, the TV may not be able to recognise the contained data.
•Use only alphanumeric characters for naming files.
•Do not disconnect a Home network server from the TV while transferring files, using the slide show function, when a screen is switching to another or before you exit “Home network” from the “HOME” or “INPUT” menu.
•Do not connect and disconnect a Home network server from the TV repeatedly.
•Depending on the USB device, the TV may not be able to recognise the contained data.
•Use only alphanumeric characters for naming files.
•File names over 80 characters (may vary depending on the character set) may not be displayed.
•Do not disconnect a USB device or memory card from the TV while transferring files, using the slide show function, when a screen is switching to another or before you exit “USB media” from the “INPUT” menu.
Selecting the mode
Common operation
Select “USB media” or “Home network” from the “HOME” or “INPUT” menu to enter this mode.
Selecting modes and drives/servers
1Press B.
When the USB media menu is displayed
1Press a/bto select “Select USB drive”, and then press ;.
•The available selections are “Select USB drive” and “Folder display setting”.
2Press a/b/c/dto select the USB device where
you want to find your files, and then press ;.
•You can select from “All” or “Folder” for the type of folder directory in “Folder display setting”.
When the Home network menu is displayed
Press a/bto select the Home network server where you want to find your files, and then press ;.
• Press Y to search for servers.
2Press c/dto select among “Photo mode”, “Music mode” or “Video mode”, and then press ;.
Music mode
Video mode
Photo mode
NOTE
•The explanations for the buttons that can be used in each mode are the explanations when using USB media mode. Some operations may differ in Home network mode. Follow the guide display during operations.
•You do not need to select the drive/server in step 1 when there is only one drive in the connected USB device or there is only one Home network server connected to the TV.
•16 is the maximum number of drives that can be displayed in USB media mode.
•10 is the maximum number of servers that can be displayed in Home network mode.
•You cannot enter these modes when there is no server connected to the TV in Home network mode.
![]()
![]() 48
48
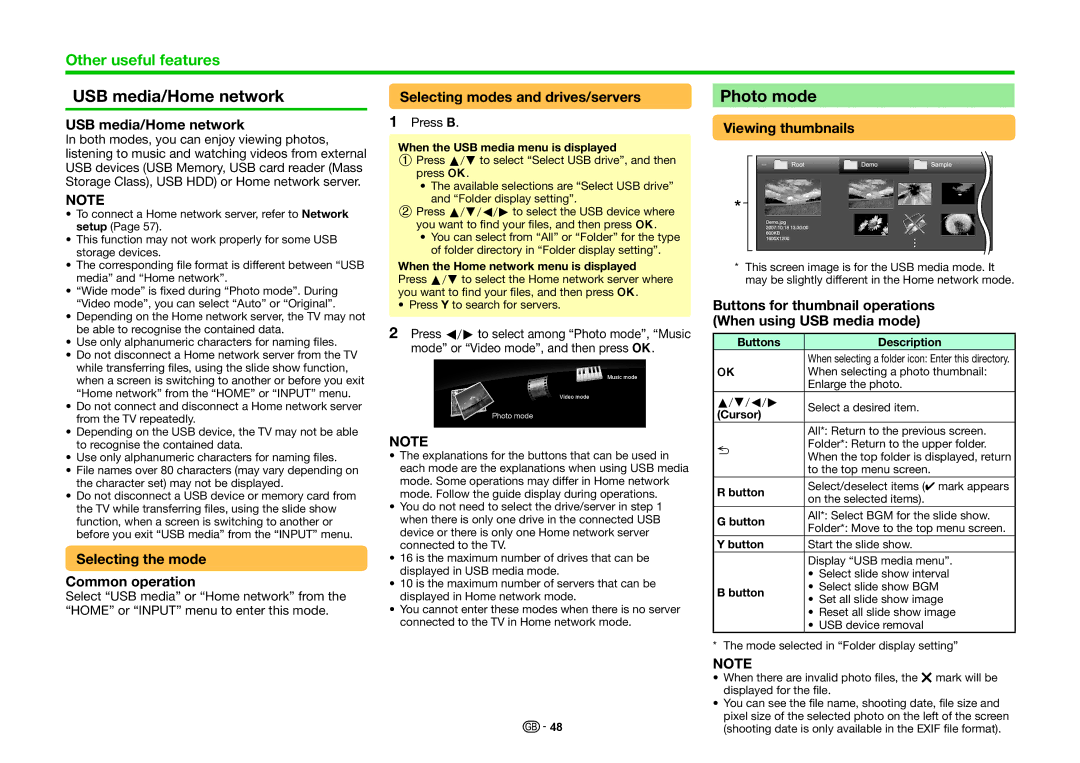
Photo mode
Viewing thumbnails
*This screen image is for the USB media mode. It may be slightly different in the Home network mode.
Buttons for thumbnail operations (When using USB media mode)
Buttons | Description |
When selecting a folder icon: Enter this directory.
;When selecting a photo thumbnail: Enlarge the photo.
a/b/c/d | Select a desired item. | |
(Cursor) |
| |
| All*: Return to the previous screen. | |
6 | Folder*: Return to the upper folder. | |
When the top folder is displayed, return | ||
| ||
| to the top menu screen. | |
R button | Select/deselect items (✔ mark appears | |
on the selected items). | ||
| ||
G button | All*: Select BGM for the slide show. | |
Folder*: Move to the top menu screen. | ||
| ||
Y button | Start the slide show. | |
| Display “USB media menu”. | |
| • Select slide show interval | |
B button | • Select slide show BGM | |
• Set all slide show image | ||
|
•Reset all slide show image
•USB device removal
*The mode selected in “Folder display setting”
NOTE
•When there are invalid photo files, the g mark will be displayed for the file.
•You can see the file name, shooting date, file size and pixel size of the selected photo on the left of the screen (shooting date is only available in the EXIF file format).