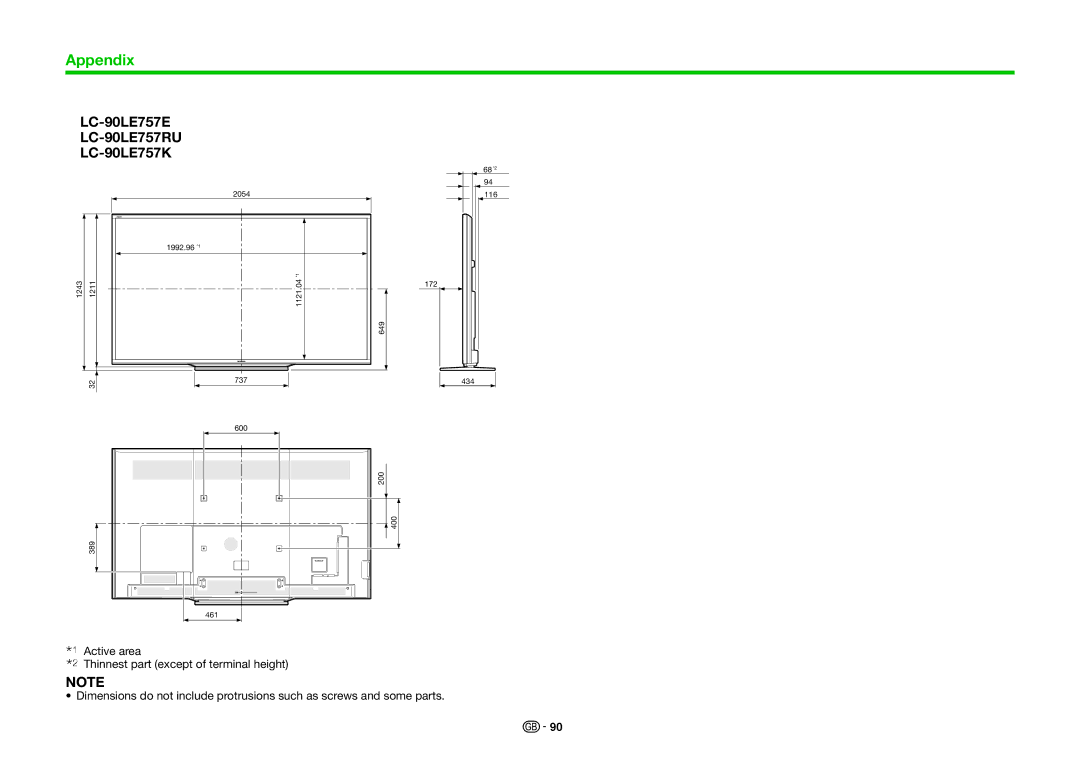
Main
Page
Dear SHARP customer
Contents
Introduction [ ENGLISH ]
Important safety precautions
Caring for the cabinet
Caring for the front panel
WARNING
3D glasses (AN-3DG40, sold separately)
Prevention of accidental ingestion
Do not disassemble
Caution for lithium battery
Supplied accessories
Optional accessories
Preparation
Attaching the stand unit
1Confirm that there are 12 screws (eight M6 screws, four M5 screws) supplied
21 Set the supporting post for the stand unit onto the polystyrene foam.
3Insert the stand into the openings on the bottom of the TV (hold the stand so
Page
Using the remote control unit Inserting the batteries
Preparation
1Open the battery cover. 2Insert the two supplied AAA size batteries.
3Close the battery cover.
Note on disposing batteries
Part names and functions
TV (front/side view)
wFor 70 inch models
wFor 80/90 inch models
TV (rear view)
Remote control unit
Part names and functions
Quick guide
3. Daily operation
1
2
3
4
Inserting the CA card into the CI module
Recording CAM PIN setting
1Go to TV Menu > Setup > Option >
2Enter the CAM PIN code.
CI plus 1.3 Standard
Using the HOME screen
1Display the HOME screen
2Select an item
3Exit the HOME screen
Tips: HOME menu contents
Using the Menu screen
Display the Menu screen
Go to TV Menu.
Selecting in the Menu
Press c/d to select the desired menu,
Initial auto installation
Confirm the following before turning on the power
1Press a on the TV.
2Setting the OSD language.
Digital broadcast setting
1Press a/b to select
2 Press a/b/c/d or
3Press a/b to select Search start, and then
4Press c/d to select Yes to start searching
Searching for satellite broadcasts
Press a/b to select Satellite search, and then
E Single satellite setting
1Press a/b to select Single satellite, and then
2Press a/b/c/d to select your favorite
Checking signal strength and channel strength (DVB-T/T2/C/S/S2)
1Go to TV Menu > Setup > View setting >
2Press c/d to select On, and then press ;.
2Press a/b to select Digital setup or Satellite
3Press a/b to select Signal strength, and then
Watching TV
Daily operation Switching on/off
Switching between digital, satellite and analogue broadcasts
Changing channels
Selecting an external video source
Selecting a sound mode
Channel display
DTV mode ATV mode
SAT mode
1Select a TV channel (the time information is
Favourite Channel Information
Before installation
How to add / remove / move your favourite channels
Selecting channels from My favourite list
1How to move between My favourite list and
EPG
Useful settings for using EPG
EPG
Display range setup
Genre icon setup
Selecting a programme using EPG
Timer setup using EPG
Cancelling the timer setup
Teletext
What is teletext?
Turning teletext on/off
1Select a TV channel or external source providing
a teletext programme.
MHEG-5 application (UK only)
Hbb TV application
Data service setting
2If you press END, data service will close.
Open Hbb TV pages
Connecting external devices
Video connections HDMI connection
n op
DVI/HDMI conversion
1Press b to select HDMI 2 from the INPUT menu, and then press
2Go to TV Menu > Setup > Option > Terminal setting > Audio
1Press b to select HDMI 2 from the INPUT menu, and then press
o
Component cable (commercially available) Audio cable (commercially available)
VIDEO connection
AV cable (commercially available)
Audio connections Speaker/amplifier connection
o
AQUOS LINK
Controlling HDMI devices using AQUOS LINK
Regarding Select recording device
3Press the 6 (Return) to end the operation.
1Go to TV Menu > Setup > View setting >
Page
AQUOS LINK setup Basic operation
AQUOS LINK control
2Press c/d to select On, and then press ;.
Auto power on
Selecting recorder
1Press a/b to select Top menu/title list, and
2Press @ to hide the menu screen to
3Select the title with a/b/c/d, and then press
Setup menu
Media change
Using a Smartphone with the TV
Basic adjustment
Picture settings
Go to TV Menu > Setup > Picture.
AV mode
OPC
Picture adjustments
Adjustment items
Advanced
C.M.S.-hue
C.M.S.-saturation
Gamma adjustment
Film mode
Active contrast
DNR
Range of OPC
Audio settings
Go to TV Menu > Setup > Audio.
Auto volume
Audio adjustment
You can adjust the sound quality to your preference with the following settings.
Power save settings
ECO picture control
Energy save
No signal off
No operation off
View settings
Auto installation
1Go to TV Menu > Setup > View setting >
2Press c/d to select Yes, and then press ;. 3Press a/b/c/d to select the desired
4Press a/b to select the broadcast standard
1Press a/b to select the desired network. 2Press ; to set the network selected.
Cable
Analogue setting
Fine
Colour sys.
Sound sys.
Label
Individual setting PIN
PIN
1Press c/d to select Yes, and then press ;. 2Enter the four-digit number as a PIN using 0_9
3Enter the same four-digit number as in step 2 to
4Press ;.
Individual setting Language
Digital audio language
Subtitle
Selectable items
Language
Useful viewing functions
Optional features settings
Go to TV Menu > Setup > Option.
Selecting the picture size manually
Wide mode
Terminal setting
Digital audio output
Audio select
Skipping specified inputs
Input skip
Headphone/Audio out select
Headphone out setting
Colour system
Screen effect settings
Additional features
Illumination
Quick start
Wallpaper setting
Data source
Game play time
Key lock
Other useful features
USB-recording
Connecting a USB HDD
USB HDD registration
Disconnecting the USB HDD
How to operate USB-recording
EButtons for USB-recording operation
USB-recording
Starting USB-recording
6Press c/d to select Yes, and then press ;.
Completing USB-recording
1Press REC STOP H.
Time shift playback
NOTE for France
Display information regarding USB- recording
The status icon shows up depending on what
USB media/Home network
Selecting the mode Common operation
Select USB media or Home network from the HOME or INPUT menu to enter this mode.
Selecting modes and drives/servers
Music mode
Buttons for music mode
Video mode
Buttons for file selecting operations
Buttons for playing mode
Disconnecting the USB device
When you disconnect the USB device, be sure to the following steps.
DivX setup
USB device compatibility
Home network server compatibility
Selecting the picture size for video mode
You can select the picture size in Video mode.
Connecting a PC
Connecting a PC
HDMI connection
HDMI-certified cable (commercially available)
3.5 mm stereo
Adjusting the PC image automatically
Auto sync.
1Press b to select PC from the INPUT
2Go to TV Menu > Setup > Option >
Adjusting the PC image manually
PC compatibility chart
PC control of the TV
Communication conditions for IP
IP Control setup
nop
Communication conditions for RS-232C
Command list
Network setup
Connecting to the network
Wired installation
PC Router (commercially available) ETHERNET cable (commercially available) Network
ETHERNET cable (commercially available)
PC Wireless LAN router/access point Wireless LAN USB adapter (supplied) Network
Network setup
1Switch on your router before starting the
2Connect the wireless LAN USB adapter
3Go to Network setup > Auto setup, and then
Net TV
What is Net TV?
DISCLAIMERS
NETFLIX
(LC-80LE657EN/LC-80LE657KN/ LC-70LE747EN/LC-70LE747KN only)
Inputting texts
Clear Net TV memory
Video store
SD card
1Insert the SD card into the SD CARD (VIDEO
Enjoying 3D image viewing
Before using the 3D glasses
Enjoying 3D image viewing
Preparing for the 3D glasses Supplied accessories
Make sure the following accessories are provided with the 3D glasses.
Part Names
no
p
Using the 3D glasses Before using the 3D Glasses
Attaching the Nose Pad
Using the 3D glasses
Pairing the 3D glasses
Switching to 3D and 2D Mode
Replacing the Battery
1Use the tip of a ballpoint pen or similar object to
2While pressing in on the lock, place your
3Replace the battery.
4Align the battery holder with the battery slot on
Cautions for 3D image viewing
Display format for 3D and 2D images
Viewing 3D images
Receiving a 3D image signal that can be detected automatically
1Go to TV Menu > Setup > Option > 3D
2Turn on the power of the 3D glasses, and then
Switching 3D to 2D mode
Watching 2D images in 3D
1Press 3D. 2Press c/d to select 2D s 3D, and then press
3Turn on the power of the 3D glasses, and then
Switching to the previous mode
1Press 3D.
3D setup
3D auto change
3D depth control
Depth change
2D s 3D convert effect
Specifications 3D glasses (sold separately) Troubleshooting 3D Images
Appendix
Troubleshooting
Page
Updating your TV via DVB-T/T2/ C/S/S2
Download setup
Searching for updates*
Downloading the software
1If the software is updated, the confirmation
Receiver report
Identification
3Press c/d to select Yes, and then press OK.
Information on the software licence for this product
Software licence
Trademarks
Software licences for Net TV
This product includes the Opera browser.
Disclaimers for services using the Internet
DISCLAIMERS
Specifications
Specifications (Wireless LAN USB adapter)
Environmental specifications
Mounting the TV on a wall
LC-70LE747E/LC-70LE747RU/LC-70LE747EN/LC-70LE747KN
LC-80LE657E/LC-80LE657RU/LC-80LE657EN/LC-80LE657KN/ LC-90LE757E/LC-90LE757RU/LC-90LE757K
Wall mount kit specifications
Standard dimensions for wall mount kits are shown below.
Rating table for child lock
Abbreviation list
89
Dimensional drawings
Dimensions do not include protrusions such as screws and some parts.
LC-70LE747E LC-70LE747RU LC-70LE747EN LC-70LE747KN
LC-80LE657E LC-80LE657RU LC-80LE657EN LC-80LE657KN
90
LC-90LE757E LC-90LE757RU LC-90LE757K
Dimensions do not include protrusions such as screws and some parts.
IActive area JThinnest part (except of terminal height)
EU Energy Label for Televisions
XYZ