8 MENU A SCHERMO

Tutte le funzioni del sistema possono essere attivate da tastierino o telecomando, con l’ausilio di un sistema di menu a schermo pratico e completo.

INPUTS

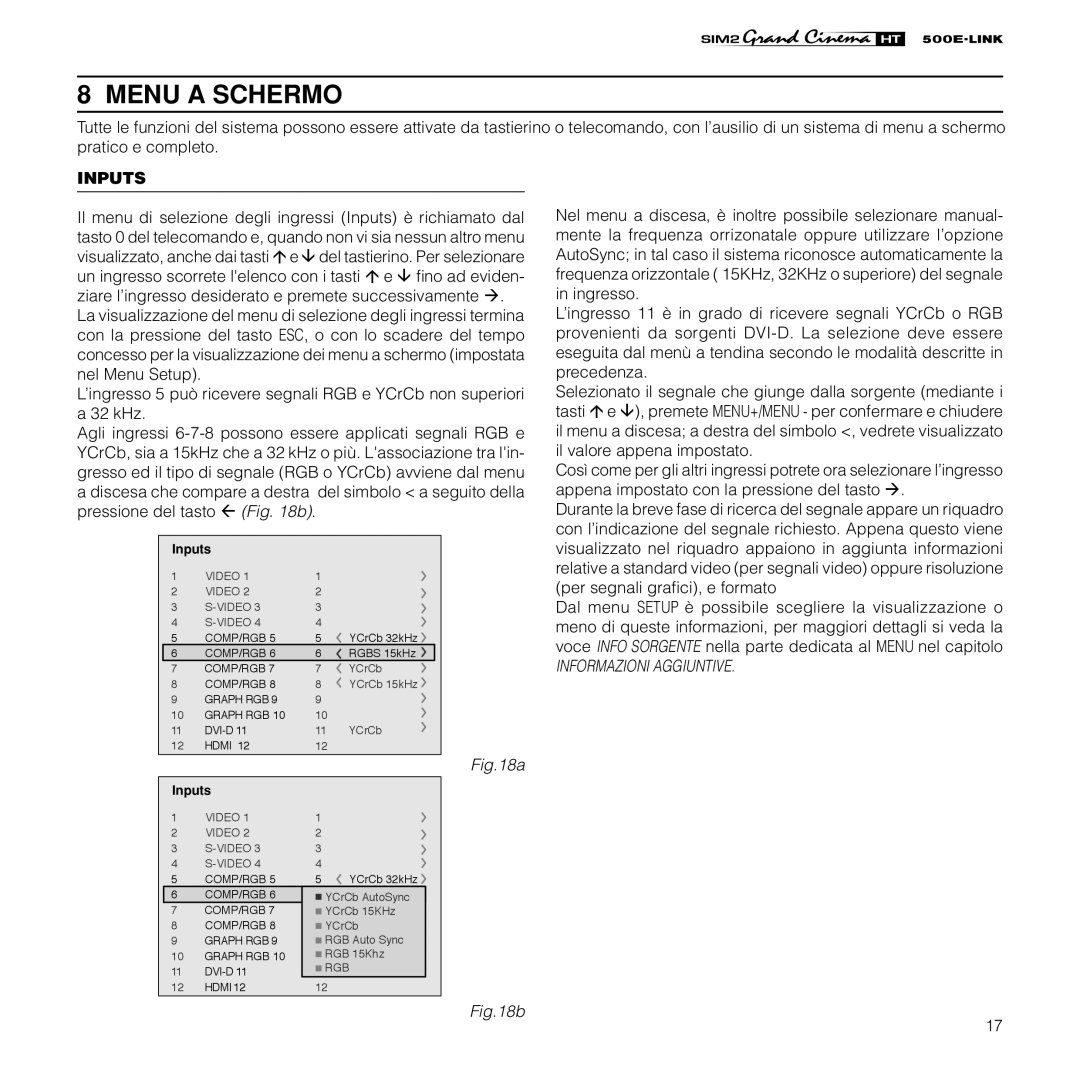
Il menu di selezione degli ingressi (Inputs) è richiamato dal tasto 0 del telecomando e, quando non vi sia nessun altro menu visualizzato, anche dai tasti ·e del tastierino. Per selezionare un ingresso scorrete l'elenco con i tasti · e fino ad eviden- ziare l’ingresso desiderato e premete successivamente .

La visualizzazione del menu di selezione degli ingressi termina con la pressione del tasto ESC, o con lo scadere del tempo concesso per la visualizzazione dei menu a schermo (impostata nel Menu Setup).

L’ingresso 5 può ricevere segnali RGB e YCrCb non superiori a 32 kHz.

Agli ingressi 6-7-8 possono essere applicati segnali RGB e YCrCb, sia a 15kHz che a 32 kHz o più. L'associazione tra l'in- gresso ed il tipo di segnale (RGB o YCrCb) avviene dal menu a discesa che compare a destra del simbolo < a seguito della pressione del tasto (Fig. 18b).

������

1

VIDEO 1

1


2

VIDEO 2

2


3

S-VIDEO 3

3


4

S-VIDEO 4

4


5

COMP/RGB 5

5

YCrCb 32kHz

6

COMP/RGB 6

6

RGBS 15kHz

7

COMP/RGB 7

7

YCrCb

8

COMP/RGB 8

8

YCrCb 15kHz

9

GRAPH RGB 9

9


10

GRAPH RGB 10

10


11

DVI-D 11

11

YCrCb

12

HDMI 12

12


Nel menu a discesa, è inoltre possibile selezionare manual- mente la frequenza orrizonatale oppure utilizzare l’opzione AutoSync; in tal caso il sistema riconosce automaticamente la frequenza orizzontale ( 15KHz, 32KHz o superiore) del segnale in ingresso.

L’ingresso 11 è in grado di ricevere segnali YCrCb o RGB provenienti da sorgenti DVI-D. La selezione deve essere eseguita dal menù a tendina secondo le modalità descritte in precedenza.

Selezionato il segnale che giunge dalla sorgente (mediante i tasti · e ), premete MENU+/MENU - per confermare e chiudere il menu a discesa; a destra del simbolo <, vedrete visualizzato il valore appena impostato.

Così come per gli altri ingressi potrete ora selezionare l’ingresso appena impostato con la pressione del tasto .

Durante la breve fase di ricerca del segnale appare un riquadro con l’indicazione del segnale richiesto. Appena questo viene visualizzato nel riquadro appaiono in aggiunta informazioni relative a standard video (per segnali video) oppure risoluzione (per segnali grafici), e formato

Dal menu SETUP è possibile scegliere la visualizzazione o meno di queste informazioni, per maggiori dettagli si veda la voce INFO SORGENTE nella parte dedicata al MENU nel capitolo

INFORMAZIONI AGGIUNTIVE.

Fig.18a

������

1

VIDEO 1

1


2

VIDEO 2

2


3

S-VIDEO 3

3


4

S-VIDEO 4

4


5

COMP/RGB 5

5

YCrCb 32kHz

6COMP/RGB 6 6 YCrCbRGBSAutoSync15kHz

7

COMP/RGB 7

7

YCrCbYCrCb15KHz

8

COMP/RGB 8

8

YCrCbYCrCb 15kHz

9

GRAPH RGB 9

9

RGB Auto Sync

10

GRAPH RGB 10

10RGB 15Khz

11

DVI-D 11

11RGBYCrCb

12

HDMI 12

12

Fig.18b

17

Page 19
Image 19
Sim2 Multimedia HT500 E-LINK manual Menu a Schermo, Inputs

HT500 E-LINK specifications

The Sim2 Multimedia HT500 E-LINK is a groundbreaking projector that has been designed to deliver an exceptional viewing experience for both home theater enthusiasts and professional environments. This state-of-the-art device incorporates advanced technologies and innovative features that set it apart from other projectors in the market.

One of the standout features of the HT500 E-LINK is its high-quality imaging capabilities. The projector boasts a resolution of 1920 x 1080 pixels, providing stunning Full HD images that are rich in detail and vibrant in color. This high resolution ensures that whether you're watching movies, sports, or playing video games, the visual experience is nothing short of spectacular. The projector is equipped with a powerful light source that delivers impressive brightness levels, making it suitable for various lighting conditions, including dimly lit rooms and well-lit environments.

Another key aspect of the HT500 E-LINK is its advanced connectivity options. With multiple input ports including HDMI, USB, and VGA, users can easily connect a range of devices such as laptops, gaming consoles, and streaming devices. The inclusion of wireless connectivity options also allows for seamless integration with smart devices, making it easy to stream content directly from smartphones or tablets.

The projector additionally features Sim2's proprietary E-LINK technology, which enhances the overall user experience. This technology enables easy and quick setup, allowing users to get started with minimal effort. The projector's intuitive interface provides easy navigation through various settings, ensuring that users can customize their viewing experience according to their preferences.

In terms of sound, the HT500 E-LINK does not disappoint. It comes equipped with built-in speakers that provide clear and immersive audio, enhancing the overall viewing experience. For those who seek a more comprehensive sound system, the projector can easily connect to external surround sound systems to deliver an even more powerful audio experience.

Design-wise, the HT500 E-LINK features a sleek and compact design that allows it to blend seamlessly into any environment. Its portability makes it an ideal choice for both home use and professional presentations.

In summary, the Sim2 Multimedia HT500 E-LINK is a versatile and powerful projector that excels in delivering high-quality visuals, robust connectivity options, and an exceptional user experience, making it an excellent choice for both entertainment and professional use.