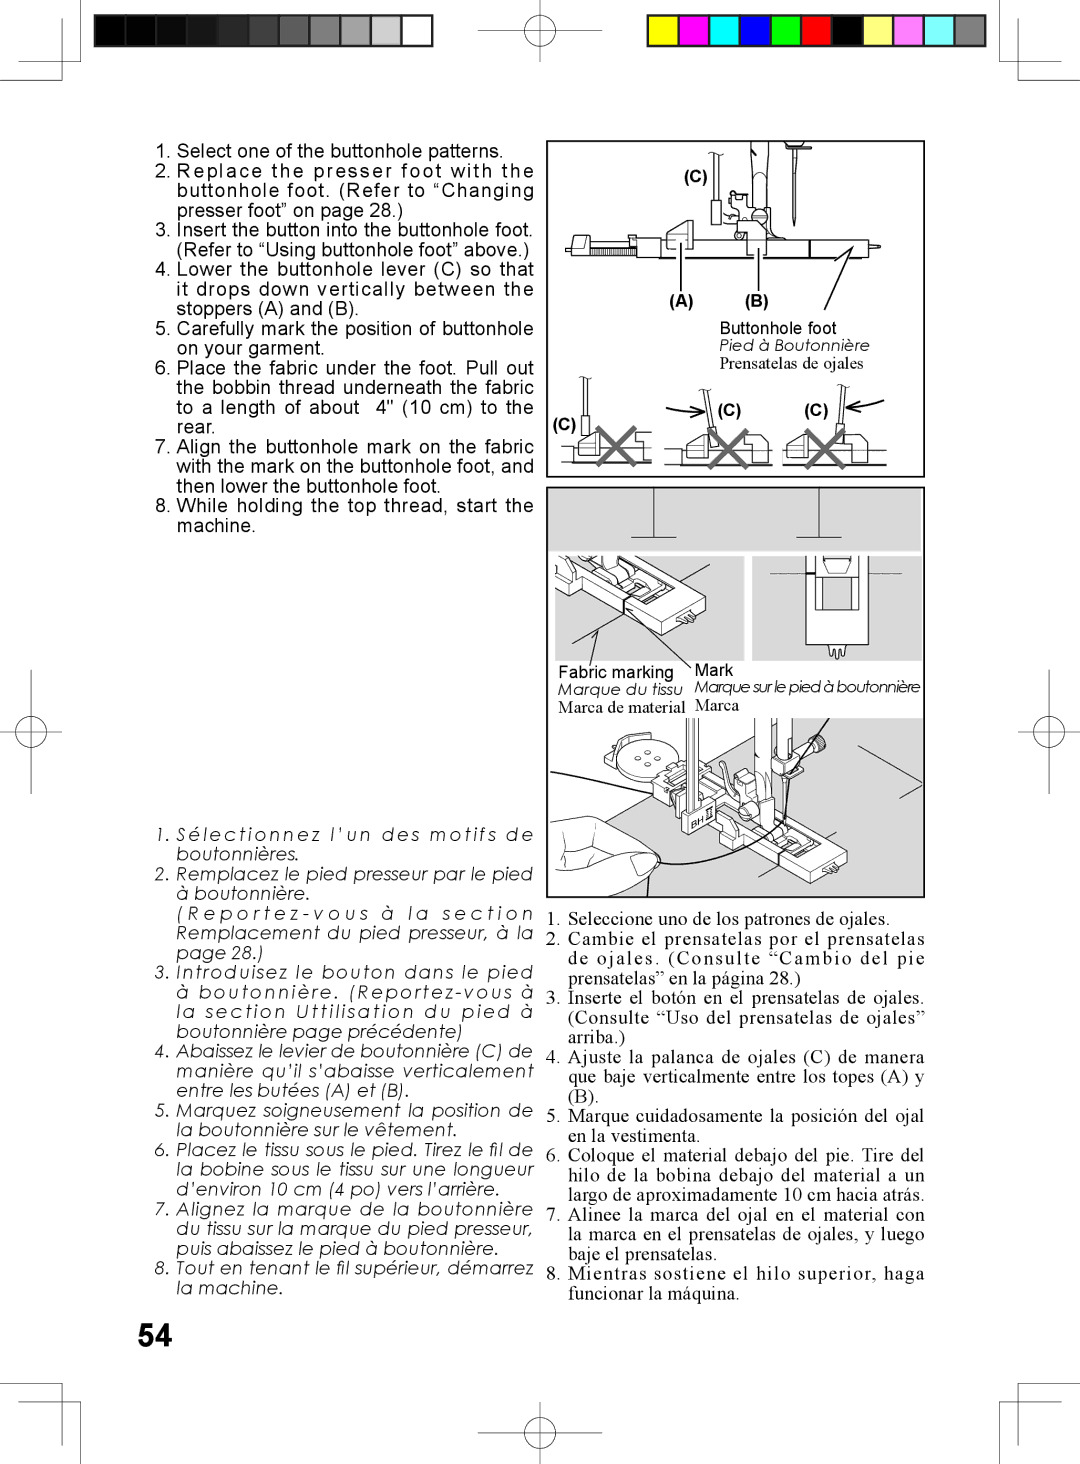
1.Select one of the buttonhole patterns.

2.Replace the presser foot with the buttonhole foot. (Refer to “Changing presser foot” on page 28.)

3.Insert the button into the buttonhole foot. (Refer to “Using buttonhole foot” above.)

4.Lower the buttonhole lever (C) so that it drops down vertically between the stoppers (A) and (B).

5.Carefully mark the position of buttonhole on your garment.

6.Place the fabric under the foot. Pull out the bobbin thread underneath the fabric to a length of about 4" (10 cm) to the rear.

7.Align the buttonhole mark on the fabric with the mark on the buttonhole foot, and then lower the buttonhole foot.

8.While holding the top thread, start the machine.

1. S é l e c t i o n n e z l ’ u n d e s m o t i f s d e boutonnières.

2. Remplacez le pied presseur par le pied à boutonnière.

( R e p o r t e z - v o u s à l a s e c t i o n Remplacement du pied presseur, à la page 28.)

3. Introduisez le bouton dans le pied à boutonnière . (Reportez - vous à la section Uttilisation du pied à boutonnière page précédente)

4. Abaissez le levier de boutonnière (C) de manière qu’il s’abaisse verticalement entre les butées (A) et (B).

5. Marquez soigneusement la position de la boutonnière sur le vêtement.

6. Placez le tissu sous le pied. Tirez le fil de la bobine sous le tissu sur une longueur d’environ 10 cm (4 po) vers l’arrière.

7. Alignez la marque de la boutonnière du tissu sur la marque du pied presseur, puis abaissez le pied à boutonnière.

8. Tout en tenant le fil supérieur, démarrez la machine.


(C)


(A)

(B)


Buttonhole foot


Pied à Boutonnière


Prensatelas de ojales

(C)

(C)

(C)


Fabric marking

Mark


Marque du tissu

Marque sur le pied à boutonnière


Marca de material

Marca


1.Seleccione uno de los patrones de ojales.

2.Cambie el prensatelas por el prensatelas de ojales. (Consulte “Cambio del pie prensatelas” en la página 28.)

3.Inserte el botón en el prensatelas de ojales. (Consulte “Uso del prensatelas de ojales” arriba.)

4.Ajuste la palanca de ojales (C) de manera que baje verticalmente entre los topes (A) y

(B).

5.Marque cuidadosamente la posición del ojal en la vestimenta.

6.Coloque el material debajo del pie. Tire del hilo de la bobina debajo del material a un largo de aproximadamente 10 cm hacia atrás.

7.Alinee la marca del ojal en el material con la marca en el prensatelas de ojales, y luego baje el prensatelas.

8.Mientras sostiene el hilo superior, haga funcionar la máquina.

54

Page 56
Image 56
Singer 5400 instruction manual Buttonhole foot

5400 specifications

The Singer 5400, a powerful and versatile sewing machine, combines modern technology with the timeless craftsmanship the Singer brand is known for. This model is designed for both beginners and experienced sewists, making it an ideal addition to any home sewing studio.

One of the standout features of the Singer 5400 is its user-friendly interface. It comes equipped with an LCD screen that displays stitch selection and settings clearly, allowing users to navigate with ease. The machine offers a variety of built-in stitches, including utility, decorative, and quilting stitches, providing countless options for creative projects. With a selection of over 100 stitches, the Singer 5400 allows you to customize your sewing experience, tailoring each project to your unique style.

The Singer 5400 also incorporates advanced sewing technologies. The automatic needle threader simplifies the threading process, ensuring that even novice users can get started quickly. Additionally, the drop-in bobbin feature enhances efficiency, allowing for easy winding and insertion. The machine features adjustable stitch length and width, giving users complete control over their sewing projects.

A notable characteristic of the Singer 5400 is its sturdy construction, which contributes to a smooth sewing experience. The heavy-duty metal frame ensures stability, reducing vibrations and allowing for precision stitching. This durability makes the 5400 suitable for a range of fabrics, from lightweight materials to thicker, more challenging textiles.

For those who enjoy quilting, the Singer 5400 includes a quilting foot and an extension table, providing ample workspace for larger projects. The free arm feature enables easy sewing around cuffs, collars, and other difficult-to-reach areas, making this machine a versatile choice for various sewing tasks.

Another innovative aspect of the Singer 5400 is its speed control, which allows users to adjust sewing speed for greater accuracy, particularly when working on intricate designs. The machine also features a reverse stitch option, enabling easy reinforcement of seams and hems.

Overall, the Singer 5400 is a well-rounded sewing machine that combines advanced technology with user-friendly features. Whether you're working on a simple repair or a complex quilting project, the Singer 5400 delivers reliability and performance, making it a valuable tool for any sewing enthusiast. With its blend of functionality and ease of use, the Singer 5400 is sure to inspire creativity in every sewist.