WINDING THE BOBBIN

PRÉPARATION DE LA CANETTE

DEVANADO DE LA BOBINA

Be sure to use Class 15 bobbins.

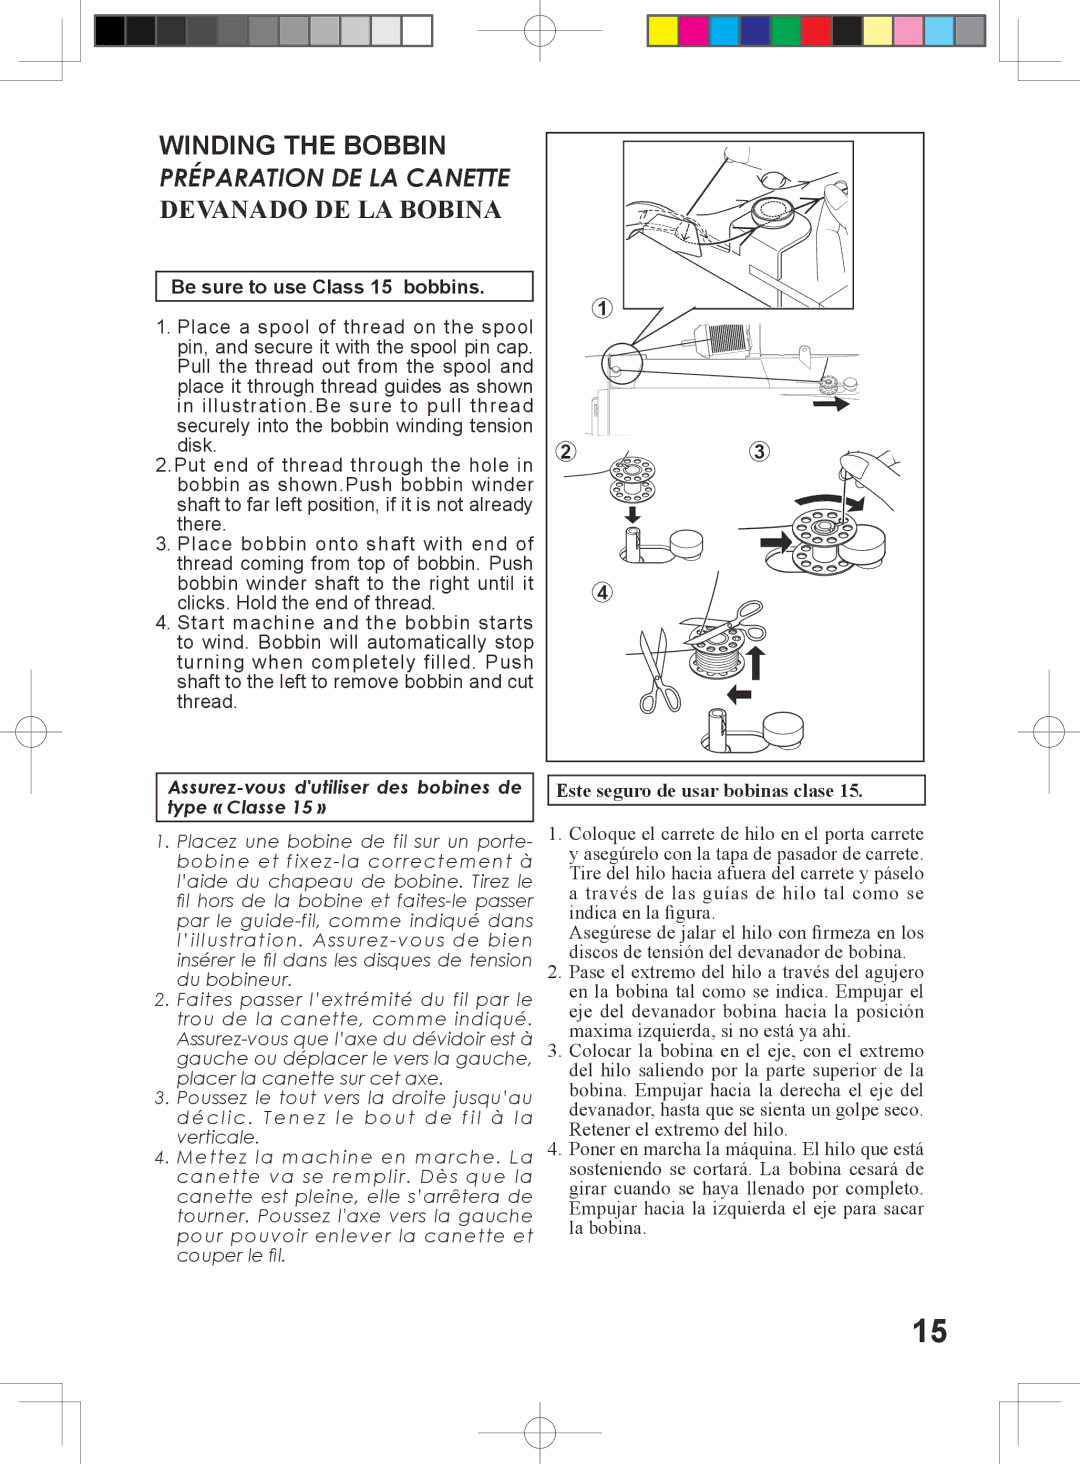
1. Place a spool of thread on the spool pin, and secure it with the spool pin cap. Pull the thread out from the spool and place it through thread guides as shown in illustration.Be sure to pull thread securely into the bobbin winding tension disk.

2.Put end of thread through the hole in bobbin as shown.Push bobbin winder shaft to far left position, if it is not already there.

3. Place bobbin onto shaft with end of thread coming from top of bobbin. Push bobbin winder shaft to the right until it clicks. Hold the end of thread.

4. Start machine and the bobbin starts to wind. Bobbin will automatically stop turning when completely filled. Push shaft to the left to remove bobbin and cut thread.

Assurez-vous d'utiliser des bobines de type « Classe 15 »

1.Placez une bobine de fil sur un porte- bobine et fixez-la correctement à l’aide du chapeau de bobine. Tirez le fil hors de la bobine et faites-le passer par le guide-fil, comme indiqué dans l’illustration. Assurez-vous de bien insérer le fil dans les disques de tension du bobineur.

2.Faites passer l’extrémité du fil par le trou de la canette, comme indiqué. Assurez-vous que l’axe du dévidoir est à gauche ou déplacer le vers la gauche, placer la canette sur cet axe.

3.Poussez le tout vers la droite jusqu’au d é c l i c . T e n e z l e b o u t d e f i l à l a verticale.

4.Mettez la machine en marche. La canette va se remplir. Dès que la canette est pleine, elle s’arrêtera de tourner. Poussez l'axe vers la gauche pour pouvoir enlever la canette et couper le fil.


1

2

3


4

Este seguro de usar bobinas clase 15.

1.Coloque el carrete de hilo en el porta carrete y asegúrelo con la tapa de pasador de carrete. Tire del hilo hacia afuera del carrete y páselo a través de las guías de hilo tal como se indica en la figura.

Asegúrese de jalar el hilo con firmeza en los discos de tensión del devanador de bobina.

2.Pase el extremo del hilo a través del agujero en la bobina tal como se indica. Empujar el eje del devanador bobina hacia la posición maxima izquierda, si no está ya ahi.

3.Colocar la bobina en el eje, con el extremo del hilo saliendo por la parte superior de la bobina. Empujar hacia la derecha el eje del devanador, hasta que se sienta un golpe seco.

Retener el extremo del hilo.

4.Poner en marcha la máquina. El hilo que está sosteniendo se cortará. La bobina cesará de girar cuando se haya llenado por completo. Empujar hacia la izquierda el eje para sacar la bobina.

15

Page 17
Image 17
Singer 5400 instruction manual Winding the Bobbin, Devanado DE LA Bobina

5400 specifications

The Singer 5400, a powerful and versatile sewing machine, combines modern technology with the timeless craftsmanship the Singer brand is known for. This model is designed for both beginners and experienced sewists, making it an ideal addition to any home sewing studio.

One of the standout features of the Singer 5400 is its user-friendly interface. It comes equipped with an LCD screen that displays stitch selection and settings clearly, allowing users to navigate with ease. The machine offers a variety of built-in stitches, including utility, decorative, and quilting stitches, providing countless options for creative projects. With a selection of over 100 stitches, the Singer 5400 allows you to customize your sewing experience, tailoring each project to your unique style.

The Singer 5400 also incorporates advanced sewing technologies. The automatic needle threader simplifies the threading process, ensuring that even novice users can get started quickly. Additionally, the drop-in bobbin feature enhances efficiency, allowing for easy winding and insertion. The machine features adjustable stitch length and width, giving users complete control over their sewing projects.

A notable characteristic of the Singer 5400 is its sturdy construction, which contributes to a smooth sewing experience. The heavy-duty metal frame ensures stability, reducing vibrations and allowing for precision stitching. This durability makes the 5400 suitable for a range of fabrics, from lightweight materials to thicker, more challenging textiles.

For those who enjoy quilting, the Singer 5400 includes a quilting foot and an extension table, providing ample workspace for larger projects. The free arm feature enables easy sewing around cuffs, collars, and other difficult-to-reach areas, making this machine a versatile choice for various sewing tasks.

Another innovative aspect of the Singer 5400 is its speed control, which allows users to adjust sewing speed for greater accuracy, particularly when working on intricate designs. The machine also features a reverse stitch option, enabling easy reinforcement of seams and hems.

Overall, the Singer 5400 is a well-rounded sewing machine that combines advanced technology with user-friendly features. Whether you're working on a simple repair or a complex quilting project, the Singer 5400 delivers reliability and performance, making it a valuable tool for any sewing enthusiast. With its blend of functionality and ease of use, the Singer 5400 is sure to inspire creativity in every sewist.