MODELS
TOOLS REQUIRED (FIG. 1)
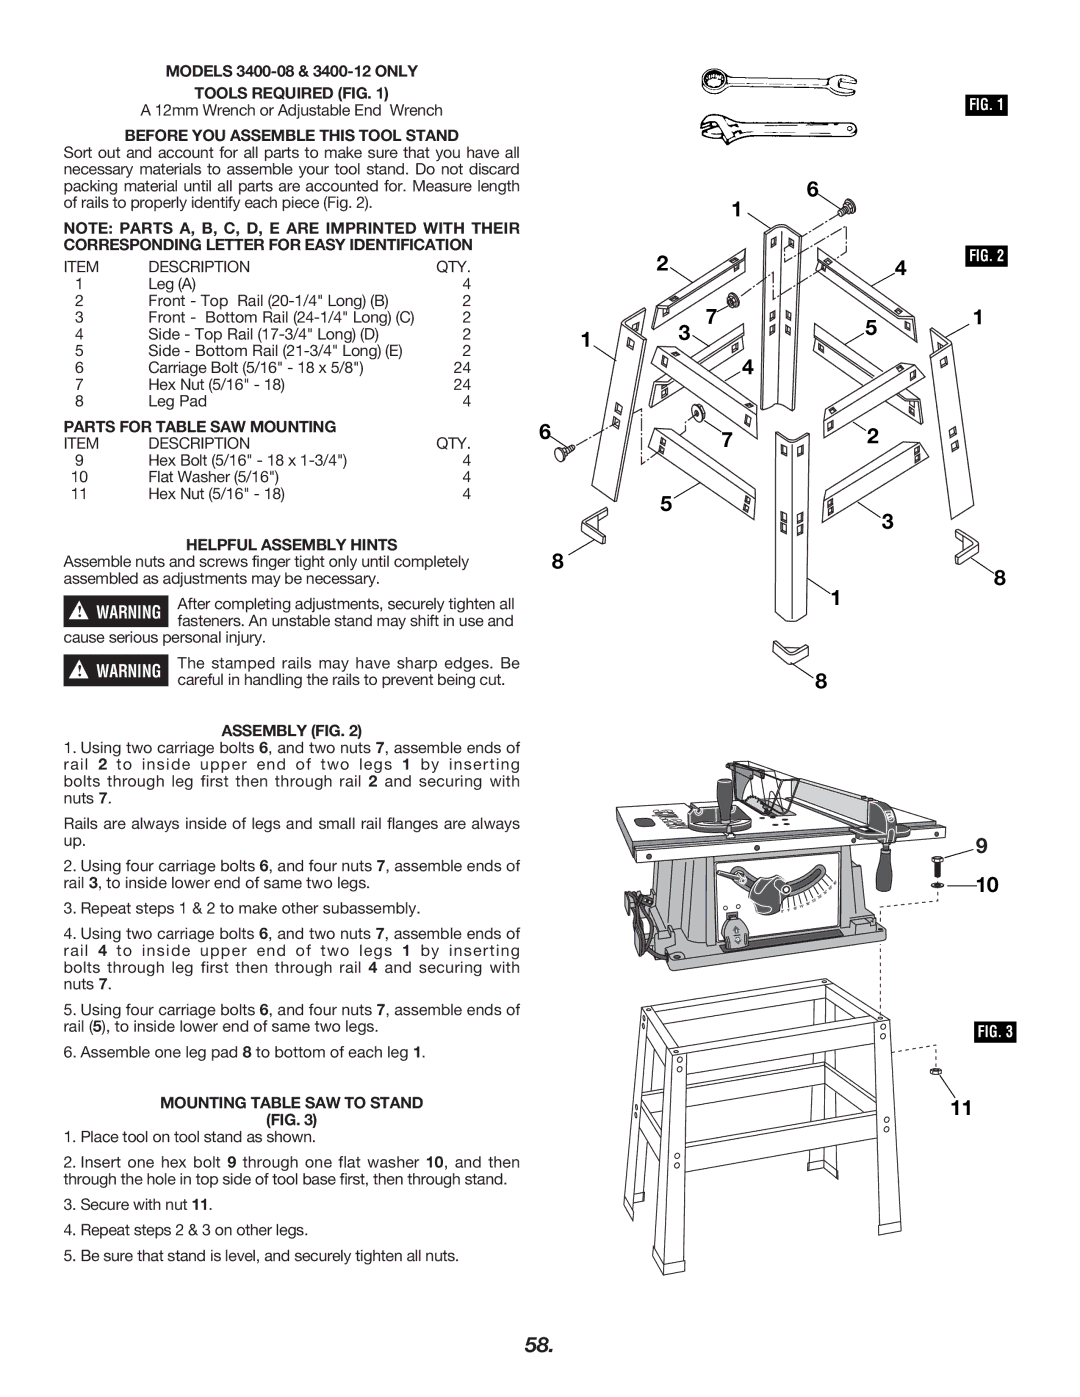
A 12mm Wrench or Adjustable End Wrench
BEFORE YOU ASSEMBLE THIS TOOL STAND
Sort out and account for all parts to make sure that you have all necessary materials to assemble your tool stand. Do not discard packing material until all parts are accounted for. Measure length of rails to properly identify each piece (Fig. 2).
NOTE: PARTS A, B, C, D, E ARE IMPRINTED WITH THEIR CORRESPONDING LETTER FOR EASY IDENTIFICATION
ITEM | DESCRIPTION | QTY. |
1 | Leg (A) | 4 |
2 | Front - Top Rail | 2 |
3 | Front - Bottom Rail | 2 |
4 | Side - Top Rail | 2 |
5 | Side - Bottom Rail | 2 |
6 | Carriage Bolt (5/16" - 18 x 5/8") | 24 |
7 | Hex Nut (5/16" - 18) | 24 |
8 | Leg Pad | 4 |
PARTS FOR TABLE SAW MOUNTING |
| |
ITEM | DESCRIPTION | QTY. |
9 | Hex Bolt (5/16" - 18 x | 4 |
10 | Flat Washer (5/16") | 4 |
11 | Hex Nut (5/16" - 18) | 4 |
HELPFUL ASSEMBLY HINTS
Assemble nuts and screws finger tight only until completely assembled as adjustments may be necessary.
After completing adjustments, securely tighten all fasteners. An unstable stand may shift in use and
cause serious personal injury.
!WARNING The stamped rails may have sharp edges. Be careful in handling the rails to prevent being cut.
ASSEMBLY (FIG. 2)
1.Using two carriage bolts 6, and two nuts 7, assemble ends of rail 2 to inside upper end of two legs 1 by inserting bolts through leg first then through rail 2 and securing with nuts 7.
Rails are always inside of legs and small rail flanges are always up.
2.Using four carriage bolts 6, and four nuts 7, assemble ends of rail 3, to inside lower end of same two legs.
3.Repeat steps 1 & 2 to make other subassembly.
4.Using two carriage bolts 6, and two nuts 7, assemble ends of rail 4 to inside upper end of two legs 1 by inserting bolts through leg first then through rail 4 and securing with nuts 7.
5.Using four carriage bolts 6, and four nuts 7, assemble ends of rail (5), to inside lower end of same two legs.
6.Assemble one leg pad 8 to bottom of each leg 1.
MOUNTING TABLE SAW TO STAND
(FIG. 3)
1.Place tool on tool stand as shown.
2.Insert one hex bolt 9 through one flat washer 10, and then through the hole in top side of tool base first, then through stand.
3.Secure with nut 11.
4.Repeat steps 2 & 3 on other legs.
5.Be sure that stand is level, and securely tighten all nuts.
|
| 1 | 6 |
|
|
| |
|
| 2 | 4 |
|
| 7 | 5 |
| 1 | 3 | |
|
|
| |
|
| 4 |
|
6 |
| 7 | 2 |
|
| 5 |
|
3
8
1
8
|
|
|
|
|
|
| º |
|
|
|
|
|
| º | 45 |
|
|
|
|
| º | 40 |
|
|
|
|
|
| 35 |
|
|
|
|
|
|
| º |
|
|
|
|
|
|
| 30 |
|
|
|
|
|
| 20º | 25º |
|
|
|
|
| 15º |
|
|
| |
| 5º | 10º |
|
|
|
| |
0º |
|
|
|
|
|
FIG. 1
FIG. 2
1
8
9
10
FIG. 3
11
58.