Troubleshooting, Adjustments, & Service

TROUBLESHOOTING

WARNING

Troubleshooting procedures are provided in the following chart. To use these procedures, first locate the problem description that best describes the trouble that you have encountered. Check the possible causes one at a time in the order that they are listed. Correct any problems that are found and try to operate the rotary tiller again to see if you have eliminated the trouble.

For your safety, do not try to adjust or repair the tractor or rotary tiller while the engine is running. Always remove the key from the ignition switch before beginning maintenance to prevent accidental starting.

Symptom


Problem


Solution


Rotary tiller tines do not rotate.

1.

Drive belt or pulleys oily.

1

Clean as required.


2.

Tiller drive belt too loose.

2

Replace belt.


3.

Rock jammed in tiller.

3.

Remove it.


4.

Tiller drive belt broken.

4.

Replace as needed.


Tills too shallow

1.

Tiller depth set too low.

1.

Adjust the attachment lift.


2.

Engine RPM speed too low.

2.

Set engine to full speed.


3.

Tractor ground speed too fast.

3.

Slow down.


4.

Ground too hard.

4.

Make several passes, tilling


deeper on each pass.


Tiller leaves ground rough

1.

Ground too wet.

1.

Wait until sod does not ball up

with large clods.

2.

Tilling too deep in one pass.


when rolled in your hand.


3.

Tractor ground speed too fast.

2.

Make several passes.


3.

Slow down.

Tractor handles poorly.

1.

Tractor ground speed too fast.

1.

Use slower speed, especially when


2.

Front wheels lifting.


running on rough or sloping surfaces.


3.

Rear wheels slip.

2.

Clean dirt from tiller. Use front wheel


counterweights and weight carrier.


4.

Tiller propels tractor.


3.

Use chains or wheel weights.


4.

Tiller depth set too low.


Troubleshooting

TINE REPLACEMENT

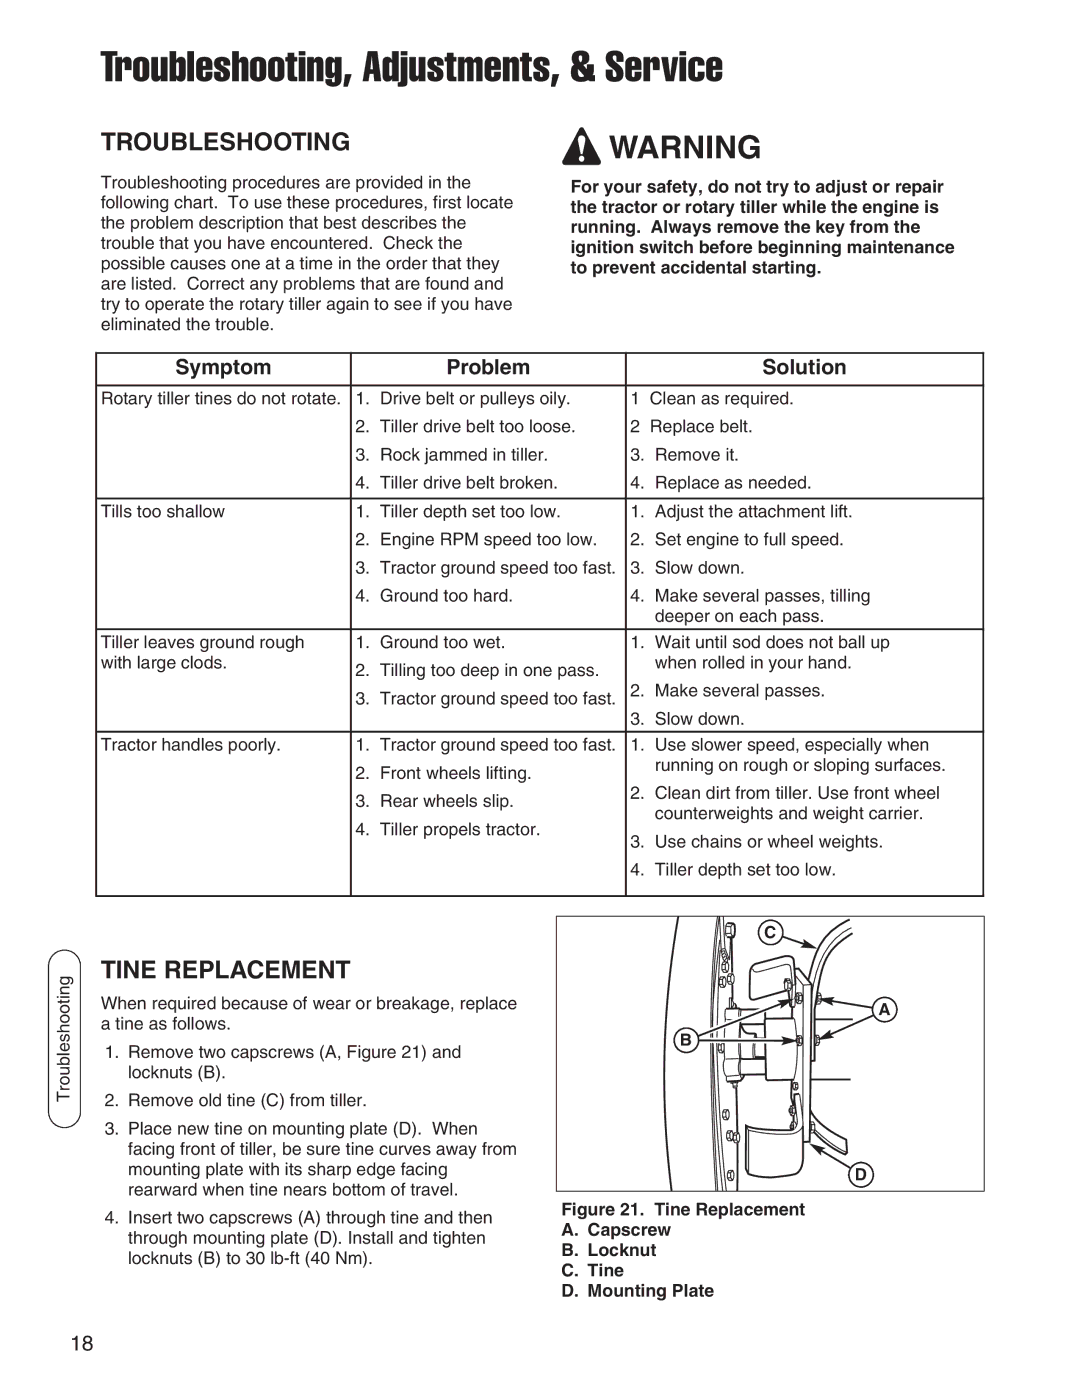
When required because of wear or breakage, replace a tine as follows.

1.Remove two capscrews (A, Figure 21) and locknuts (B).

2.Remove old tine (C) from tiller.

3.Place new tine on mounting plate (D). When facing front of tiller, be sure tine curves away from mounting plate with its sharp edge facing rearward when tine nears bottom of travel.

4.Insert two capscrews (A) through tine and then through mounting plate (D). Install and tighten locknuts (B) to 30 lb-ft (40 Nm).

C

A

B

D

Figure 21. Tine Replacement

A.Capscrew

B.Locknut

C.Tine

D.Mounting Plate

18

Page 18
Image 18
Snapper 1695419, 1694151 manual Troubleshooting, Adjustments, & Service, Tine Replacement, Symptom Problem Solution

1694151, 1695419 specifications

Snapper 1694151 and 1695419 are two innovative models from Snapper, a brand synonymous with quality outdoor power equipment. These models are particularly designed to provide exceptional performance and reliability while being user-friendly and efficient, catering to both residential and commercial users.

One of the standout features of Snapper 1694151 is its powerful engine, equipped with a robust propulsion system that ensures easy maneuverability across various terrains. It offers significant torque and speed, making it ideal for tackling demanding yard tasks efficiently. The engine is designed for low emissions, aligning with environmental standards while ensuring powerful performance.

In contrast, Snapper 1695419 comes with advanced technology that enhances user experience. One notable aspect is its enhanced cutting deck, which offers a larger cutting width compared to its predecessor. This feature enables quicker mowing sessions, significantly reducing the time spent on lawn maintenance. Additionally, the cutting system utilizes a unique design that improves grass collection and minimizes clumping, providing a cleaner cut.

Both models showcase Snapper's commitment to durability and ease of maintenance. They come equipped with all-season tires designed to provide excellent traction and stability, even in challenging conditions. The materials used in construction are heavy-duty yet lightweight, ensuring the longevity of the equipment without compromising on portability.

User comfort is another essential consideration in the design of Snapper 1694151 and 1695419. Both models offer an ergonomically designed handle that provides superior comfort and grip, reducing fatigue during extended use. Furthermore, they incorporate adjustable seat options, allowing users to find their ideal operating position for enhanced control and visibility.

In terms of technology, Snapper has integrated features such as electric start options, allowing for instant ignition without the need for manual starting. The models are also compatible with various attachments, expanding their functionality for multiple tasks, such as snow removal or leaf collection.

Ultimately, Snapper 1694151 and 1695419 stand out for their blend of power, efficiency, and user-friendliness. Designed for both weekend warriors and full-time landscape professionals, these models underscore Snapper's dedication to crafting reliable, high-performance outdoor equipment to meet a wide range of lawn care needs. These innovative machines are poised to meet the diverse demands of users looking for quality in every blade of grass they cut.