Regular Maintenance

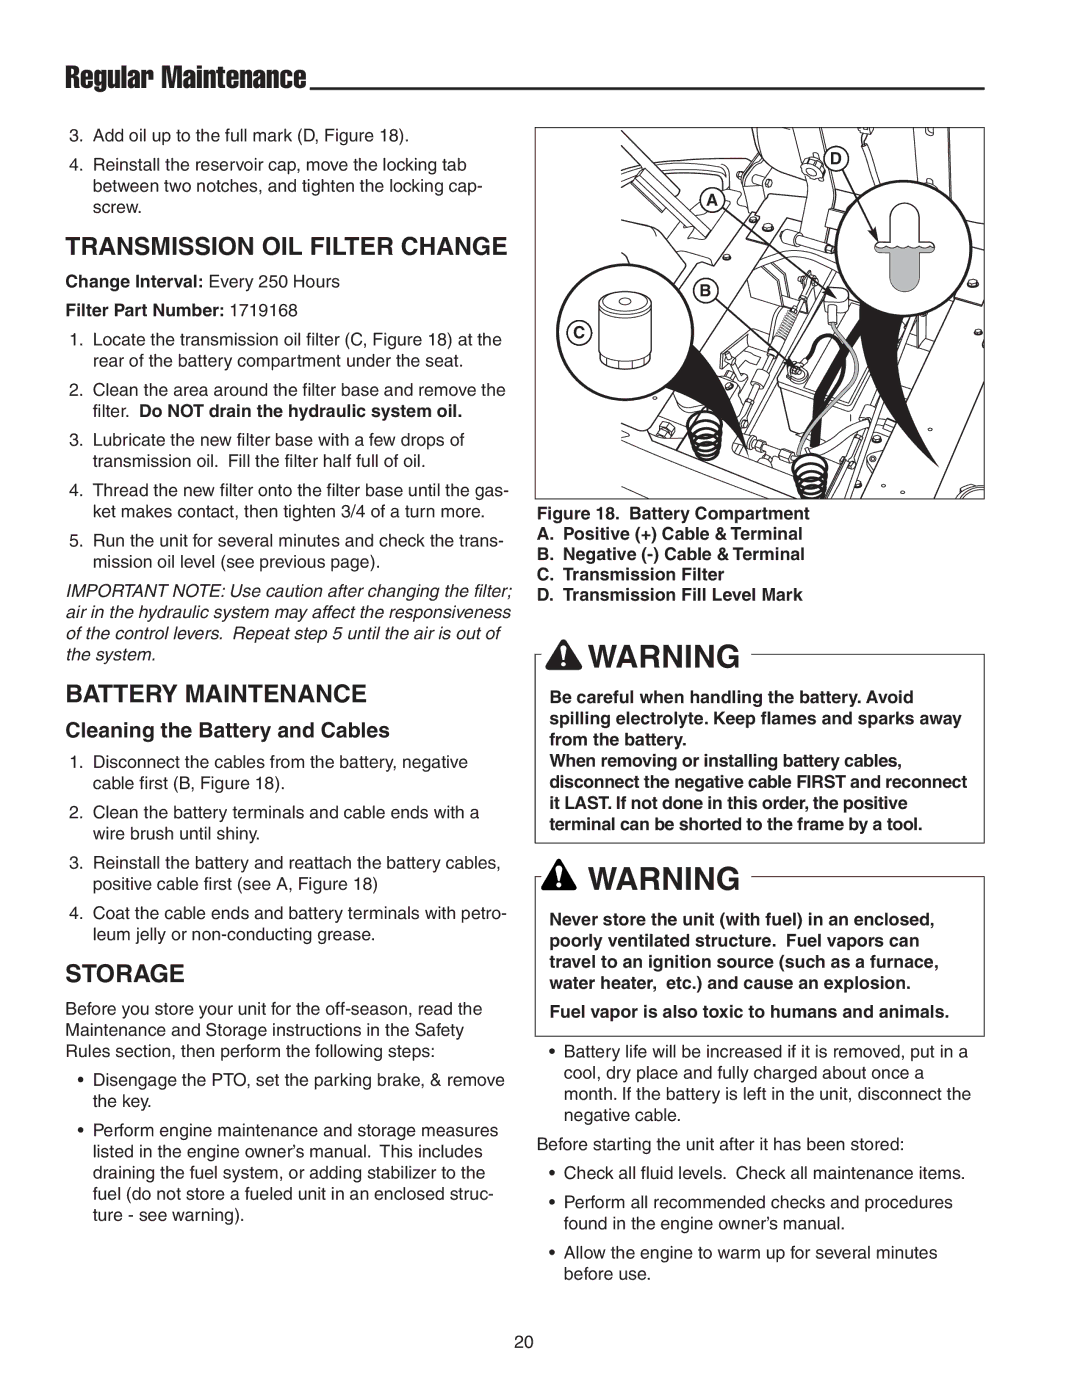
3.Add oil up to the full mark (D, Figure 18).

4.Reinstall the reservoir cap, move the locking tab between two notches, and tighten the locking cap- screw.

TRANSMISSION OIL FILTER CHANGE

Change Interval: Every 250 Hours

Filter Part Number: 1719168

1.Locate the transmission oil filter (C, Figure 18) at the rear of the battery compartment under the seat.

2.Clean the area around the filter base and remove the filter. Do NOT drain the hydraulic system oil.

3.Lubricate the new filter base with a few drops of transmission oil. Fill the filter half full of oil.

4.Thread the new filter onto the filter base until the gas- ket makes contact, then tighten 3/4 of a turn more.

5.Run the unit for several minutes and check the trans- mission oil level (see previous page).

IMPORTANT NOTE: Use caution after changing the filter; air in the hydraulic system may affect the responsiveness of the control levers. Repeat step 5 until the air is out of the system.

BATTERY MAINTENANCE

Cleaning the Battery and Cables

1.Disconnect the cables from the battery, negative cable first (B, Figure 18).

2.Clean the battery terminals and cable ends with a wire brush until shiny.

3.Reinstall the battery and reattach the battery cables, positive cable first (see A, Figure 18)

4.Coat the cable ends and battery terminals with petro- leum jelly or non-conducting grease.

STORAGE

Before you store your unit for the off-season, read the Maintenance and Storage instructions in the Safety Rules section, then perform the following steps:

Disengage the PTO, set the parking brake, & remove the key.

Perform engine maintenance and storage measures listed in the engine owner’s manual. This includes draining the fuel system, or adding stabilizer to the fuel (do not store a fueled unit in an enclosed struc- ture - see warning).

D

A

B

C

Figure 18. Battery Compartment

A.Positive (+) Cable & Terminal

B.Negative (-) Cable & Terminal

C.Transmission Filter

D.Transmission Fill Level Mark

WARNING

Be careful when handling the battery. Avoid spilling electrolyte. Keep flames and sparks away from the battery.

When removing or installing battery cables, disconnect the negative cable FIRST and reconnect it LAST. If not done in this order, the positive terminal can be shorted to the frame by a tool.

WARNING

Never store the unit (with fuel) in an enclosed, poorly ventilated structure. Fuel vapors can travel to an ignition source (such as a furnace, water heater, etc.) and cause an explosion.

Fuel vapor is also toxic to humans and animals.

Battery life will be increased if it is removed, put in a cool, dry place and fully charged about once a month. If the battery is left in the unit, disconnect the negative cable.

Before starting the unit after it has been stored:

Check all fluid levels. Check all maintenance items.

Perform all recommended checks and procedures found in the engine owner’s manual.

Allow the engine to warm up for several minutes before use.

20

Page 21
Image 21
Snapper 18HP, 19HP manual Transmission OIL Filter Change, Battery Maintenance, Storage, Cleaning the Battery and Cables

18HP, 19HP specifications

The Snapper 18HP and 19HP mowers are powerful and versatile machines designed for residential and light commercial use. Known for their reliability and efficient performance, these mowers are well-suited for homeowners looking to maintain their lawns with ease and precision.

One of the standout features of the Snapper 18HP and 19HP models is their robust engine performance. With an 18 or 19 horsepower engine, these mowers deliver ample power to tackle a variety of grass types and challenging terrains. The engines are designed for optimal fuel efficiency without sacrificing performance, ensuring that users can complete their mowing tasks without frequent refueling.

Another significant characteristic of the Snapper mowers is their cutting technology. The models are equipped with a high-performance cutting deck that provides a clean and even cut, promoting healthy grass growth. The adjustable cutting heights allow users to choose the perfect setting for their lawn, accommodating different grass types and seasonal needs. This versatility makes the Snapper mowers ideal for various landscaping projects, whether it’s a manicured lawn or a more rugged field.

The Snapper 18HP and 19HP mowers also showcase advanced ergonomic design. The comfortable seating and intuitive control systems enable users to operate the mower with ease. The strategically placed controls ensure that everything is within reach, providing a seamless mowing experience. Furthermore, the mowers feature a tight turning radius, allowing for superior maneuverability around obstacles like trees and flower beds.

Additionally, these mowers come with durable construction, made from high-quality materials that withstand the rigors of regular use. The heavy-duty steel frame ensures longevity, while the rust-resistant finish helps the machine maintain its appearance over time. Maintenance is made simple with easily accessible components, allowing users to perform routine checks and services without difficulty.

Safety features are also integrated into the design of Snapper mowers. The presence of safety switches and a robust braking system ensures that operators can mow with confidence, minimizing the risk of accidents.

In summary, the Snapper 18HP and 19HP mowers blend power, efficiency, and comfort into one comprehensive package. With their advanced cutting technology, ergonomic design, and durable construction, they are excellent choices for anyone looking to maintain their lawn effectively. Whether you're a seasoned landscaper or a weekend warrior, these mowers deliver the performance and reliability you need.