Step 1: Opening the Computer
First turn off computer and remove / unplug all power cables!
Remove computer cover as directed in the User’s Manual.
Step 2: SCSI Configuration
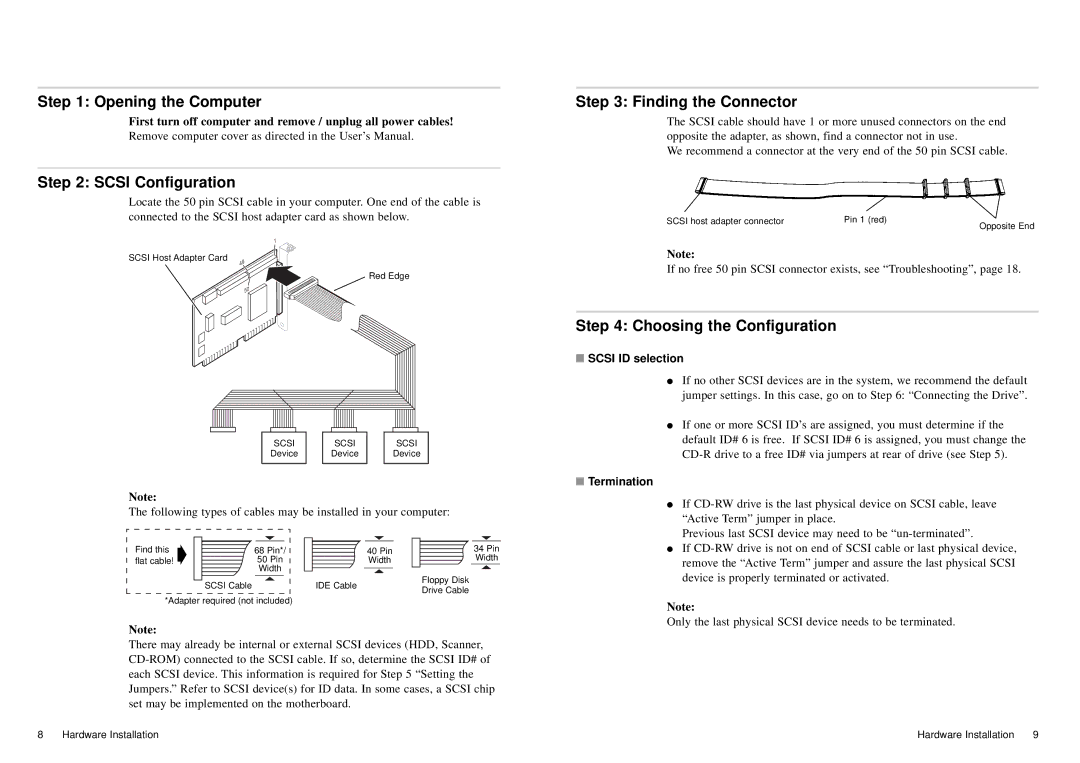
Locate the 50 pin SCSI cable in your computer. One end of the cable is connected to the SCSI host adapter card as shown below.
1
SCSI Host Adapter Card
49
Red Edge
50
SCSI | SCSI | SCSI |
Device | Device | Device |
Note:
The following types of cables may be installed in your computer:
Step 3: Finding the Connector
The SCSI cable should have 1 or more unused connectors on the end opposite the adapter, as shown, find a connector not in use.
We recommend a connector at the very end of the 50 pin SCSI cable.
SCSI host adapter connector | Pin 1 (red) |
| Opposite End |
Note:
If no free 50 pin SCSI connector exists, see “Troubleshooting”, page 18.
Step 4: Choosing the Configuration
■ SCSI ID selection |
● If no other SCSI devices are in the system, we recommend the default |
jumper settings. In this case, go on to Step 6: “Connecting the Drive”. |
● If one or more SCSI ID’s are assigned, you must determine if the |
default ID# 6 is free. If SCSI ID# 6 is assigned, you must change the |
■ Termination |
● If |
“Active Term” jumper in place. |
Previous last SCSI device may need to be |
Find this |
|
|
|
| |
| 68 Pin*/ | ||||
flat cable! ➧ |
|
| 50 Pin | ||
|
|
|
| Width |
|
|
|
| SCSI Cable | ||
|
|
| |||
*Adapter required (not included)
40 Pin
Width
IDE Cable
34 Pin
Width
Floppy Disk
Drive Cable
● If |
remove the “Active Term” jumper and assure the last physical SCSI |
device is properly terminated or activated. |
Note:
Note:
There may already be internal or external SCSI devices (HDD, Scanner,
Only the last physical SCSI device needs to be terminated.
8 | Hardware Installation | Hardware Installation | 9 |
