Mini Hi-Fi Component System
DHCMD5 3-858-047-12 1EN
TableofContents
Connect the speakers
Hookingupthesystem
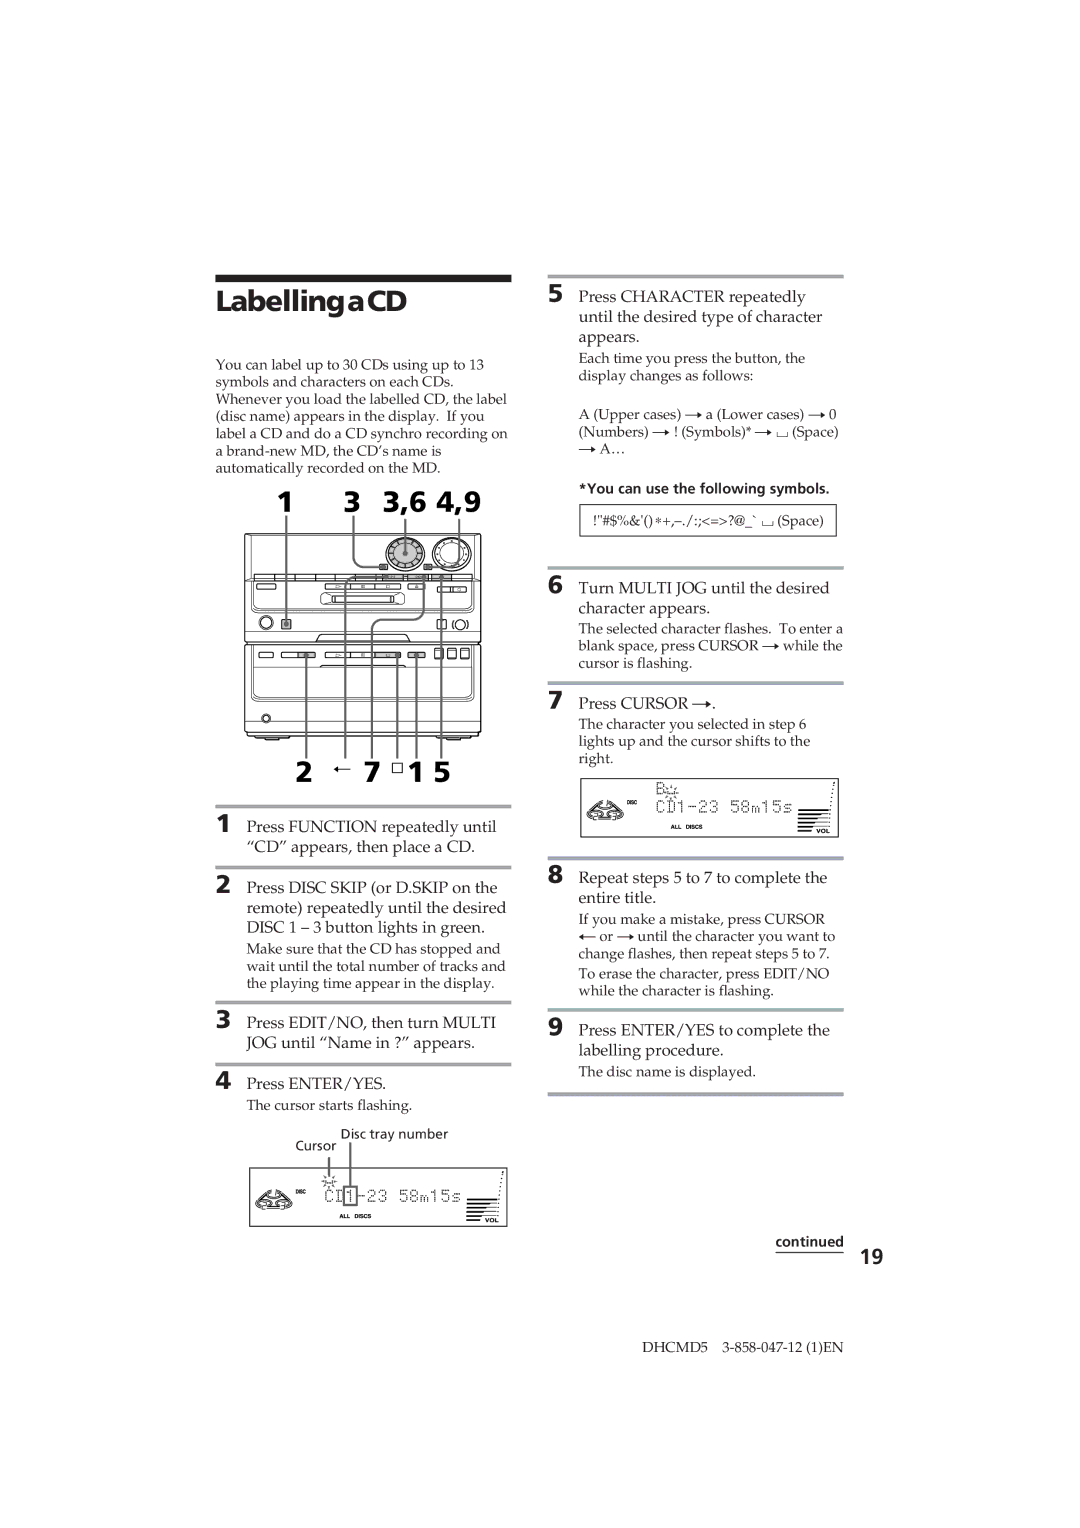
Inserting two R6 size AA batteries into the remote
Setting the time
To change the preset time
4 3,5
3,6
Presetting radiostations
To tune in a station with a weak signal
To change the preset number
Connecting a video game
Connectingoptional AVcomponentsand outdooraerials
Connecting audio components
FM aerial
Connecting outdoor aerials
Connecting optional AV components and outdoor aerials
Connecting an MD/DAT deck
Basic Operations
PlayingaCD
Press ¤and place a CD on the disc tray
Press one of the Disc 1 3 buttons
Insert a recordable MD
RecordingaCD
Playing a CD
CD Synchro Recording
To stop recording
Press ¤on the CD player and place a CD on the disc tray
Press ¸ on the MD deck
To record only the first track on each CD Hit Parade
Insert an MD
PlayinganMD
Press á
To listen to non-preset radio stations
Preset Tuning
Listeningtotheradio
Press rREC
Recordingfromthe radio
To check the total playing time and the number of tracks on
UsingtheCDdisplay
To cancel Repeat Play
PlayingtheCDtracks repeatedly
PlayingtheCDtracks inrandomorder
To cancel Shuffle Play
Shuffle Play
Programme Play
ProgrammingtheCD tracks
To check the total number of the programmed tracks
Loop
LoopingpartofaCD
Difference between Normal and Rhythm
3,6 4,9
LabellingaCD
7 ¹1
Labelling a CD
UsingtheMDdisplay
To cancel labelling
Checking the remaining time of a track
PlayingtheMDtracks repeatedly
Press Display in stop mode
Checking the remaining time of a disc
¹ 3
PlayingtheMDtracks ProgrammingtheMD Inrandomorder tracks
Shuffle Play Programme Play
Other digital components
When the source you record from is This system’s CD player
Beforeyoustart recording
Repeat steps 3 and 4 to programme other tracks Press á
Start playing the source to be recorded
RecordingonanMD manually
Before you start recording
Press ¸ of the MD deck
While TOC lights up or is flashing
When Rec Level Over appears
Markingtrack numbers
Marking track numbers at a specific point while recording
Marking track numbers
To cancel the track marking
3,4
Marking track numbers automatically while analog recording
Erase Function
Erasingrecordings
2 3,4
Erasing a single track
Erasing a portion of a track
Erasing all tracks
Erasing recordings Erase Function
Turn Multi JOG until the new track position appears
Movingrecorded tracks
2,4 3,5
Move Function
While playing the MD, press ¸
Press ENTER/YES again when you find the point to be divided
Dividingrecorded tracks
Divide Function
Press EDIT/NO, then turn Multi JOG until Combine? appears
Press ENTER/YES again when you find the portion
Combiningrecorded tracks
Combine Function
2,5 3,8 ¸ 1 6
LabellinganMD
To erase all names
Adjustingthesound
To get a powerful sound
To check the names with the remote only
3,4,7 5,10
SelectingthePreset Equalizermenu
Labellingthepreset stations
To cancel the mode
To erase the name
UsingtheRadioData SystemRDS
What is the Radio Data System?
Receiving RDS broadcasts
To check the RDS information
Using the Radio Data System RDS
3,5 2,4,6
Locating a station by programme type PTY
To check the remaining time
Sleep Timer
To cancel the Sleep Timer function
Fallingasleepto music
Wakinguptomusic
Wake-up Timer
6,8
To cancel the timer operation
Timer-recordingradio programmes
5,7 10 9 Timerselect 4,5,8
To check the setting
Insert a recordable MD Turn off the power
Timer-recording radio programmes contined
Set the time to start recording
Precautions
Some tracks cannot be combined with others
Precautions
Cleaning the cabinet
Systemlimitationsof MDs
Track numbers cannot be marked
Sound may drop-out while searching the edited tracks
Guide to the Serial Copy Management System
CD Player
Troubleshooting
General
Speakers
Tuner
MD error messages
Troubleshooting
Specifications
AM tuner section
MD deck section
Tuner section
FM tuner section
Dbfb
Index