Digital Photo Printer
Owner’s Record
Declaration of Conformity
User Registration
Table of contents
What you can do with the printer
Printing 25/30 sheets at one time
On the demonstration mode
What you can do with the printer
Wide variety of prints available with your printer
Getting started
Identifying the parts
Printer front panel
Printer rear panel
Printer operation panel
Screen
Identifying the parts
Paper tray
10 GB
Open the operation panel while pressing PUSH/OPEN
Using the stylus and operation panel
Opening the operation panel
11 GB
Using the stylus and operation panel
12 GB
13 GB
Selecting an image or item on the screen
Tap directly on the image or item on the screen
Item or image is selected after you tap Enter
Printing an image from a Memory Stick
Connecting the printer
Inserting a Memory Stick or PC card
Printing an image from a PC card
Connecting to a television optional
15 GB
Connecting the printer Connecting the AC power cord
Connecting to a computer optional
16 GB
PC input indicator lights and the printer enters the PC mode
17 GB
Printing pack Contents
Preparing the printing pack
18 GB
Loading the print cartridge
Press the Power button to turn on the printer
Power indicator lights in green
19 GB
Loading the print cartridge
To replace the print cartridge
20 GB
Inserting the print paper
Set the print paper into the tray
21 GB
Inserting the print paper
22 GB
Insert it firmly until it clicks into place
When you connect your printer to your television
Printing selected images
23 GB
To display a preview image
Printing the selected image
Tap the image you want to print on the screen
24 GB
25 GB
To cancel the selection
Tap Enter or Print Quantity +
To print multiple images at a time
Press the Print button
26 GB
To stop printing
Printing all images or Dpof preset images at one time
What is DPOF?
27 GB
28 GB
Printing all images or Dpof preset images at one time
To return to the usual printing mode
Press the ALL or Dpof button again
To save the image with the selected effects
Adding effects to an image
What you can do with the Effect menu
29 GB
Adding effects to an image
To change the printer settings midway
You can tap Menu and change the settings
To print the edited image
Tap Edit
Procedures
Changing the image size and position
Tap the desired item to edit the image
Adjustment sub menu is displayed
Adjusting the pictures
Tap Adjustment
Tap Back
Items Procedures
Tap the desired adjustment item
Adjustment screen of the selected item is displayed
33 GB
Tap Filter
Adding a special filter to an image
Tap Enter
34 GB
Tap a filter you want to add to an image
35 GB
Items Filters
36 GB
Adding drawings, stamps, or characters Tool
What you can do with the Tool sub menu
Icons Tools Functions
To exit the Tool sub menu
37 GB
Tap the desired color box
To select the stroke weight for the pencil drawings, tap
Tool sub menu page 36, tap Pencil tool
Tap and draw a freehand line on the preview
39 GB
Tap Pencil tool to release the pencil tool mode
Repeat steps 2 through 6 to draw other line art
Drawing you made is fixed and pasted to the image
Tool sub menu page 36, tap Stamp tool
Tap on the preview image where you want to paste the stamp
Adding drawings, stamps, or characters Tool Pasting stamps
Tap the desired stamp
41 GB
Tap Stamp tool to release the stamp tool mode
To paste the same stamps, repeat steps 3 through
Stamp is fixed to the image
Tool sub menu page 36, tap Type tool
Tap the characters you want to input in the character table
42 GB
To select the color
43 GB
Character input screen is closed
To delete characters in the input box
44 GB
Adding drawings, stamps, or characters Tool
To input the same characters, repeat steps 4 through
Characters are fixed to the image
What you can do with the Creative Print menu
During or after the Creative Print procedures
Making various prints Creative Print
45 GB
To print the Creative Print image
Making various prints Creative Print
To display the preview image only
To exit the Creative Print menu
Tap the desired paper size icon
Making a card
Tap Card in the main Creative Print menu
47 GB
Tap the desired template
Entering a greeting
48 GB
49 GB
Entering characters
Selecting images
Thumbnail list used for selecting an image is displayed
Tap Done
Making a calendar
Tap Calendar in the main Creative Print menu
51 GB
Tap Sunday or Monday
Setting the calendar
Screen used for setting the calendar is displayed
Tap Sunday in red or Sunday in red/Saturday in blue
Making a split print
Tap Split Images in the main Creative Print menu
53 GB
Select and adjust an image
Tap an image area
For details on selecting an image, see Selecting images on
Tap Sticker in the main Creative Print menu
Making a sticker
Making a 9-split image sticker with a frame
Tap the desired 9-split template
Tap the desired frame
Select and adjust the desired image
Making a 9-split image sticker without a frame
56 GB
Tap the desired pattern of image alignment
Making an index print
Tap Index Print in the main Creative Print menu
57 GB
Tap Done
Check the preview and press the Print button
Tap Creative Print to exit the Creative Print menu 58 GB
To display the Menu screen, tap Menu on the operation panel
Setting up the printer Menu
What you can do with the Menu
To exit the Menu
Tap Menu
Tap Set Up
Tap the setting items you want to select
60 GB
Items Settings Contents
61 GB
Setting the printer Menu
62 GB
Menu screen is displayed again
Screen Setup screen is displayed
Setting video output and LCD screen contrast
Tap Screen Setup
Set the video output or LCD screen contrast
To stop the slideshow
Viewing a slideshow
Tap Slideshow
64 GB
Tap Delete Image
Deleting images
Deleting selected images
65 GB
Formatting a Memory Stick
Tap Yes to delete the image or No to cancel deletion
Deleting images
To exit the Menu, tap Menu
Using your printer with Windows computers
System requirements
67 GB
Click Next
When using Windows 98/98SE/Me
Installing the USB driver
68 GB
Click Finish
Sony DPP-SV77 USB driver is installed
To check the installation
69 GB
Select the language for the application, then click OK
Using your printer with Windows computers
Installing the printer driver and reader software
70 GB
Click Browse
Check Local printer and click Next
Click Have Disk
Drives box, select the CD-ROM drive
When using Windows 2000 Professional
Setup Complete dialog box is displayed
Select Sony DPP-SV77 and click Next
73 GB
Uninstalling the printer driver
Uninstalling the software
Uninstalling the Sony DPP-SV77
74 GB
75 GB
76 GB
Using the reader software
77 GB
Set the printer
Print Setup dialog box appears
Choose When you make
78 GB
79 GB
To set properties of the printer
Set the print range and copies and click Print
Graphics tab
When the data is in the printer queue
Stopping printing midway when printing from your computer
When a printing dialog box is on the screen
80 GB
Connect your Macintosh and the printer
Using your printer with Macintosh computers
Installing the printer driver
Turn on the printer and start your Macintosh
Double-click Setup Program Click Install
Using your printer with Macintosh computers
Uninstalling the printer driver
82 GB
Choose the printer settings
83 GB
84 GB
On installation
Precautions
On safety
On moisture condensation
On transport
Precautions
On cleaning
On restrictions on duplication
To protect Memory Stick Images
About the Memory Stick and PC card media
On Memory Stick
87 GB
About the Memory Stick and PC card media
88 GB
Television displays no images
Troubleshooting
LCD screen of the printer displays no images
Cannot print
Beeps sound
Troubleshooting
Or indicator is lit or an error message is displayed
Cannot remove the print cartridge
If paper jams
91 GB
Specifications
92 GB
Index
93 GB
Index
94 GB
Page
Avertissement
Enregistrement utilisateur
Opérations d’impression avancée
Configuration
Préparatifs
Impression depuis votre ordinateur
Fonction Super Coat
Fonctionnalités de l’imprimante
Impression de qualité photographique
Fonction d’impression fine automatique Auto Fine Print
Fonctionnalités de l’imprimante
Déballage de l’imprimante
Remarque
Identification des composants
Panneau avant de l’imprimante
Panneau arrière de l’imprimante
Panneau de commande de l’imprimante
Ecran
Identification des composants
Magasin à papier
10 FR
11 FR
Utilisation du crayon optique et du panneau de commande
Ouverture du panneau de commande
Une fois que vous avez fini
Utilisation du crayon optique et du panneau de commande
12 FR
Sélection d’une image ou d’un élément à l’écran
Appuyez directement sur l’image ou l’élément à l’écran
13 FR
Impression d’une image à partir d’un Memory Stick
Raccordement de l’imprimante
Insertion d’un Memory Stick ou d’une carte PC
Impression d’une image à partir d’une carte PC
Raccordement au téléviseur facultatif
Pour éjecter la carte PC
15 FR
Raccordement à un ordinateur facultatif
16 FR
17 FR
Remarque concernant le câble USB
Préparation du kit d’impression
18 FR
Kit d’impression Contenu
Ouvrez le capot du compartiment de la cartouche
’indicateur Power s’allume en vert
Chargement de la cartouche d’impression
19 FR
Chargement de la cartouche d’impression
Pour remplacer la cartouche d’impression
20 FR
Insertion du papier d’impression
Chargez le papier d’impression dans le magasin
21 FR
Insertion du papier d’impression
22 FR
Insérez fermement le magasin jusqu’à ce qu’il s’enclenche
23 FR
Le voyant Power s’allume en vert
Impression de l’image sélectionnée
Lorsque vous raccordez votre imprimante à votre téléviseur
24 FR
Impression de l’image sélectionnée
Pour afficher l’aperçu d’une image
Pour afficher une autre
Pour annuler la sélection
Appuyez sur Enter ou Print Quantity +
25 FR
Pour imprimer plusieurs images à la fois
Appuyez sur la touche Print
26 FR
Pour arrêter l’impression
27 FR
Qu’est-ce que le DPOF?
Pour revenir au mode d’impression habituel
28 FR
Appuyez sur le bouton ALL ou Dpof
Pour enregistrer l’image avec effet
Ajout d’effets à une image
Fonctions du menu Effect
29 FR
30 FR
Ajout d’effets à une image
Pour imprimer l’image modifiée
Vous pouvez appuyer sur Menu et modifier les paramètres
Appuyez sur l’élément souhaité pour modifier l’image
Modification de la taille et de la position d’une image
Appuyez sur Edit
31 FR
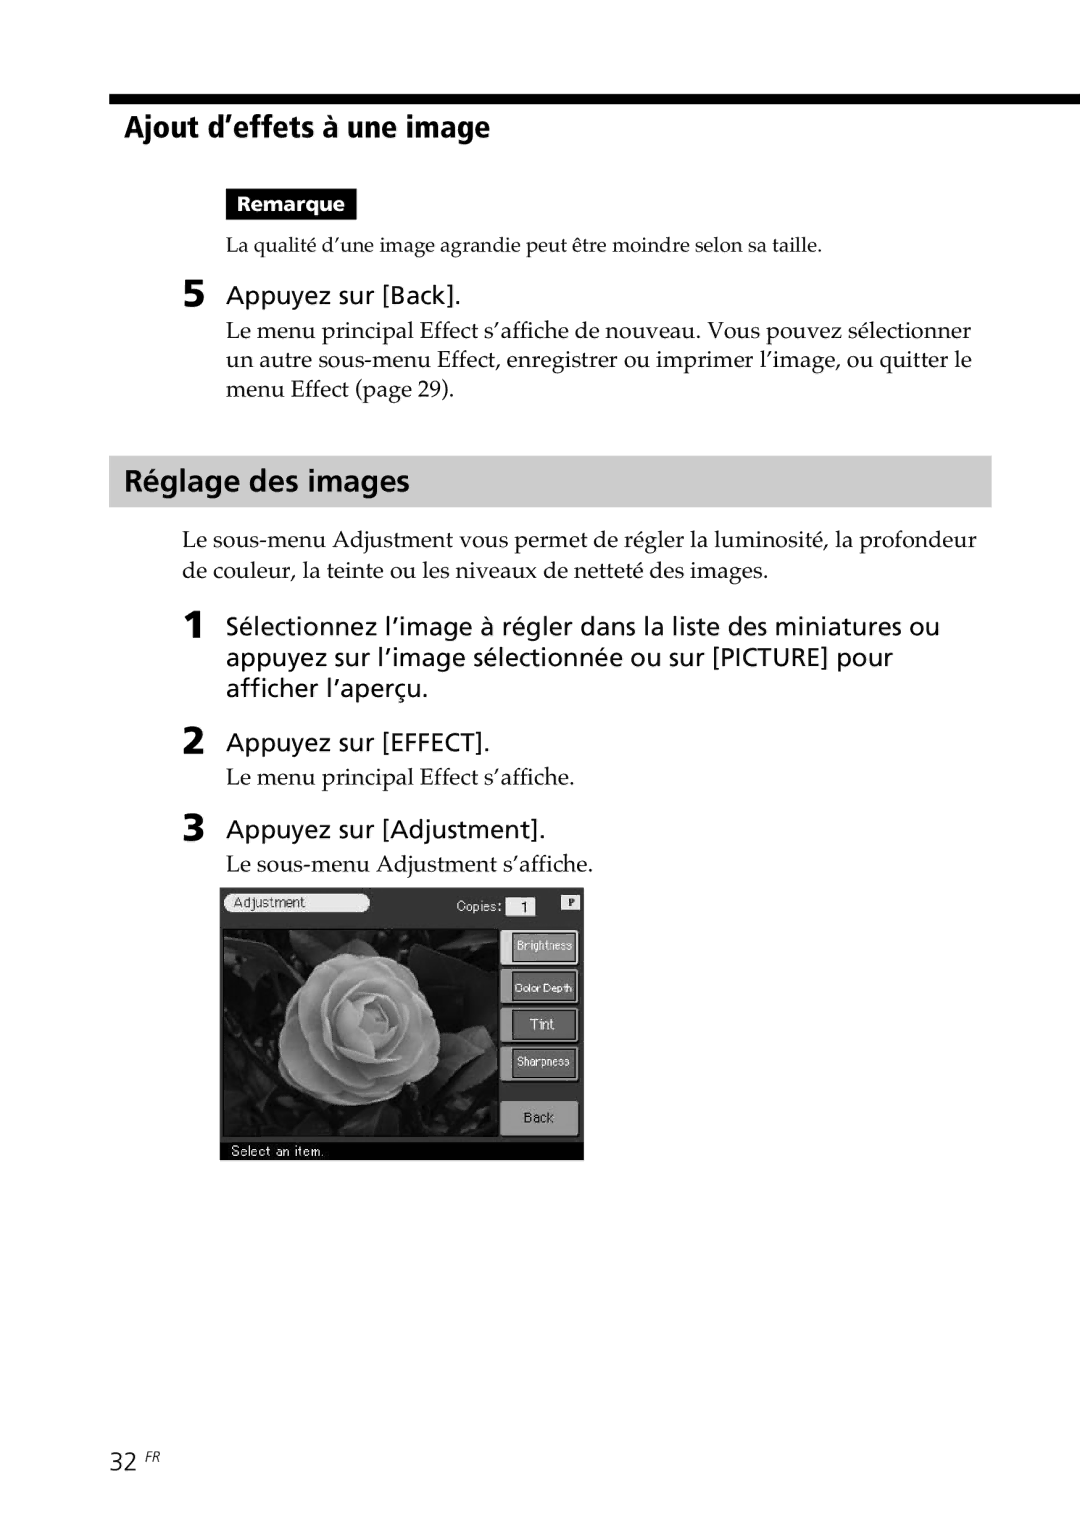
Réglage des images
Appuyez sur Adjustment
Le sous-menu Adjustment s’affiche
Appuyez sur Back
’écran de réglage de l’élément sélectionné s’affiche
Appuyez sur l’élément de réglage souhaité
33 FR
Eléments Procédures
Appuyez sur Filter
Ajout d’un filtre spécial à une image
Appuyez sur Enter
34 FR
35 FR
Eléments Filtres
36 FR
Ajout de dessins, vignettes ou caractères Tool
Fonctions du sous-menu Tool
Icônes Outils Fonctions
Pour quitter le sous-menu Tool
37 FR
38 FR
Dans le sous-menu Tool page 36, appuyez sur Outil crayon
Appuyez sur la couleur souhaitée
’écran de sélection de la couleur apparaît
Votre dessin est intégré et collé dans l’image
Répétez les étapes 2 à 6 pour dessiner des lignes
39 FR
Les dessins sont collés dans l’image
40 FR
Dans le sous-menu Tool page 36, appuyez sur outil vignette
Appuyez sur la vignette souhaitée
Pour annuler la vignette
La vignette est intégrée à l’image
Pour coller la les mêmes vignettes, répétez les étapes 3 à
41 FR
Les vignettes sont collées dans l’image
Pour basculer entre les écrans de saisie des caractères
Dans le sous-menu Tool page 36, appuyez sur Outil saisie
42 FR
Pour sélectionner les majuscules
Pour sélectionner la police
43 FR
’écran de saisie des caractères disparaît
Pour sélectionner la couleur
Les caractères sont intégrés à l’image
Ajout de dessins, vignettes ou caractères Tool
44 FR
Les caractères sont collés sur l’image
Pendant ou après les procédures Creative Print
Création d’impressions diverses Creative Print
Fonctions du menu Creative Print
45 FR
Pour imprimer l’image Creative Print
Création d’impressions diverses Creative Print
Pour afficher uniquement l’aperçu de l’image
Pour quitter le menu Creative Print
47 FR
Création d’une carte
Appuyez sur Card dans le menu principal Creative Print
Pour revenir au menu principal Creative Print
Appuyez sur le modèle souhaité
Insertion d’un message de vœux
48 FR
49 FR
Saisie des caractères
Sélection d’images
La liste des miniatures de sélection d’une image s’affiche
Appuyez sur Done
Création d’un calendrier
Appuyez sur Calendar dans le menu principal Creative Print
51 FR
’écran de définition du calendrier apparaît
Définition du calendrier
52 FR
Appuyez sur Sunday ou Monday
Appuyez sur Sunday in red ou Sunday in red/Saturday in blue
Création d’une impression en plusieurs portions
53 FR
Vous pouvez imprimer une image en 4, 9 ou 16 portions
Appuyez sur une zone images
Sélectionnez et réglez votre image
Appuyez sur le modèle en 9 portions souhaité
Création d’un autocollant
Appuyez sur Sticker dans le menu principal Creative Print
55 FR
56 FR
Création d’un autocollant d’image en 9 portions sans cadre
Appuyez sur le cadre souhaité
’écran de sélection d’une image s’affiche
57 FR
Création d’une impression d’index
Appuyez sur le format souhaité des alignements de l’image
’écran de sélection du titre apparaît
Apuyez sur Done
Vérifiez l’aperçu et appuyez sur la touche Print
Pour quitter le Menu
Configuration de l’imprimante Menu
Fonctions du Menu
59 FR
Appuyez sur le paramètre que vous souhaitez sélectionner
Appuyez sur Set Up
Appuyez sur Menu
60 FR
61 FR
Paramètres Réglages Fonctions
Paramètres Réglages
Configuration de l’imprimante Menu
62 FR
’écran Menu apparaît de nouveau
Réglez la sortie vidéo ou le contraste de l’écran LCD
Appuyez sur Screen Setup
Réglage de la sortie vidéo et du contraste de l’écran LCD
63 FR
Pour arrêter le diaporama
Affichage d’un diaporama
Appuyez sur Slideshow
64 FR
Appuyez sur Delete Image
Suppression d’images
Suppression des images sélectionnées
65 FR
Pour quitter l’écran Menu, appuyez sur Menu
Suppression d’images
Formatage du Memory Stick
66 FR
Configuration du système
Utilisation de l’imprimante sous Windows
67 FR
Cliquez sur Suivant
Installation du pilote USB
Utilisation sous Windows 98/98SE/Me
68 FR
Cliquez sur Terminer
Le pilote USB Sony DPP-SV77 est installé
Pour vérifier l’installation
69 FR
La boîte de dialogue Exécuter s’affiche
Utilisation de l’imprimante sous Windows
70 FR
La boîte de dialogue de bienvenue s’affiche
Cliquez sur Parcourir
Cochez la case Imprimante locale et cliquez sur Suivant
Cliquez sur Disquette fournie
10 Sélectionnez le lecteur de CD-ROM dans la zone Lecteurs
La boîte de dialogue de fin de l’installation s’affiche
Utilisation sous Windows 2000 Professional
72 FR
73 FR
Désinstallation du pilote d’imprimante
Désinstallation du logiciel
Désinstallation de Sony DPP-SV77
74 FR
75 FR
76 FR
Exécutez Setup.exe sur le CD-ROM fourni
Utilisation du logiciel de lecture
77 FR
78 FR
Configurez l’imprimante
Impression à partir d’une application
La boîte de dialogue Mise en page s’affiche
Sélectionnez Pour réaliser
Pour définir les propriétés de l’imprimante
79 FR
Onglet Graphiques
80 FR
Lorsquun message impression est à lécran
Lorsque les données sont dans la queue dimpression
La fenêtre Imprimantes s’affiche
Connectez votre Macintosh et l’imprimante
Installation du pilote d’imprimante
Utilisation de l’imprimante avec un Macintosh
81 FR
82 FR
Désinstallation du pilote d’imprimante
Utilisation de l’imprimante avec un Macintosh
Le dossier de la langue sélectionnée s’ouvre
Configurez l’imprimante en détail
83 FR
La boîte de dialogue Format d’impression s’affiche
84 FR
Sécurité
Installation
Précautions
85 FR
Transport
Précautions
Condensation d’humidité
Nettoyage
Pour protéger les images ’un Memory Stick
Propos du Memory Stick et de la carte PC
Propos du Memory Stick
87 FR
88 FR
Impossible d’imprimer
Guide de dépannage
Le téléviseur n’affiche aucune image
89 FR
Impossible de retirer la cartouche de l’imprimante
Guide de dépannage
’imprimante émet un bip sonore
90 FR
Bourrage de papier
91 FR
Spécifications
92 FR
93 FR
94 FR
Print Quantity
Page
Advertencia
Atención
Aviso a los usuarios
Registro del usuario
Instalación
Índice
Procedimientos iniciales
Operaciones básicas de impresión
Función Super Coat
Utilidades de la impresora
Impresión fotorealista
Función de impresión fina automática Auto Fine Print
Impresión continua de 25/30 hojas
Utilidades de la impresora
Selección del acabado de la impresión
Amplia variedad de impresiones con la impresora
Desembalaje de la impresora
Procedimientos
Identificación de los componentes
Panel frontal de la impresora
Panel posterior de la impresora
Panel de operaciones de la impresora
Pantalla
Identificación de los componentes
Bandeja del papel
10 ES
Abra el panel de operaciones mientras pulsa PUSH/OPEN
Uso del bolígrafo de contacto y del panel de operaciones
Apertura del panel de operaciones
11 ES
Uso del bolígrafo de contacto y del panel de operaciones
12 ES
13 ES
Selección de imágenes o elementos en pantalla
Toque directamente sobre la imagen o elemento en pantalla
El elemento o imagen se selecciona cuando se toca Enter
Impresión de una imagen de un Memory Stick
Conexión de la impresora
Inserción de un Memory Stick o tarjeta de PC
Impresión de una imagen de una tarjeta de PC
Conexión a un televisor opcional
15 ES
Conexión a un ordenador opcional
16 ES
17 ES
Advertencia sobre el uso del cable USB
Preparación del paquete de impresión
18 ES
Paquete de impresión Contenido
Carga del cartucho de impresión
Pulse el botón Power para encender la impresora
El indicador Power se ilumina en verde
19 ES
Carga del cartucho de impresión
Para sustituir el cartucho de impresión
20 ES
Inserción del papel de impresión
Ajuste el papel de impresión en la bandeja
21 ES
Inserción del papel de impresión
22 ES
Insértela firmemente hasta que quede encajada en su sitio
Impresión de la imagen seleccionada
23 ES
Cuando conecte la impresora a un televisor
Para mostrar una imagen de vista previa
Impresión de la imagen seleccionada
Toque la imagen en pantalla que desee imprimir
24 ES
25 ES
Para cancelar la selección
Toque Enter o Print Quantity +
Para imprimir varias imágenes en una operación
Pulse el botón Print
26 ES
Para detener la impresión
Impresión de todas las imágenes Dpof en una sola operación
27 ES
Descripción de Dpof
28 ES
Impresión de todas las imágenes Dpof en una sola operación
Para recuperar el modo de impresión habitual
Pulse de nuevo el botón ALL o Dpof
Para guardar la imagen con efectos
Adición de efectos a las imágenes
Utilidades del menú Effect
29 ES
Para imprimir la imagen editada
Puede pulsar Menu y cambiar los valores de configuración
Adición de efectos a las imágenes
Para cambiar los valores de la impresora durante el proceso
Toque el elemento deseado para editar la imagen
Cambio de la posición y tamaño de la imagen
Toque Edit
31 ES
Ajuste de las imágenes
Toque Adjustment
Aparece el submenú Adjustment
Toque Back
Se muestra la pantalla de ajustes del elemento seleccionado
Toque el elemento de ajuste deseado
33 ES
Elementos Procedimientos
Toque Filter
Adición de un filtro especial a las imágenes
Toque Enter
34 ES
Toque el filtro que desee añadir a la imagen
35 ES
Elementos Filtros
36 ES
Adición de dibujos, estampas o caracteres Tool
Utilidades del submenú Tool
Iconos Herramientas
Para salir del submenú Tool
37 ES
Toque y dibuje una línea a mano alzada en la vista previa
En el submenú Tool página 36, toque herramienta lapicero
Toque el cuadro de color deseado
38 ES
El dibujo creado se fija y se incorpora en la imagen
Repita los pasos 2 a 6 para dibujar figuras
39 ES
Los dibujos se incorporan en la imagen
En el submenú Tool página 36, toque herramienta estampa
Toque la estampa deseada
40 ES
Las estampas se incorporan en la imagen
41 ES
La estampa se fija en la imagen
Para deshacer la estampa
En el submenú Tool página 36, toque Herramienta escritura
Toque en la tabla de caracteres los que desee introducir
42 ES
Para seleccionar el color
43 ES
La pantalla de introducción de caracteres se cierra
Para eliminar caracteres del cuadro de introducción
44 ES
Durante o después de los procedimientos de Creative Print
Realización de diversos tipos de impresiones
Utilidades del menú Creative Print
45 ES
Para imprimir la imagen Creative Print
Realización de diversos tipos de impresiones Creative Print
Para visualizar solamente la imagen de vista previa
Para salir del menú Creative Print
Toque el icono del tamaño del papel que desee
Creación de tarjetas
Toque Card en el menú principal Creative Print
47 ES
Toque la plantilla deseada
Introducción de un saludo
48 ES
49 ES
Introducción de caracteres
Selección de una o varias imágenes
Aparece la lista de miniaturas para seleccionar la imagen
Toque Done
Creación de calendarios
Toque Calendar en el menú principal Creative Print
51 ES
Toque Sunday o Monday
Ajuste del calendario
Aparece la pantalla para ajustar el calendario
Toque Sunday in red o Sunday in red/Saturday in blue
Realización de impresiones con divisiones
Toque Split Images en el menú principal Creative Print
53 ES
Toque un área de imagen
Seleccione una imagen y ajústela
Toque Sticker en el menú principal Creative Print
Creación de etiquetas
Hacer una imagen de 9 divisiones con un marco
Toque la plantilla de 9 divisiones que desee
56 ES
Hacer una imagen de 9 divisiones sin marco
Toque el marco deseado
Se muestra la pantalla de selección de imágenes
Toque el patrón deseado de las alineaciones de la imagen
Realización de impresiones del índice
Toque Index Print en el menú principal Creative Print
57 ES
Toque Done
Compruebe la vista previa y pulse el botón Print
Para salir del Menu
Ajuste de la impresora Menu
Utilidades del Menu
59 ES
Toque el ajuste que desee seleccionar
Toque Set Up
Toque Menu
60 ES
61 ES
Elementos Ajustes
Ajuste de la impresora Menu
62 ES
La pantalla Menu aparece de nuevo
63 ES
Toque Screen Setup
Se muestra la pantalla Screen Setup
Se muestra la pantalla Menú página
Para detener la presentación de diapositivas
Visualización de presentaciones de diapositivas
Toque Slideshow
64 ES
Toque Delete Image
Eliminación de imágenes
Eliminación de una o varias imágenes seleccionadas
65 ES
Para salir del Menu, toque Menu
Eliminación de imágenes
Formateo del Memory Stick
66 ES
Puerto
Requisitos de sistema
67 ES
Unidad
Haga clic en Siguiente
Cuando se utiliza Windows 98/98SE/Me
Instalación del controlador USB
68 ES
El controlador USB DPP-SV77 Sony se instala
Haga clic en Finalizar
69 ES
Para comprobar la instalación
Aparece el cuadro de diálogo Ejecutar
Uso de la impresora con ordenadores equipados con Windows
70 ES
Aparece el cuadro de diálogo Bienvenido
Haga clic en Examinar
Marque Impresora local y haga clic en Siguiente
Haga clic en Utilizar disco
En el cuadro Unidades, seleccione la unidad de CD-ROM
Cuando se utiliza Windows 2000 Professional
Seleccione Sony DPP-SV77 y haga clic en Siguiente
73 ES
Desinstalación del controlador de impresora
Desinstalación del software
Desinstalación de Sony DPP-SV77
74 ES
Mediante el puerto USB
Configuración y, a continuación, Panel de control
Abra el Administrador de dispositivos, seleccione Sony DPP
De bus serie universal, y haga clic en Propiedades
76 ES
Uso del software lector
77 ES
Ajuste la impresora
Aparece el cuadro de diálogo Print Setup
Impresión mediante un software de aplicación
78 ES
1Ajuste Impresora en Sony DPP-SV77 2Ajuste Tamaño del papel
Para establecer propiedades de la impresora
79 ES
Elija Cuando realice
80 ES
Cuando el cuadro de diálogo imprimiendo está en pantalla
Cuando los datos aparcen en la cola de impresión
Se muestra la ventana Impresoras
Encienda la impresora e inicie el Macintosh
Instalación del controlador de impresora
Conecte el Macintosh y la impresora
81 ES
Desinstalación del controlador de impresora
Haga doble clic en Setup Program Haga clic en Install
Uso de la impresora con ordenadores Macintosh
82 ES
Ajuste la impresión en detalle
83 ES
84 ES
Instalación
Precauciones
Seguridad
85 ES
Transporte
Precauciones
Condensación de humedad
Limpieza
Para proteger las imágenes Del Memory Stick
Acerca de Memory Stick y tarjeta de PC
Memory Stick
87 ES
Acerca de Memory Stick y tarjeta de PC Notas sobre el uso
88 ES
El televisor no muestra las imágenes
Solución de problemas
La pantalla LCD de la impresora no muestra las imágenes
No es posible imprimir
Se oyen pitidos
Solución de problemas
El indicador or se ilumina o aparece un mensaje de error
No es posible extraer el cartucho de impresión
Si el papel se atasca
91 ES
Especificaciones
92 ES
Índice alfabético
93 ES
Índice alfabético
94 ES