Sony
Sony Corporation
Precaucion
Installing
Image Retention is not Coveredby Your Warranty
Use
For the set with a polarized AC power cord plug
For the set with a three-wire grounding type AC plug
Grounding or PoLarization
Antennas Outdoor Antenna Grounding
Service
Ventilation
Lightning
Be careful when moving the projection TV
Carry the projection TV in the specified manner
Page
Using Remote Control
Using Features
Using Menus
Features
Welcome
High-bandwidth Digital Content Protection
Uniform Brightness Screen TM KP-57/65WV700 only Special
VCR DVD
Overview
VCR
Video
Carrying Your Projection TV
Installing
Handle one on eachside
Pushup and release
TV Controls and Connectors
Front Video Controls
Video OUT
Memory
Power
KP-57165WV600 Front Panel
Off when
KP-57/65WV700 Front Panel
Timer LED
CHANNEL+ IvoLuME +
Infrared Receiver
OEo !j
Rear Panel
To other
Copy-protected
0utput
If you are connecting a VCR
Basic Connections Connecting a Cable or Antenna
Cable Box and Cable Only
Cable
Cable or Antenna Only
VHF Only
Cable Type
For best results, use this connection if you
Cable and Antenna
Company
Have a cable Antenna
Between
ANT to
AUX
For best results, use this connection if
Cable Box Cable Only
With this connection you can
7s-ohm coaxialcable Not supplied
To connect the cable box and cable
Coaxial cable
CAW cable unscrambledchannels
CAW Coaxial cable VHF/UHF cable
For best results, use this connection
To connect the cable box
Press SAT/CABLEFUNCTION
Equipment
Connecting Optional Equipment
About Using
Tape Editing
VCR and Cable
UsingS VIDEOjacks? Seepage
Coaxial cable
Watch VCR Press Video repeatedly Select
VCR and Cable Box
Using VIDEOjacks? See
Splitter, which is a small, inexpensive device that you can
Coaxial NW
Splitter
White to white, et
Cablesare often
Two VCRs for Tape Editing
To connect two VCRs for tape editing
Connect red to red
Page
To connect a satellite receiver
Satellite Receiver
CAW cable IllPJrPJ,Pdl
Press SAT/CABLEFUNCTION
Satellite Receiver and VCR
CAW cable
Page
To connect a DVD player with component video connectors
DVD Player with Component Video Connectors
Audio output
Illustration
DVD Player with Video and Audio Connectors
To connect a DVD player with A/V connectors
Componentvideo cables
Component Video Connectors
White to white, etc Connectred to red Audiocable
VlDEOjacks?
Cables are often Color-codedto connectors
Camcorder
See
For Improved Sound Quality, you
Audio Receiver
Want Play TVs Audio Through Your stereo system
Using the Control S Feature
Using Auto Setup
Setting Up the Channel List
To reset the TV to factory settings
Adjusting the Convergence Automatically Flash Focus
For details on using Setup Menu, see
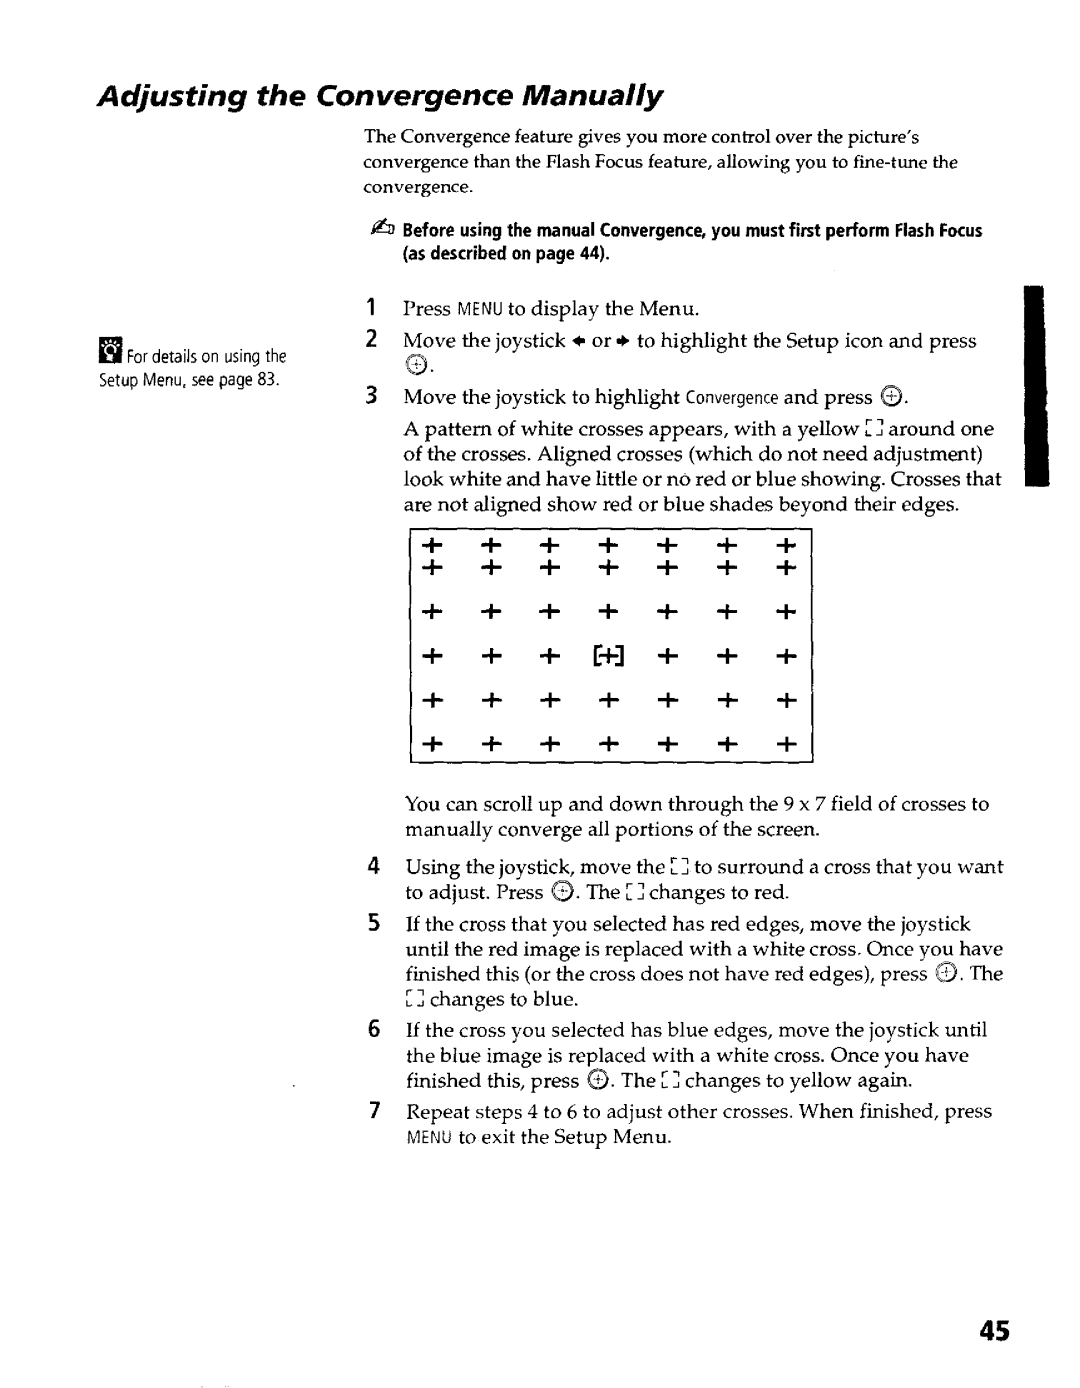
Adjusting the Convergence Manually
I- -I- -4- -I I- d- -I- -I
Adjusting Convergence Manually
Inserting Batteries
Outside Panel
Button Descriptions
Klv
Enter
Power
PIC Mode
Twin View
Disc Menu
Slide Switch
AVI/2/3/DVD
Press Codeset
Programming the Remote Control
Enter the three-digit manufacturers code number Press Enter
Corresponds
DVD Players
Manufacturers Codes VCRs
Laserdisc Players
Cable Boxes
Operating a VCR
Using Other Equipment with Your TV Remote Control
All Equipment
CH +/- lUMP
Operating a Cable Box
Laserdisc Player
This chapter describes how to use the features of your TV
Press TV Function
Press TV Power
Watching TV
ENTERor
Live preview window
Using the Scrolling Index
Press Index
To exit the Scrolling Index
WideZoom
Using Wide Mode
Possible to change between Wide Screen modes
Normal
Displaying Twin
Using Twin View
To cancel Twin View and watch the active picture
Pictures
Move Joystick
Activating the Picture
To activate Picture in the right Left Window
Functions Available in the Active Highlighted Window
Changing the Picture Size
Creating a List Favorite Channels
Using Favorite
Channels
Displaying a List Favorite Channels
Using the Freeze Function
Supported Image
Using the Memory Stick Picture Viewer
About Memory Stick
Types
Following
Unsupported Image Types
Display
DCF
To insert a Memory Stick
To remove a Memory Stick
Displaying Memory Stick Menu
FgtqTJ ,3
Buttons are available only if
Pageand folder
Larger images will take longer to display on screen
Changing Memory Stick Setup Options
Using the Rotate Picture Screen
PressMNUto enter Exit Menus
Navigating Through Menus
SAP
Video Menu includes the following options
Using the Video Menu
Selecting Video Options
To select the Video Menu
CineM0tion
Interlaced
Custom Clarity
Audio Menu includes the following options
Using the Audio Menu
Selecting Audio Options
To select the Audio Menu
VariabJe
Speaker Off Audio Out
To Off
Fixed
Selecting Screen Mode Options
Using the Screen Menu
Screen menu includes the following options
Vertical Center Wide Zoom
Full
Channel Menu Includes Following Options
Using the Channel Menu
Selecting Channel
To select the Channel Menu
Press
Parent Menu includes the following options
Using the Parent Menu
To select the Parent Menu
US Models Selecting Custom Rating Options
TV Rating Block programs by their rating, content or both
Content-Based Ratings
Movie Rating G PG-I NC-17
FrenchRating
For Canadian Models Custom Rating Menu
English Rating
AIRating
To select the Setup Menu
Using the Setup Menu
Selecting Setup Options
Caption Vision
If you select Skip, your 13/skips this input when you
CIock/Timers
Demo
Clock/Timers
Pages
Current Time
Page
This Chapter Includes Following Topics
480i 480p 720p 1080i
Formats used by HDTVHigh Definition TV
Precautions
Bol
Contacting Sony
Troubleshooting
Etc., to the factory default settings
Twin View
TV Function
Away from
If you
May
Video
GO0d sound
Audio
Use Auto program
6e paSSw0rdscreen epage
Specifications
Projecti0n Lenses
Cable VMC-810/820/830 HG Audio Cable RKC-515HG
Optional Accessories
MB MSA-32A 64 MB MSA-64A 128 MB MSA-128A
Control S
DVI. See Digital Visual Interface
Freeze
Menu button 48, 50, 56
Variable Audio Setting
On/off