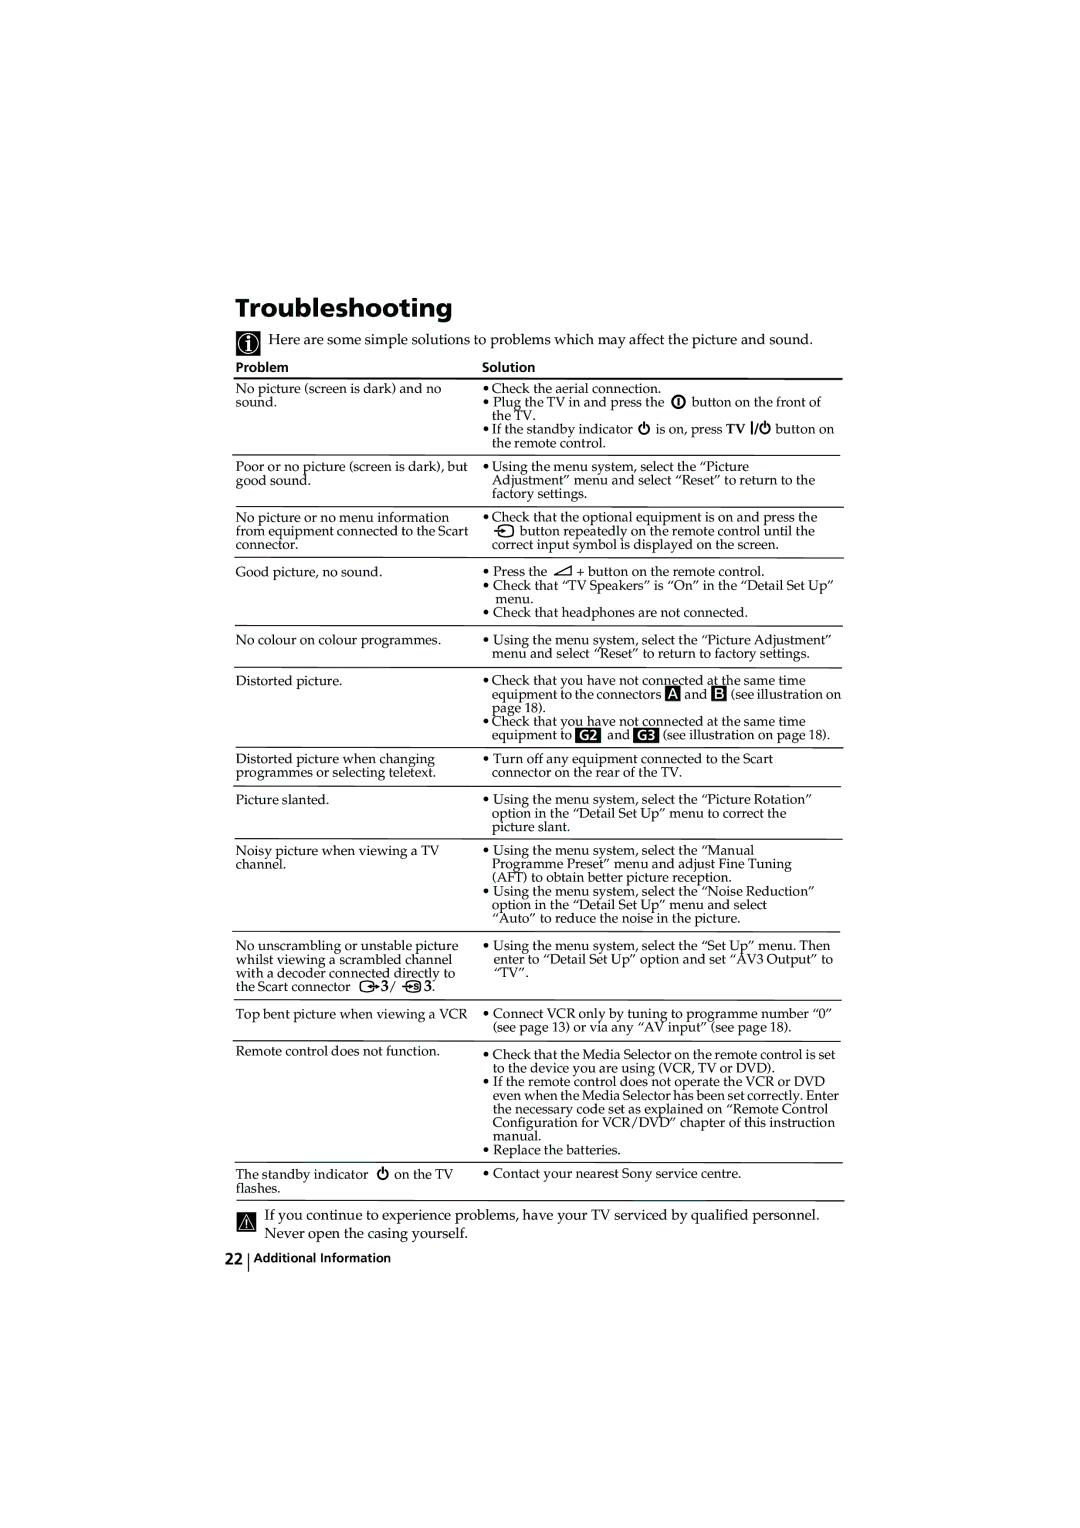
Troubleshooting
![]() Here are some simple solutions to problems which may affect the picture and sound.
Here are some simple solutions to problems which may affect the picture and sound.
Problem | Solution |
|
No picture (screen is dark) and no | • Check the aerial connection. |
|
sound. | • Plug the TV in and press the | button on the front of |
| the TV. |
|
•If the standby indicator ![]() is on, press TV
is on, press TV ![]()
![]()
![]() button on the remote control.
button on the remote control.
Poor or no picture (screen is dark), but good sound.
No picture or no menu information from equipment connected to the Scart connector.
Good picture, no sound.
•Using the menu system, select the “Picture Adjustment” menu and select “Reset” to return to the factory settings.
•Check that the optional equipment is on and press the
![]() button repeatedly on the remote control until the correct input symbol is displayed on the screen.
button repeatedly on the remote control until the correct input symbol is displayed on the screen.
•Press the ![]() + button on the remote control.
+ button on the remote control.
•Check that “TV Speakers” is “On” in the “Detail Set Up” menu.
•Check that headphones are not connected.
No colour on colour programmes. | • Using the menu system, select the “Picture Adjustment” | ||||
| menu and select “Reset” to return to factory settings. | ||||
Distorted picture. | • Check that you have not connected at the same time | ||||
| equipment to the connectors Aand B(see illustration on | ||||
| page 18). | ||||
| • Check that you have not connected at the same time | ||||
| equipment to | G2 | and | G3 | (see illustration on page 18). |
Distorted picture when changing | • Turn off any equipment connected to the Scart | ||||
programmes or selecting teletext. | connector on the rear of the TV. | ||||
Picture slanted. | • Using the menu system, select the “Picture Rotation” | ||||
| option in the “Detail Set Up” menu to correct the | ||||
| picture slant. | ||||
Noisy picture when viewing a TV channel.
•Using the menu system, select the “Manual Programme Preset” menu and adjust Fine Tuning (AFT) to obtain better picture reception.
•Using the menu system, select the “Noise Reduction” option in the “Detail Set Up” menu and select “Auto” to reduce the noise in the picture.
No unscrambling or unstable picture whilst viewing a scrambled channel with a decoder connected directly to the Scart connector ![]() 3/
3/ ![]() S 3.
S 3.
Top bent picture when viewing a VCR
Remote control does not function.
The standby indicator ![]() on the TV flashes.
on the TV flashes.
•Using the menu system, select the “Set Up” menu. Then enter to “Detail Set Up” option and set “AV3 Output” to “TV”.
•Connect VCR only by tuning to programme number “0” (see page 13) or via any “AV input” (see page 18).
•Check that the Media Selector on the remote control is set to the device you are using (VCR, TV or DVD).
•If the remote control does not operate the VCR or DVD even when the Media Selector has been set correctly. Enter the necessary code set as explained on “Remote Control Configuration for VCR/DVD” chapter of this instruction manual.
•Replace the batteries.
•Contact your nearest Sony service centre.
If you continue to experience problems, have your TV serviced by qualified personnel. Never open the casing yourself.
22
Additional Information
