INSTALLATION INSTRUCTIONS

I.aWARNINGI

To reduce the possibility of the unit tipping forward, you must reposition the front levelers to make contact with the floor. You will have to extend these legs when the unit Is finally positioned.

Step 6

Remove all packing materials and tape.

GRILLE REMOVAL

Step 7

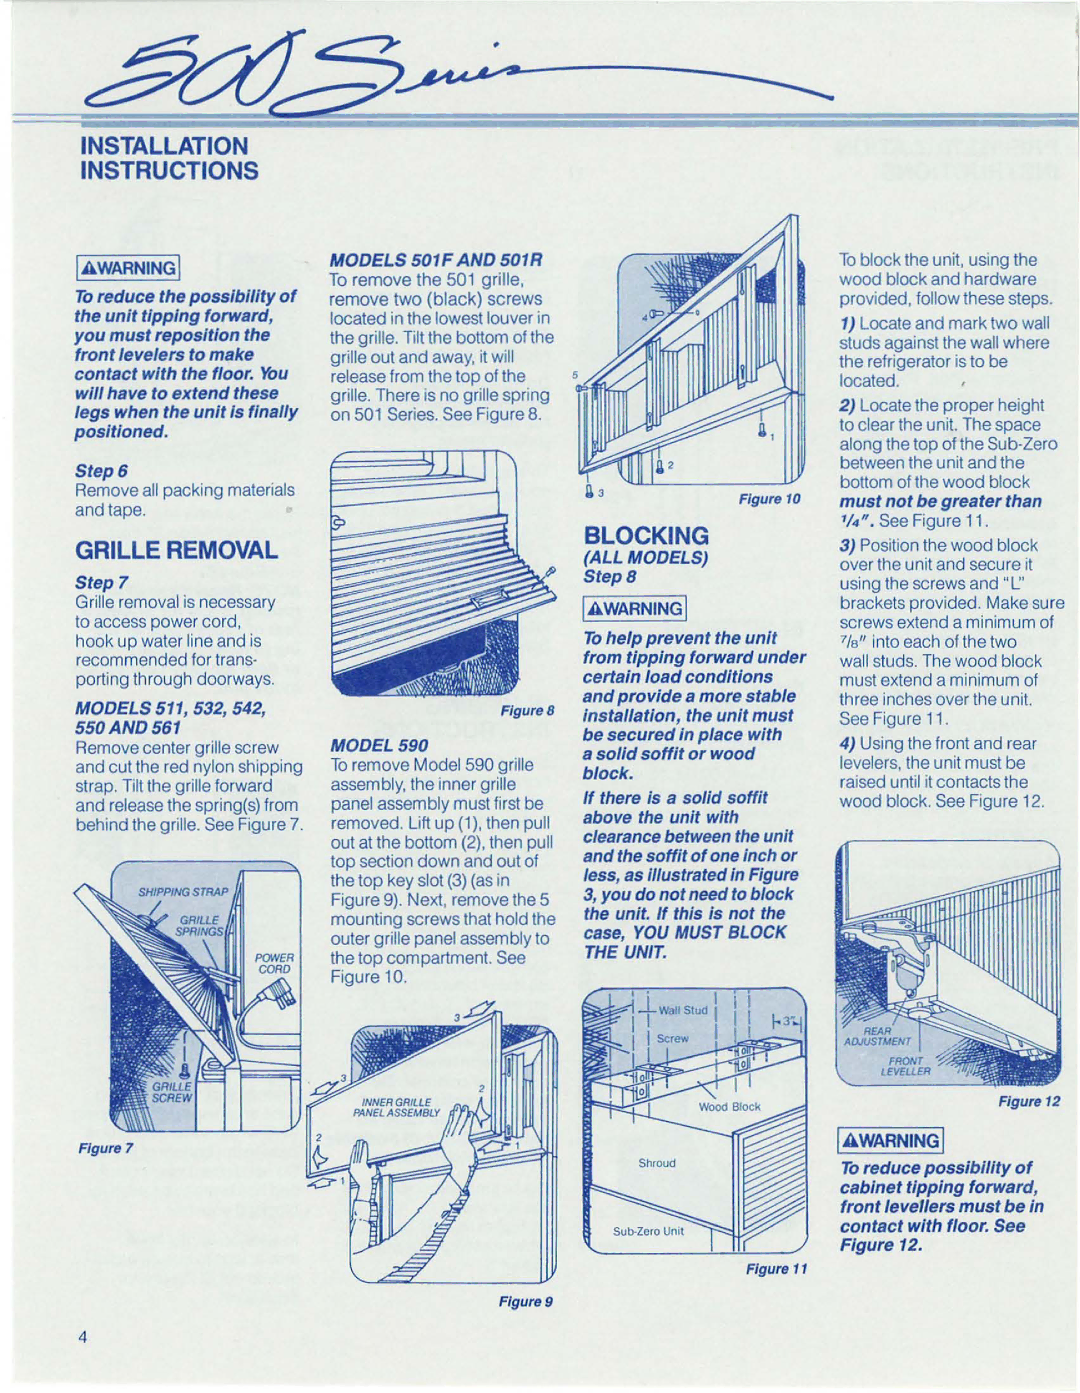
Grille removal is necessary to access power cord, hook up water line and is recommended for trans- porting through doorways.

MODELS 511,532,542, 550 AND 561

Remove center grille screw and cut the red nylon shipping strap. Tilt the grille forward and release the spring(s) from behind the grille. See Figure 7.

SHIPPING STRAP

/

Figure 7

MODELS 501 F AND 501 R

To remove the 501 grille, remove two (black) screws located in the lowest louver in the grille. Tilt the bottom of the grille out and away, it will release from the top of the grille. There is no grille spring on 501 Series. See Figure 8.

Figure 8

MODEL 590

To remove Model 590 grille assembly, the inner grille panel assembly must first be removed. Lift up (1), then pull out at the bottom (2), then pull top section down and out of the top key slot (3) (as in Figure 9). Next, remove the 5 mounting screws that hold the outer grille panel assembly to the top compartment. See Figure 10.

Figure 10

BLOCKING

(ALL MODELS) Step 8

I.aWARNINGI

To help prevent the unit from tipping forward under certain load conditions and provide a more stable Installation, the unit must be secured In place with

a solid soffit or wood block.

If there Is a solid soffit above the unit with clearance between the unit and the soffit of one Inch or less, as illustrated In Figure 3, you do not need to block the unit. If this Is not the case, YOU MUST BLOCK THE UNIT.

Figure 11

To block the unit, using the wood block and hardware provided, follow these steps.

1)Locate and mark two wall studs against the wall where the refrigerator is to be located.

2)Locate the proper height to clear the unit. The space along the top of the Sub-Zero between the unit and the bottom of the wood block must not be greater than

'!4". See Figure 11.

3)Position the wood block over the unit and secure it using the screws and "I.:' brackets provided. Make sure screws extend a minimum of 7/B" into each of the two

wall studs. The wood block must extend a minimum of three inches over the unit.

See Figure 11.

4)Using the front and rear levelers, the unit must be raised until it contacts the wood block. See Figure 12.

Figure 12

I.aWARNINGI

To reduce possibility of cabinet tipping forward, front levellers must be In contact with floor. See Figure 12.

Figure 9

4

Page 4
Image 4
Sub-Zero 542, 590, 511, 532, 561 Installation Instructions, Grille Removal, Blocking, Models 501 F and 501 R, ALL Models Step

550, 542, 561, 532, 511 specifications

Sub-Zero, a renowned name in luxury refrigeration, has long set the standard for high-performance refrigeration with its exceptional line of products, including models 590, 511, 532, 561, and 542. Each of these models showcases advanced features and cutting-edge technology designed to preserve food freshness while enhancing kitchen aesthetics.

The Sub-Zero 590 is a standout model known for its dual refrigeration system, which employs separate systems for the refrigerator and freezer compartments. This innovative approach allows for optimal humidity control and temperature management, preventing cross-contamination of odors and ensuring that perishables remain fresh for longer. Additionally, the 590 boasts a sleek design that can be seamlessly integrated into any kitchen decor.

Model 511 is designed with convenience in mind. Its compact design makes it an excellent choice for smaller kitchens or bar areas. This model continues the tradition of Sub-Zero's high standards, featuring advanced cooling technologies and smart storage solutions, such as adjustable shelving and door storage, maximizing usable space without compromising on performance.

The Sub-Zero 532 elevates the refrigeration experience with its advanced air purification system, which filters out particles and ethylene gas, a natural compound that accelerates ripening in fruits and vegetables. This ensures that your food stays fresher, longer, while preserving its nutritional quality. The model also includes features such as tempered glass shelves and LED lighting, providing both functionality and elegance.

The 561 model impresses with its built-in design, allowing for perfect integration into cabinetry for a custom look. This model offers a generous capacity while maintaining a sleek exterior. Furthermore, it includes advanced technology like a microprocessor control panel that monitors and adjusts temperatures, ensuring that your food is stored under ideal conditions.

Lastly, the Sub-Zero 542 showcases a classic built-in refrigerator/freezer configuration. Its signature design includes the option for a panel-ready finish, allowing homeowners to match it to their cabinetry. With features like smart touch controls and an advanced cooling system that maintains consistent temperatures, the 542 guarantees reliability and performance.

These Sub-Zero models represent the pinnacle of refrigeration technology, with features that prioritize freshness, convenience, and luxury aesthetics, making them a perfect addition to any modern kitchen.