WARNING

Limitations of Duct Detectors

The National Fire Protection Association has established that DUCT DETECTORS MUST NOT BE USED AS A SUBSTITUTE FOR OPEN AREA DETECTOR PROTECTION as a means of providing life safety. Nor are they a substitute for early warning in a building’s regular fire detection system.

It is strongly recommended that the user read NFPA Standards 90A, 72, and 101.

WARNING

This device will not operate without electrical power. Fire situations may cause an interruption of power. The system safeguards should be discussed with your local fire protection specialist.

WARNING

This device will not sense smoke unless the ventilation system is operat- ing.

WARNING

In order to function properly, this detector must be installed according to the instructions. Do not exceed the electrical or ambient specifications or the detector will not function properly. This detector must be protected from the elements.

Installation Sequence


Step 1.

Verify duct air flow direction and velocity

2

Step 2.

Drill the mounting holes

2

Step 2.1

Install the sampling tube for ducts


less than 112 feet (0.46m) wide

2

Step 3.

Secure the detector housing to the duct

2

Step 4.

Install the sampling tube for ducts


greater than 112 feet (0.46m) wide

2

Step 4.1

Installation for ducts greater than 112 feet


(0.46m) but less than 8 feet (2.4m) wide

3

Step 4.2

Installation for ducts more than 8 feet


(2.4m) wide

4

Step 5.

Install the filters

4

Step 6.

Field wiring

4

Step 7.

Perform detector check

5

Step 8.

Install the cover

5

Step 9.

Detector Maintenance and Test Procedures

5

[1] Verify Duct Air Flow Direction And Velocity

The DH200RPL duct smoke detector is designed to be used in air han- dling systems having air velocities of 100 to 4000 feet per minute (0.5 to 20.32m/s). Be sure to check engineering specifications to ensure that the air velocity in the duct falls within these parameters. If necessary, use a velocity meter to check the air velocity in the duct. See Air Flow Test, section 9.1.

[2] Drill The Mounting Holes

Remove the paper backing from the mounting template supplied. Affix the template to the duct at the desired mounting location. Make sure the template lies flat and smooth on the duct. Center punch holes A and B. Drill the holes as indicated on the template.

[2.1] Sampling Tube Installation for Ducts Less Than 112 Feet (0.46m) Wide (see Figure 2)

1.Remove the front cover.

2.Slide the plastic sampling tube into the housing bushing.

3.Align the holes in the bushing with the holes in the sampling tube. Make sure there are 6 exposed holes on the plastic sampling tube. Secure with the #8 self-tapping screw into the bottom of the permanent tube (shown in Fig. 2).

NOTE: For ducts greater than 112 feet (0.46m) in width, refer to sec- tions [4], [4.1] and [4.2].

[3] Secure The Detector Housing To The Duct

Slide the foam gaskets over the tube bushings as shown in Figure 3. Use the two 1 1⁄4long sheet metal screws to screw the detector housing to the duct.

CAUTION: Do not overtighten the screws.

[4]Sampling Tube Installation for Ducts Greater Than 112 Feet (0.46m) Wide

The sampling tube is identified by a series of air inlet holes on the tube. A plastic tube is included for ducts up to 112 feet (0.46m) wide. All other lengths must be purchased separately. Order the correct length, as speci- fied in Table 1, for width of the duct where it will be installed. It is recom- mended that the sampling tube length extend at least 23 across the duct width for optimal performance. The exhaust tube is molded onto the base of the duct housing, and the A2440-00 Exhaust Tube Extension is available as an accessory in those cases where the molded exhaust port does not extend at least 2 inches (50mm) into the duct.

The sampling tube is always installed with the air inlet holes facing into the air flow. To assist proper installation, the tube’s mounting flange is marked with an arrow. Make sure the sampling tube is mounted so that the arrow points into the air flow (see Figure 4). Figure 5 shows the various combinations of tube mounting configurations with respect to air flow. Mounting the detector housing in a vertical orientation is acceptable, provided that a metal sampling tube is installed and the air flows directly into the sampling tube holes as indicated in Figure 4.

Figure 2. Plastic sampling tube connected to duct smoke detector:

[4.1] Installation For Ducts Greater Than 112 Feet (0.46m) But Less Than 8 Feet (2.4m) Wide

1.If the tube is longer than the width of the air duct, drill a 34(19mm) hole in the duct opposite the hole already cut for the sampling tube. Make sure the hole is 1to 2(25 to 50mm) below the inlet hole on the opposite side of the duct to allow moisture drainage away from the detector. If the tube is shorter than the width of the air duct, install the end cap into the sampling tube as shown in Figure 4. Sampling tubes over 3 ft. (0.91m) long must be supported at the end opposite the duct smoke detector.

D200-39-00

2

I56-1977-004R

Page 2
Image 2
System Sensor DH200RPL Limitations of Duct Detectors, Installation Sequence, Verify Duct Air Flow Direction And Velocity

DH200RPL specifications

The System Sensor DH200RPL is a cutting-edge smoke detection sensor designed to enhance fire safety in a variety of environments. With a commitment to innovation and reliability, this sensor is engineered to meet the demands of both commercial and residential applications.

One of the defining features of the DH200RPL is its dual detection technology, which utilizes both photoelectric and ionization sensing methods. This dual approach ensures that the sensor can effectively identify both smoldering and flaming fires, providing a comprehensive solution for smoke detection. The photoelectric component is particularly effective in detecting slow, smoldering fires, while the ionization part excels in identifying fast-flaming fires. This combination enhances the overall effectiveness of fire detection, offering peace of mind to users.

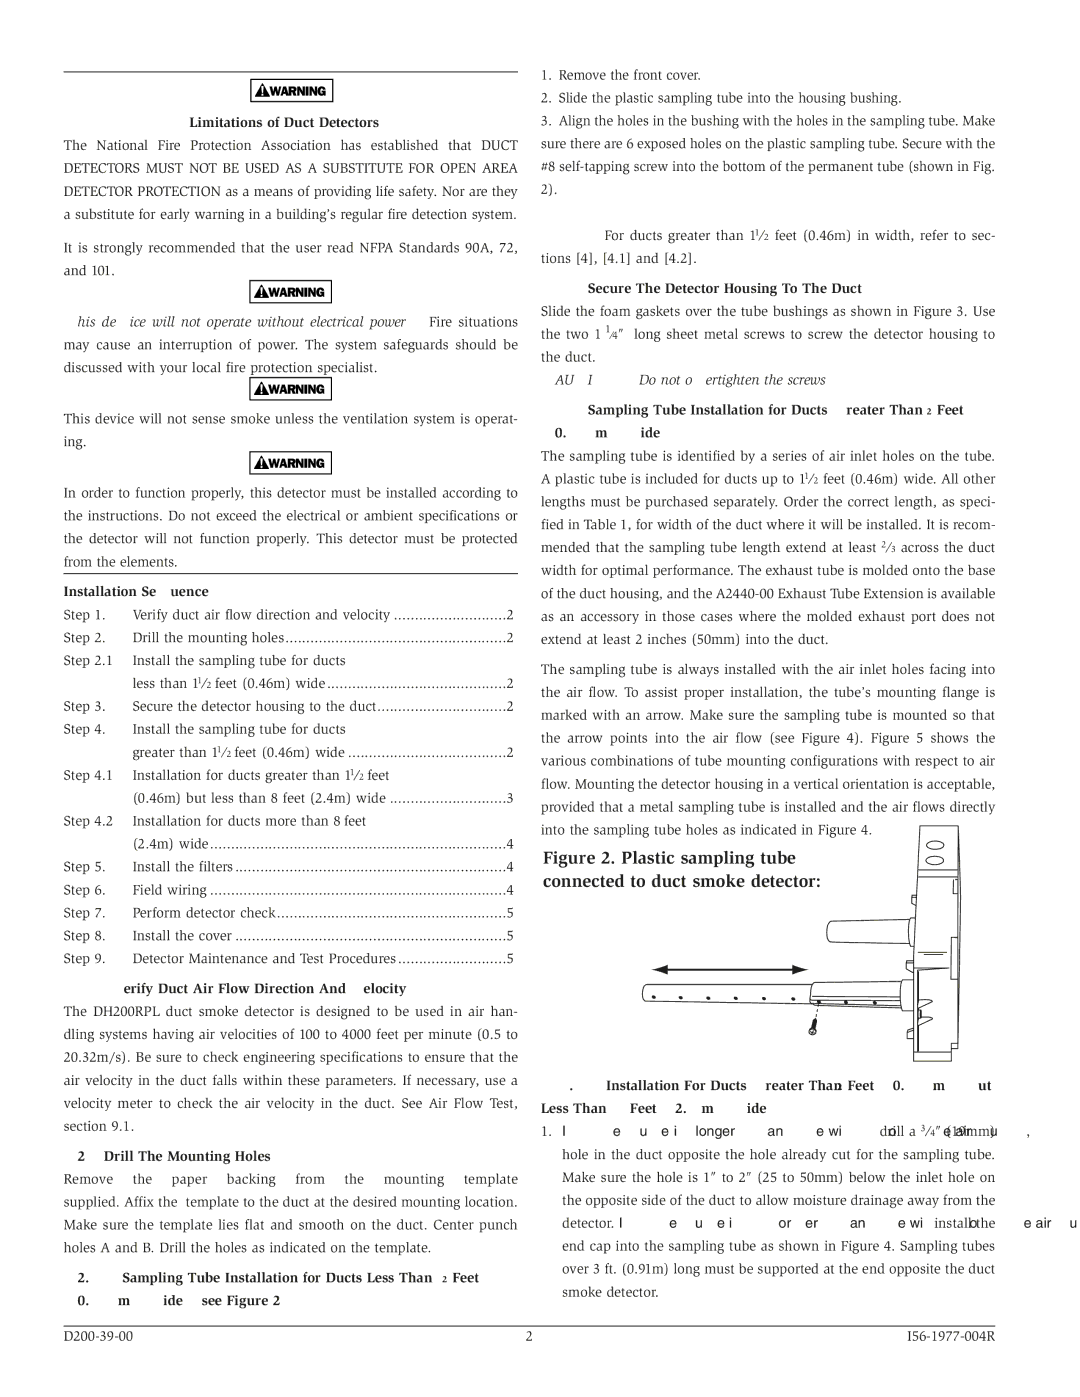
Additionally, the DH200RPL is equipped with advanced digital signal processing technology. This technology allows for improved sensitivity and a faster response time, ensuring that any potential smoke event is detected promptly. The sensor is also designed to minimize false alarms, addressing a common concern in smoke detection systems. By intelligently analyzing the environmental conditions, the DH200RPL can differentiate between actual smoke and non-threatening particles, reducing unnecessary alerts.

The sensor features a sleek, modern design that can seamlessly integrate into various settings without being obtrusive. It is compact and lightweight, making it easy to install in various locations. Furthermore, the DH200RPL is compatible with a wide range of existing fire alarm systems, providing flexibility for upgrades or new installations.

Another notable feature is its built-in connectivity options, allowing for integration with advanced fire alarm monitoring systems. This feature enhances the sensor’s functionality by enabling remote monitoring and alert notifications, ensuring that users are informed of any potential issues even when they are not on-site.

In conclusion, the System Sensor DH200RPL smoke detector stands out in the market due to its dual detection technology, advanced signal processing, and integration capabilities. Its efficient design and smart functionalities make it an ideal choice for ensuring safety in various environments, making it a trusted option for both homeowners and business operators alike. With the DH200RPL, users can rest assured that they are protected by one of the most reliable smoke detection technologies available today.