Operating Your Receiver

1

ON/ECO

MUTE

5


13

14


6

H O M E T H E A T E R A U D I O V I D E O R E C E I V E R D P L 4 0 0 0


VOLUME


BAND

TUNING

MEMORY

SETUP TEST TONE

EQ DIGITAL INPUT


SOURCE


OK

ST/M

SURR. MODE DSP MODE


BASS/TREBLE


LEVEL


OPEN/CLOSE


L AUDIO R

VIDEO

S-VIDEO

PHONES

V-AUX

2

3

4

12

9

11

17

8

15

10 7

16

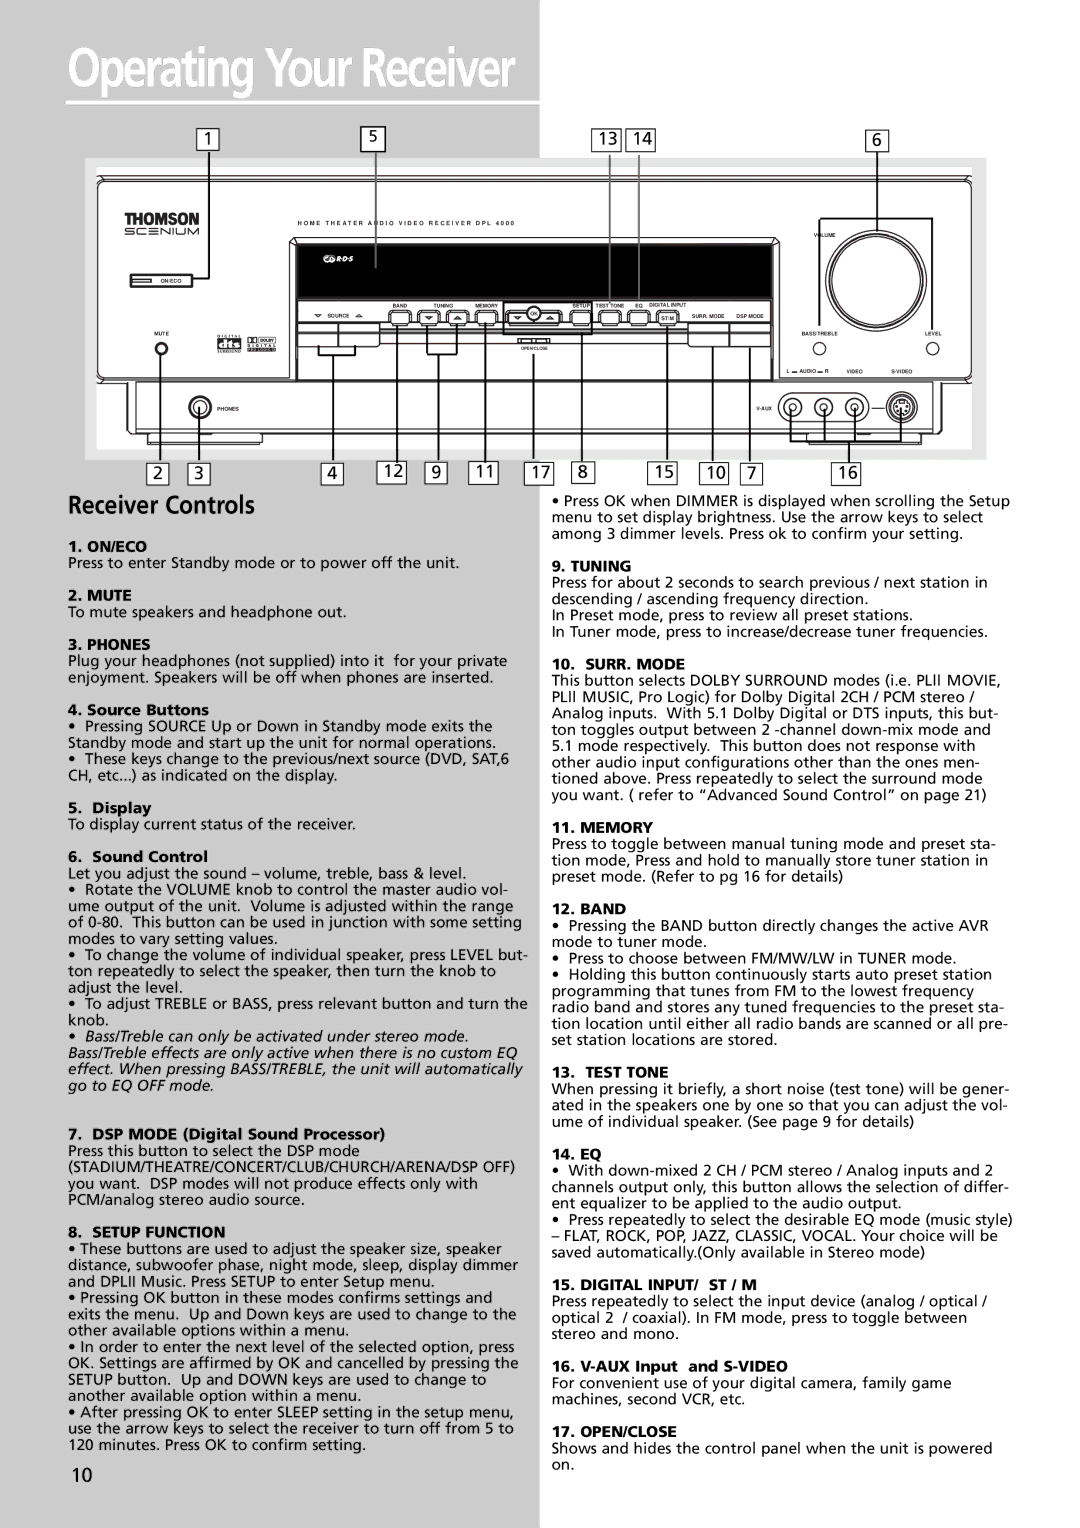
Receiver Controls

1. ON/ECO

Press to enter Standby mode or to power off the unit.

2. MUTE

To mute speakers and headphone out.

3. PHONES

Plug your headphones (not supplied) into it for your private enjoyment. Speakers will be off when phones are inserted.

4. Source Buttons

Pressing SOURCE Up or Down in Standby mode exits the Standby mode and start up the unit for normal operations.

These keys change to the previous/next source (DVD, SAT,6 CH, etc...) as indicated on the display.

5. Display

To display current status of the receiver.

6. Sound Control

Let you adjust the sound – volume, treble, bass & level.

Rotate the VOLUME knob to control the master audio vol- ume output of the unit. Volume is adjusted within the range of 0-80. This button can be used in junction with some setting modes to vary setting values.

To change the volume of individual speaker, press LEVEL but- ton repeatedly to select the speaker, then turn the knob to adjust the level.

To adjust TREBLE or BASS, press relevant button and turn the knob.

Bass/Treble can only be activated under stereo mode. Bass/Treble effects are only active when there is no custom EQ effect. When pressing BASS/TREBLE, the unit will automatically go to EQ OFF mode.

7.DSP MODE (Digital Sound Processor) Press this button to select the DSP mode

(STADIUM/THEATRE/CONCERT/CLUB/CHURCH/ARENA/DSP OFF) you want. DSP modes will not produce effects only with PCM/analog stereo audio source.

8.SETUP FUNCTION

These buttons are used to adjust the speaker size, speaker distance, subwoofer phase, night mode, sleep, display dimmer and DPLII Music. Press SETUP to enter Setup menu.

Pressing OK button in these modes confirms settings and exits the menu. Up and Down keys are used to change to the other available options within a menu.

In order to enter the next level of the selected option, press OK. Settings are affirmed by OK and cancelled by pressing the SETUP button. Up and DOWN keys are used to change to another available option within a menu.

After pressing OK to enter SLEEP setting in the setup menu, use the arrow keys to select the receiver to turn off from 5 to 120 minutes. Press OK to confirm setting.

10

Press OK when DIMMER is displayed when scrolling the Setup menu to set display brightness. Use the arrow keys to select among 3 dimmer levels. Press ok to confirm your setting.

9. TUNING

Press for about 2 seconds to search previous / next station in descending / ascending frequency direction.

In Preset mode, press to review all preset stations.

In Tuner mode, press to increase/decrease tuner frequencies.

10. SURR. MODE

This button selects DOLBY SURROUND modes (i.e. PLII MOVIE, PLII MUSIC, Pro Logic) for Dolby Digital 2CH / PCM stereo / Analog inputs. With 5.1 Dolby Digital or DTS inputs, this but- ton toggles output between 2 -channel down-mix mode and

5.1mode respectively. This button does not response with other audio input configurations other than the ones men- tioned above. Press repeatedly to select the surround mode you want. ( refer to “Advanced Sound Control” on page 21)

11. MEMORY

Press to toggle between manual tuning mode and preset sta- tion mode, Press and hold to manually store tuner station in preset mode. (Refer to pg 16 for details)

12. BAND

Pressing the BAND button directly changes the active AVR mode to tuner mode.

Press to choose between FM/MW/LW in TUNER mode.

Holding this button continuously starts auto preset station programming that tunes from FM to the lowest frequency radio band and stores any tuned frequencies to the preset sta- tion location until either all radio bands are scanned or all pre- set station locations are stored.

13. TEST TONE

When pressing it briefly, a short noise (test tone) will be gener- ated in the speakers one by one so that you can adjust the vol- ume of individual speaker. (See page 9 for details)

14. EQ

With down-mixed 2 CH / PCM stereo / Analog inputs and 2 channels output only, this button allows the selection of differ- ent equalizer to be applied to the audio output.

Press repeatedly to select the desirable EQ mode (music style)

– FLAT, ROCK, POP, JAZZ, CLASSIC, VOCAL. Your choice will be saved automatically.(Only available in Stereo mode)

15. DIGITAL INPUT/ ST / M

Press repeatedly to select the input device (analog / optical / optical 2 / coaxial). In FM mode, press to toggle between stereo and mono.

16. V-AUX Input and S-VIDEO

For convenient use of your digital camera, family game machines, second VCR, etc.

17. OPEN/CLOSE

Shows and hides the control panel when the unit is powered on.

Page 13
Image 13
Technicolor - Thomson DPL4000 manual Operating Your Receiver, Receiver Controls

DPL4000 specifications

The Technicolor - Thomson DPL4000 is a highly regarded digital video projector that has made a significant impact in both home theater and professional environments. Renowned for its rich color reproduction and sharp image quality, the DPL4000 incorporates advanced technologies that elevate the viewing experience to new heights.

One of the standout features of the DPL4000 is its use of Digital Light Processing (DLP) technology. This innovative approach to image projection utilizes a digital micromirror device (DMD), which enables precise control over individual pixels and results in smoother transitions and better color accuracy. The DLP technology employed in the DPL4000 reduces the occurrence of color artifacts and delivers a clear, bright image, making it ideal for high-definition video content.

The projector boasts a native resolution of 1920 x 1080 (Full HD), ensuring that viewers can enjoy intricate details in movies and presentations. Moreover, it supports various aspect ratios, providing flexibility for different screen formats. This adaptability is particularly useful for various content types—from cinematic features to business presentations.

Another key characteristic of the DPL4000 is its impressive brightness, rated at approximately 5000 lumens. This high lumen output allows the projector to perform well in various lighting conditions, making it suitable for both dimly lit home theaters and brighter conference rooms. The powerful lamp technology further enhances longevity and reduces maintenance costs, ensuring that users get the best return on their investment.

The connectivity options available on the DPL4000 are extensive, catering to a modern digital ecosystem. HDMI, VGA, and USB ports are included, allowing users to connect a wide range of devices seamlessly. This compatibility not only facilitates easy integration with laptops and multimedia players but also enables wireless streaming capabilities, enhancing convenience.

In addition to its technical specifications, the DPL4000 features an intuitive interface that simplifies operation for both novice and experienced users alike. The user-friendly remote control and on-screen menus make navigating settings straightforward, enabling users to customize their viewing experience easily.

Overall, the Technicolor - Thomson DPL4000 projector stands out for its combination of advanced DLP technology, high brightness, and excellent connectivity options. Whether for home entertainment or professional presentations, it delivers stunning visuals and exceptional reliability that meet the demands of modern users.