Contents
Important information regarding the batteries
Precautions and information before connecting
Inserting the batteries
Important notice Please read the recommendations given on
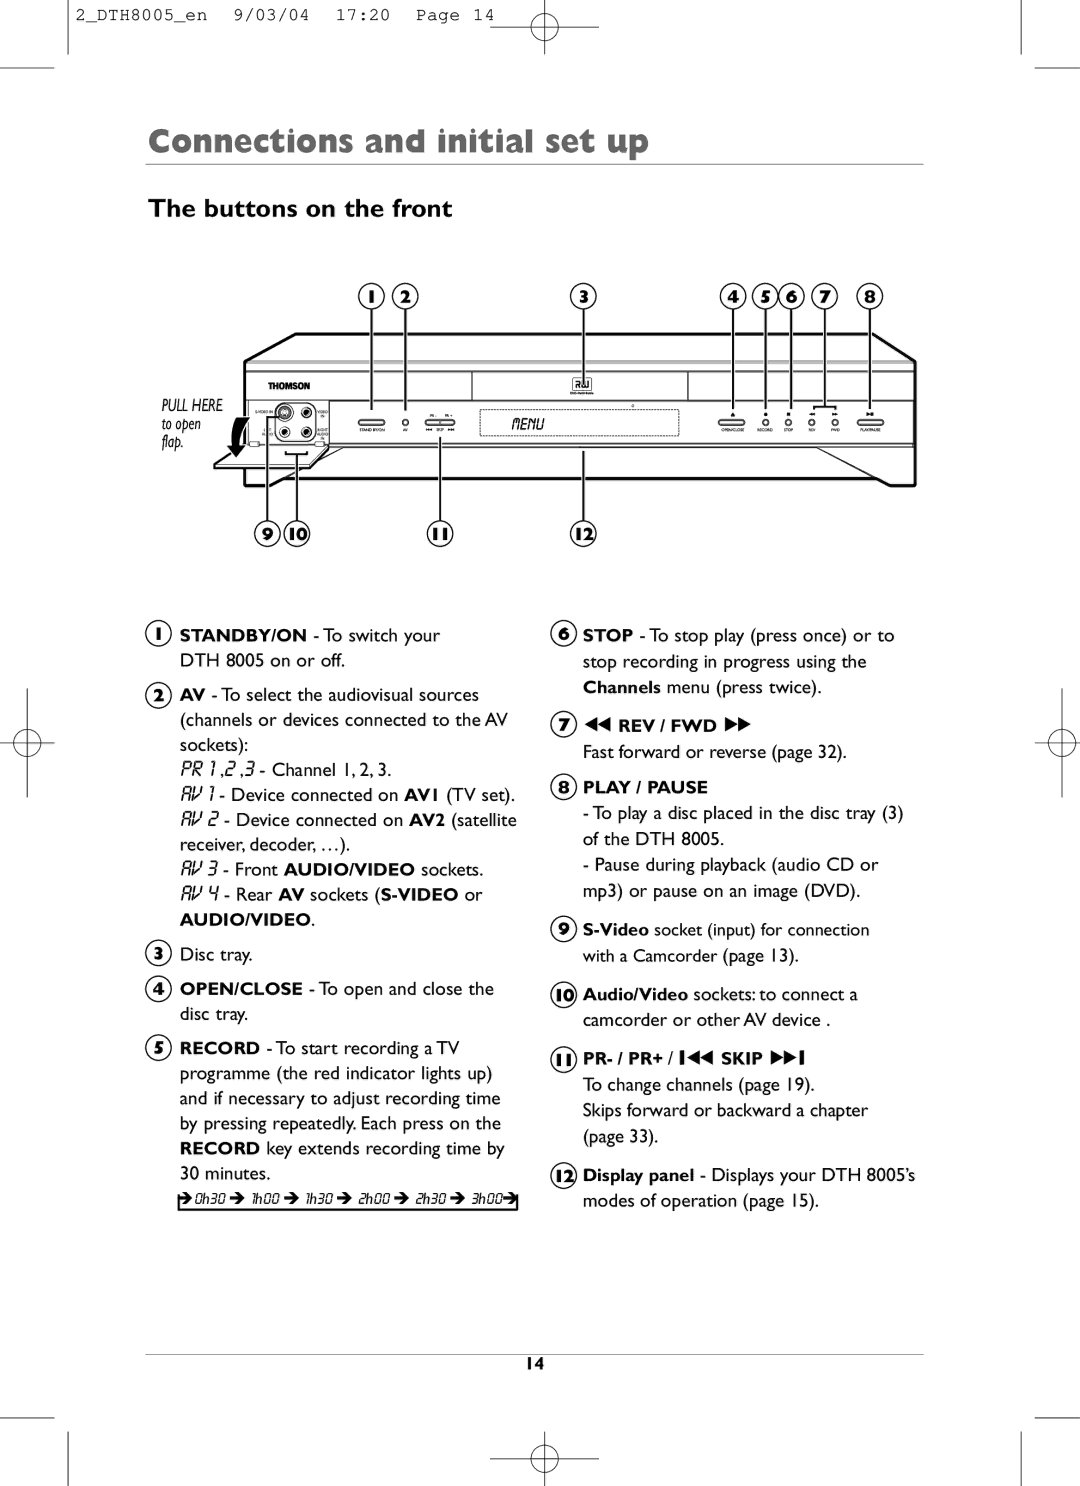
Connections and initial set up
Basic connections
Switch on your DTH 8005 and your TV set
Placing the DTH 8005 in service
Using the remote control unit correctly
About your device
To find your country, use the buttons on your remote control
Automatic channel search
Clock setting
Sorting the channels
Manual channel search
France LL’ for France
Channel update
Satellite receiver
Other recommended connections
Satellite or cable reciever or decoder
Grey connections already carried out connections from page3
TV set Video recorder
Video recorder
Satellite reciever and video recorder
Not supplied
Video in Composite Cvbs Composite Video Input
Sockets and cables inputs
Audio inputs Input L, R
Video input Y/C S-VIDEO
Video out socket Y/C S-VIDEO OUT
Sockets and cables outputs
Optical and coaxial Out sockets Digital Audio OUT
Audio outputs Output L, R
AV sockets Audio/Video
Front sockets inputs
Video socket
PR- / PR+ / Igskip FI To change channels
Buttons on the front
Pull Here to open flap
With a disc
Messages on the display
TV Functions
Other indications
Description of keys in DVD mode
Controlling a satellite or cable receiver
Remote control Code A-B
Controlling a TV set
Manual programming
Programming the remote control
Automatic code search
Name of the present broadcast, as start and end times
To watch TV Programmes
To change channel
Recording functions
Record the current programme
Stop recording
Closing a DVD+R or DVD+RW disc Finishing a disc
Channel
Programming a recording
Name
Day s
Recording quality
Keep Timer
Start time and stop time
Recording through the Naviclick TV guide
Naviclick programmes guide
Consulting the TV guide with Naviclick
From a Camcorder or other device AV3, AV4 socket
Recording from a connected device
From a satellite receiver or cable receiver AV2 socket
Library
To find a Title recording
Sort by Category, Sort by Date
Access to the title menu
Sort by Title
Assign or Change the Category of a title
Show discs
Discs you can record
Discs you can play
Information on the TV channel being watched
Television mode Operating principle
Interactive banners
Recording the channel being watched here, channel
With an audio CD
Disc Playing mode Operating principle
With a DVD
With a VCD Video CD
Quick search of an image or a track
Loading and playing a disc
Search Options
Still picture and frame advance
Playback options
Title or Track DVD,VCD, CD
Timer DVD,VCD, CD
Disc information banner
Chapter DVD
Banner
Subtitle and dialogue language DVD
Play modes of discs DVD VCD
Provided on the disc
PBC Playback control menu VCD
Play mode for Audio CDs
Camera angles DVD
IntroScan CD
Access to the edit menu
Edit Menu
Delete Chapter Marker DVD+RW only
Edit menu functions
Insert a Chapter Bookmark DVD+RW only
Hide Chapter
Divide the title DVD+RW and DVD+R
View Chapter
New Title Frame
Or PR
Playing images JPEG, and sounds mp3 files
Reading music files MP3 and / or images Jpeg
Rotating an image
Image Functions
Changing images
Zooming in on an image zoom and the Pan and Scan function
Disc Title menu DVD+R, DVD+RW
Disc menu
Play Disc
To access disc functions
Menus
Displayed name to be entirely deleted
To access the title functions
Rename a disc or a title DVD+R, DVD+RW
Playlist
Name of the DVD+R or DVD+RW disc Titles and chapters
Screen Format DVD / VCD
Disc options
Autoplay
Angle icon DVD
Audio DVD disc dialogue languages
Language Menu
Display Language of DTH 8005 menus
From the menu of the DTH
Subtitles Language of DVD subtitles
Disc DVD disc menu language
Parental control menu
Locking
Ratings limits
Non categorized titles
SRS TruSurround
System Options Menu
Digital output audio
Incorporated under license agreement from SRS Labs, Inc
Display Dimmer
Standby mode
Black level
PAL/NTSC output
SmartRecord
Recording Options Menu
Recording quality
Low 8 hours
Troubleshooting guide
If you encounter difficulties
Further information
Reconfiguring your player’s initial set-up
Other problems
Choice of NexTView channel
Settings
NexTView channel downloading time
Updating Naviclick via Teletext
NexTView Channels
Channels and Teletext pages Naviclick
Condensation
Disclaimer of warranty
For your safety
Discs
Remote control setting on code B
Remote control Code A-B
Technical data
DTH 8005 setting on code B


 to open


 flap.
flap. 
