BEFORE USING FOR THE FIRST TIME
Before beginning to use your dishwasher for the first time:
1.Check to make sure that the voltage on which the dishwasher is to operate is the same as shown on the rating plate.
2.Check to make sure that the water valve to the dishwasher is open. The installer may have closed the valve upon completing the installation.
3.Thoroughly inspect unit for cosmetic damage. Cosmetic damage must be reported within 5 days
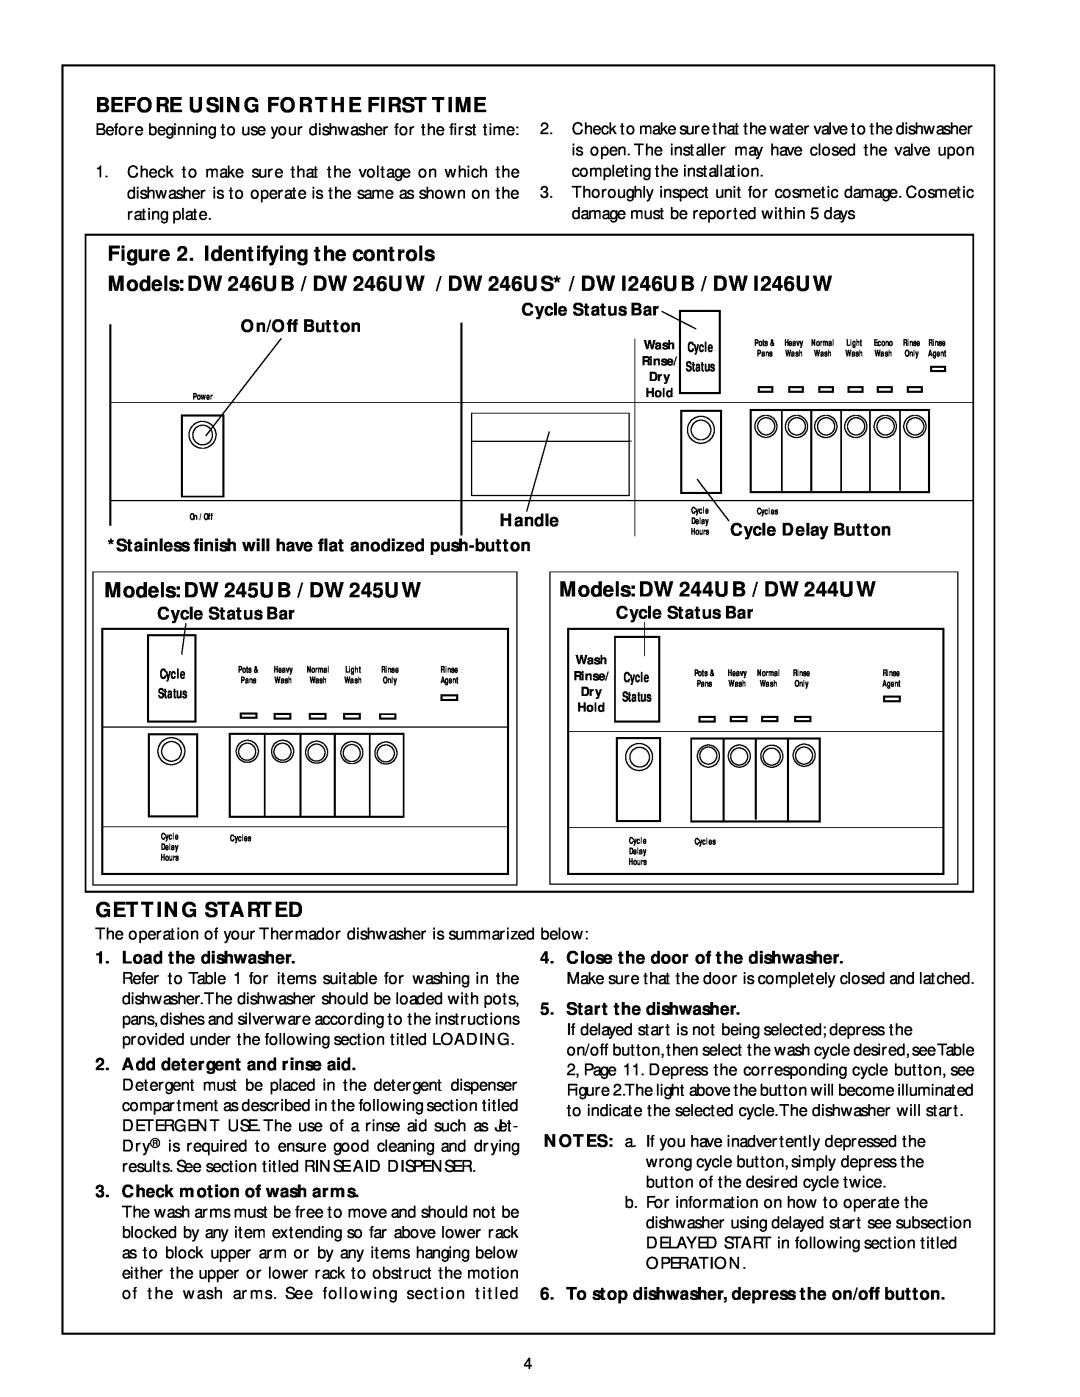
Figure 2. Identifying the controls |
|
|
|
|
|
|
|
|
|
|
| |||||
Models: DW246UB / DW246UW / DW246US* / DWI246UB / DWI246UW |
|
|
| |||||||||||||
| On/Off Button |
|
| Cycle Status Bar |
|
|
|
|
|
|
|
| ||||
|
|
|
| Wash | Cycle |
| Pots & | Heavy | Normal | Light | Econo | Rinse Rinse | ||||
|
|
|
|
|
|
|
|
| ||||||||
|
|
|
|
|
|
|
|
| Pans | Wash | Wash | Wash | Wash | Only Agent | ||
|
|
|
|
|
|
|
| Rinse/ Status |
| |||||||
|
|
|
|
|
|
|
|
|
|
|
|
|
|
| ||
|
|
|
|
|
|
|
| Dry |
|
|
|
|
|
|
|
|
| Power |
|
|
|
|
|
| Hold |
|
|
|
|
|
|
|
|
| On / Off |
|
|
|
|
| Handle |
| Cycle |
| Cycles |
|
|
|
|
|
|
|
|
|
|
|
| Delay | Cycle Delay Button |
| |||||||
|
|
|
|
|
|
|
|
| ||||||||
*Stainless finish will have flat anodized |
| Hours |
| |||||||||||||
|
|
|
|
|
|
|
|
| ||||||||
Models: DW245UB / DW245UW |
| Models: DW244UB / DW244UW |
| |||||||||||||
Cycle Status Bar |
|
|
|
|
| Cycle Status Bar |
|
|
|
|
|
| ||||
Cycle | Pots & | Heavy | Normal | Light | Rinse | Rinse | Wash | Cycle | Pots & | Heavy | Normal | Rinse |
|
| Rinse |
|
Rinse/ |
|
|
| |||||||||||||
Pans | Wash | Wash | Wash | Only | Agent |
|
|
| ||||||||
Pans | Wash | Wash | Only |
|
| Agent |
| |||||||||
Status |
|
|
|
|
|
| Dry | Status |
|
|
| |||||
|
|
|
|
|
|
|
|
|
|
|
|
|
| |||
|
|
|
|
|
|
| Hold |
|
|
|
|
|
|
|
|
|
Cycle | Cycles |
|
|
|
|
|
| Cycle | Cycles |
|
|
|
|
|
|
|
Delay |
|
|
|
|
|
|
| Delay |
|
|
|
|
|
|
|
|
Hours |
|
|
|
|
|
|
|
|
|
|
|
|
|
|
| |
|
|
|
|
|
|
| Hours |
|
|
|
|
|
|
|
| |
|
|
|
|
|
|
|
|
|
|
|
|
|
|
|
| |
GETTING STARTED
The operation of your Thermador dishwasher is summarized below:
1.Load the dishwasher.
Refer to Table 1 for items suitable for washing in the dishwasher.The dishwasher should be loaded with pots, pans, dishes and silverware according to the instructions provided under the following section titled LOADING.
2.Add detergent and rinse aid.
Detergent must be placed in the detergent dispenser compartment as described in the following section titled DETERGENT USE. The use of a rinse aid such as Jet- Dry® is required to ensure good cleaning and drying results. See section titled RINSE AID DISPENSER.
3.Check motion of wash arms.
The wash arms must be free to move and should not be blocked by any item extending so far above lower rack as to block upper arm or by any items hanging below either the upper or lower rack to obstruct the motion of the wash arms. See following section titled
4.Close the door of the dishwasher.
Make sure that the door is completely closed and latched.
5.Start the dishwasher.
If delayed start is not being selected; depress the
on/off button, then select the wash cycle desired, seeTable 2, Page 11. Depress the corresponding cycle button, see Figure 2.The light above the button will become illuminated to indicate the selected cycle.The dishwasher will start.
NOTES: a. If you have inadvertently depressed the wrong cycle button, simply depress the button of the desired cycle twice.
b.For information on how to operate the dishwasher using delayed start see subsection DELAYED START in following section titled
OPERATION.
6.To stop dishwasher, depress the on/off button.
4
