INSTALLATION continued

3.Electrical Connections:

FREE STANDING UNITS: All free standing hot food servers are quipped with a factory installed 36” (914mm) cord and plug.

120V models: Plug conforms to NEMA Standard 5-15P

208/240V models: Plug conforms to NEMA Standard 6-15P

BUILT-IN UNITS: Most units are provided with a 48” flexible metal conduit for electrical connections (see electrical specifications for specifics).

D. Installation of Built-In Units:

All of these units are true built-in models and are designed to be installed into the front face of a counter fixture. Front of units extends beyond the body to form a self-trimming flange that covers the cut out in the fixture.

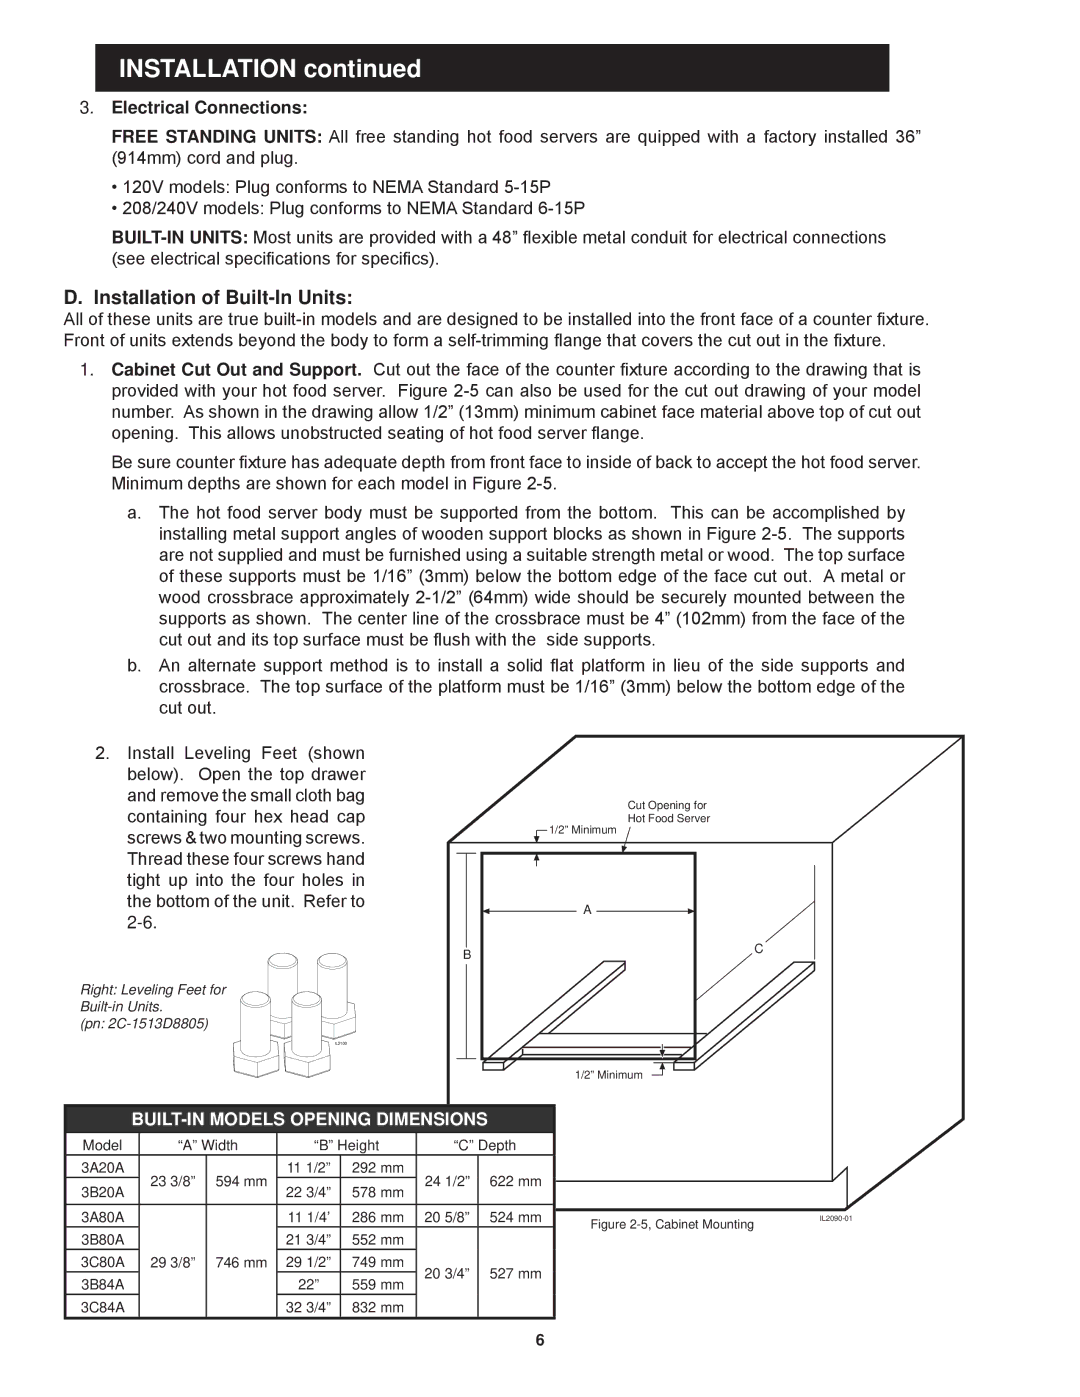
1.Cabinet Cut Out and Support. Cut out the face of the counter fixture according to the drawing that is provided with your hot food server. Figure 2-5 can also be used for the cut out drawing of your model number. As shown in the drawing allow 1/2” (13mm) minimum cabinet face material above top of cut out opening. This allows unobstructed seating of hot food server flange.

Be sure counter fixture has adequate depth from front face to inside of back to accept the hot food server. Minimum depths are shown for each model in Figure 2-5.

a.The hot food server body must be supported from the bottom. This can be accomplished by installing metal support angles of wooden support blocks as shown in Figure 2-5. The supports are not supplied and must be furnished using a suitable strength metal or wood. The top surface of these supports must be 1/16” (3mm) below the bottom edge of the face cut out. A metal or wood crossbrace approximately 2-1/2” (64mm) wide should be securely mounted between the supports as shown. The center line of the crossbrace must be 4” (102mm) from the face of the cut out and its top surface must be flush with the side supports.

b.An alternate support method is to install a solid flat platform in lieu of the side supports and crossbrace. The top surface of the platform must be 1/16” (3mm) below the bottom edge of the cut out.

2.Install Leveling Feet (shown below). Open the top drawer

and remove the small cloth bagCut Opening for

containing four hex head capHot Food Server

screws & two mounting screws.

1/2” Minimum


Thread these four screws hand


tight up into the four holes in


the bottom of the unit. Refer to

A

2-6.


B

C


Right: Leveling Feet for


Built-in Units.


(pn: 2C-1513D8805)


IL2100


1/2” Minimum

BUILT-IN MODELS OPENING DIMENSIONS


Model

“A” Width


“B” Height

“C” Depth


3A20A

23 3/8”

594 mm

11 1/2”

292 mm

24 1/2”

622 mm


3B20A

22

3/4”

578 mm


3A80A


11

1/4’

286 mm

20 5/8”

524 mm


Figure 2-5, Cabinet Mounting

IL2090-01

3B80A

29 3/8”

746 mm

21

3/4”

552 mm


3C80A

29

1/2”

749 mm

20 3/4”

527 mm


3B84A


22”

559 mm


3C84A


32

3/4”

832 mm


Page 8
Image 8
Toastmaster 3B84A, 3C84A, 3B84D, 3B20A, 3C80A, 3A20A, 3A80A, 3B80A, 3D8XD Installation of Built-In Units, Electrical Connections

3A81D, 3C84D, 3B84A, 3D8XD, 3B80A specifications

Toastmaster appliances, especially from models 3A20A, 3B84A, 3D8XD, 3C84A, and 3B84D, are renowned for their innovative features and reliability in the kitchen. These models are designed to elevate culinary experiences, catering to both novice cooks and seasoned chefs.

Starting with the Toastmaster 3A20A, this model is equipped with a powerful heating element that ensures quick and even cooking. Its user-friendly interface allows for precise temperature control, making it ideal for a variety of dishes. The 3A20A also boasts an automatic shut-off feature, enhancing safety by preventing overheating.

The Toastmaster 3B84A stands out with its sleek design and advanced technology. It includes a digital display that shows cooking times and temperature settings, allowing users to monitor their meals effortlessly. The convection cooking feature promotes even heat distribution, which is essential for baking and roasting tasks. Additionally, the 3B84A has a durable stainless-steel exterior that not only looks good but is also easy to clean.

Next, the Toastmaster 3D8XD emphasizes versatility with its multiple cooking functions, which include toasting, baking, broiling, and more. It features an adjustable rack for various food sizes and types. The 3D8XD utilizes advanced heating technology to ensure faster cooking times, while its compact size makes it a perfect fit for kitchens with limited space.

In the lineup, the Toastmaster 3C84A offers excellent capacity and functionality. With a spacious interior, this model can accommodate larger dishes, making it suitable for family gatherings or meal prep. Its intuitive control panel allows users to toggle between different modes effortlessly. The 3C84A also features a timer and alert system, ensuring that meals are cooked to perfection without constant supervision.

Lastly, the Toastmaster 3B84D combines efficiency and performance in one package. It is equipped with a turbo fan that enhances air circulation, promoting quicker cooking and browning. The model is designed for easy operation, with clearly labeled settings that simplify the cooking process. Its robust build ensures durability, making it a reliable kitchen companion for years to come.

Overall, the Toastmaster models 3A20A, 3B84A, 3D8XD, 3C84A, and 3B84D exemplify a blend of convenience, safety, and high performance, catering to a wide range of culinary needs. Their advanced features make them essential tools in any modern kitchen, promising delicious results every time.