INSTALLATION continued

3.Electrical Connection. All electrical connections required for this unit must be performed by a certified electrician. Built-in models are equipped with a 3/4” (19mm) diameter x 4ft. (122cm) long flexible conduit containing power lead pigtails and a ground wire. It is necessary that this conduit and the wiring leads connect at a junction box in accordance with local codes. Be sure to check the data plate on the front of the unit to be sure the power supply is correct. 115V units operate on voltage ranging from 110V to 125V. 220V units operate on voltage ranging from 208V to 240V.

4.Mount Unit in Cabinet.

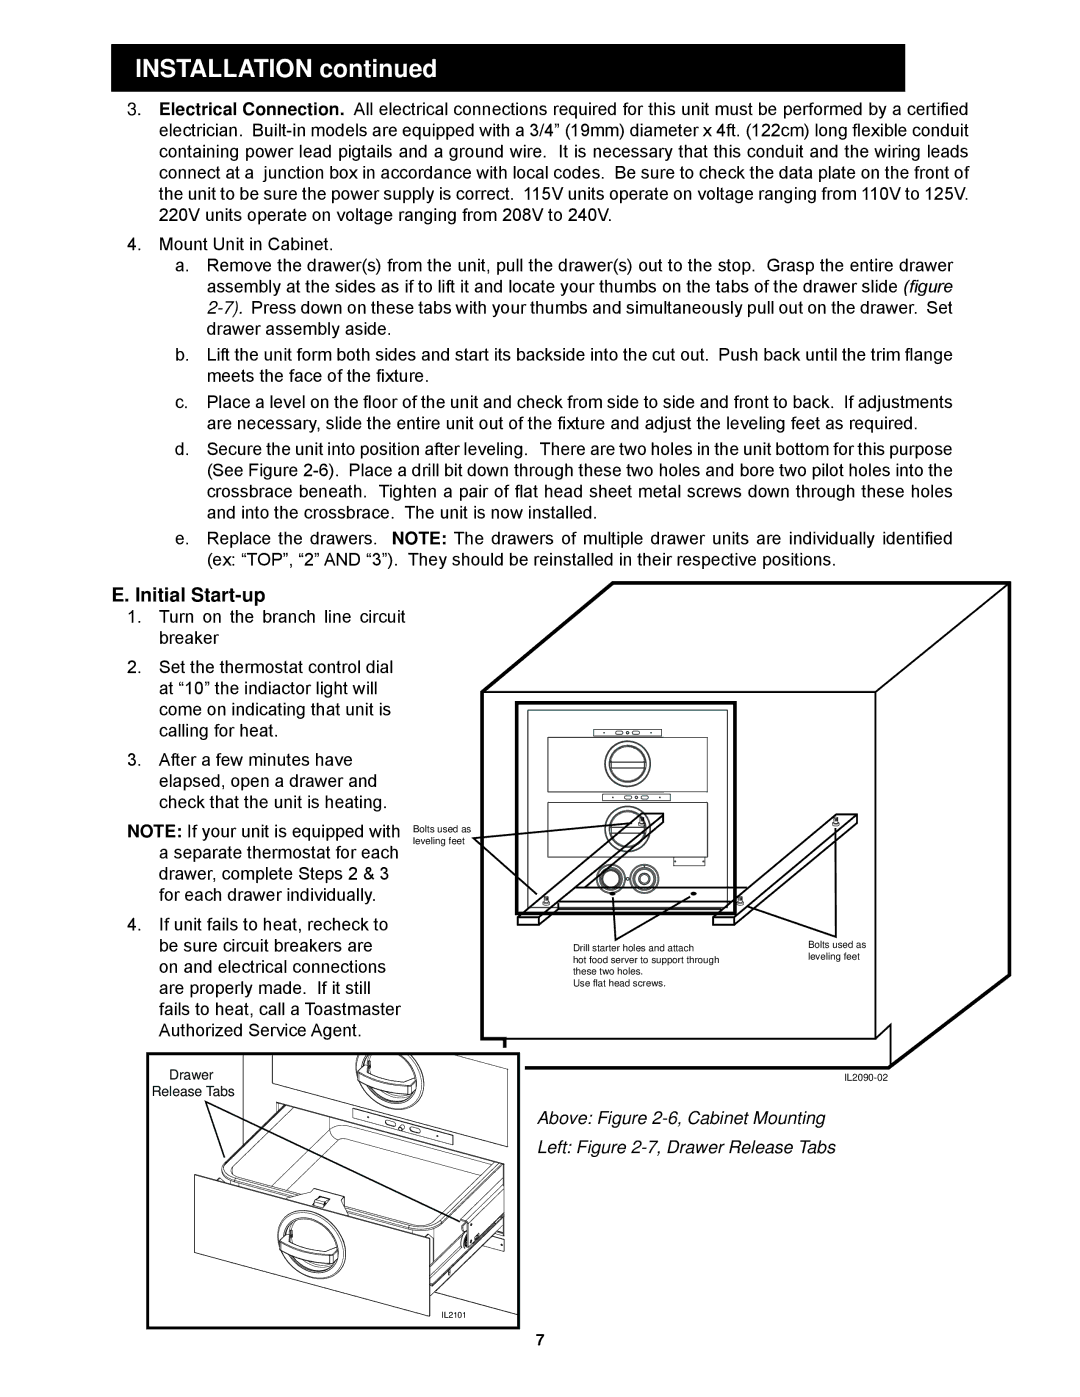
a.Remove the drawer(s) from the unit, pull the drawer(s) out to the stop. Grasp the entire drawer assembly at the sides as if to lift it and locate your thumbs on the tabs of the drawer slide (figure 2-7).Press down on these tabs with your thumbs and simultaneously pull out on the drawer. Set drawer assembly aside.

b.Lift the unit form both sides and start its backside into the cut out. Push back until the trim flange meets the face of the fixture.

c.Place a level on the floor of the unit and check from side to side and front to back. If adjustments are necessary, slide the entire unit out of the fixture and adjust the leveling feet as required.

d.Secure the unit into position after leveling. There are two holes in the unit bottom for this purpose (See Figure 2-6). Place a drill bit down through these two holes and bore two pilot holes into the crossbrace beneath. Tighten a pair of flat head sheet metal screws down through these holes and into the crossbrace. The unit is now installed.

e.Replace the drawers. NOTE: The drawers of multiple drawer units are individually identified

(ex: “TOP”, “2” AND “3”). They should be reinstalled in their respective positions.

E. Initial Start-up

1.Turn on the branch line circuit breaker

2.Set the thermostat control dial at “10” the indiactor light will come on indicating that unit is calling for heat.

3.After a few minutes have elapsed, open a drawer and check that the unit is heating.

NOTE: If your unit is equipped with a separate thermostat for each drawer, complete Steps 2 & 3 for each drawer individually.

4.If unit fails to heat, recheck to be sure circuit breakers are on and electrical connections are properly made. If it still fails to heat, call a Toastmaster Authorized Service Agent.

Bolts used as leveling feet

Drill starter holes and attach

hot food server to support through these two holes.

Use flat head screws.

Bolts used as leveling feet

Drawer

Release Tabs

IL2101

IL2090-02

Above: Figure 2-6, Cabinet Mounting

Left: Figure 2-7, Drawer Release Tabs


Page 9
Image 9
Toastmaster 3C84D, 3C84A, 3B84D, 3B20A, 3C80A, 3A20A, 3A80A, 3B80A, 3D8XD, 3B84A, 3A81D manual Initial Start-up

3A81D, 3C84D, 3B84A, 3D8XD, 3B80A specifications

Toastmaster appliances, especially from models 3A20A, 3B84A, 3D8XD, 3C84A, and 3B84D, are renowned for their innovative features and reliability in the kitchen. These models are designed to elevate culinary experiences, catering to both novice cooks and seasoned chefs.

Starting with the Toastmaster 3A20A, this model is equipped with a powerful heating element that ensures quick and even cooking. Its user-friendly interface allows for precise temperature control, making it ideal for a variety of dishes. The 3A20A also boasts an automatic shut-off feature, enhancing safety by preventing overheating.

The Toastmaster 3B84A stands out with its sleek design and advanced technology. It includes a digital display that shows cooking times and temperature settings, allowing users to monitor their meals effortlessly. The convection cooking feature promotes even heat distribution, which is essential for baking and roasting tasks. Additionally, the 3B84A has a durable stainless-steel exterior that not only looks good but is also easy to clean.

Next, the Toastmaster 3D8XD emphasizes versatility with its multiple cooking functions, which include toasting, baking, broiling, and more. It features an adjustable rack for various food sizes and types. The 3D8XD utilizes advanced heating technology to ensure faster cooking times, while its compact size makes it a perfect fit for kitchens with limited space.

In the lineup, the Toastmaster 3C84A offers excellent capacity and functionality. With a spacious interior, this model can accommodate larger dishes, making it suitable for family gatherings or meal prep. Its intuitive control panel allows users to toggle between different modes effortlessly. The 3C84A also features a timer and alert system, ensuring that meals are cooked to perfection without constant supervision.

Lastly, the Toastmaster 3B84D combines efficiency and performance in one package. It is equipped with a turbo fan that enhances air circulation, promoting quicker cooking and browning. The model is designed for easy operation, with clearly labeled settings that simplify the cooking process. Its robust build ensures durability, making it a reliable kitchen companion for years to come.

Overall, the Toastmaster models 3A20A, 3B84A, 3D8XD, 3C84A, and 3B84D exemplify a blend of convenience, safety, and high performance, catering to a wide range of culinary needs. Their advanced features make them essential tools in any modern kitchen, promising delicious results every time.