User Guide
TF 6000 PVR ES
Personal Video Recorder
TOPFIELD
Page
Contents
2 Setup
1 Introduction
3 Preference Settings
4 Service Search
5 Daily Usage
Listing Services
Recording and Playing
Accessing to The Digital Receiver via The Internet
Firmware Update
Topfield Application Program
Index
Contents
Page
1.1 Features
Introduction
Chapter
1.2 Controlling the digital receiver
1.2.1 The front panel
1.2.2 The remote control
Page
Page
1.3 What is common interface?
2.1 Unpacking
Setup
2.2 Safety precautions
Chapter
Place the digital receiver on a firm and level surface
2.3 Rear panel connections
2.4 Connecting up your digital receiver
2.4.1 Connecting the antenna
2.4 Connecting up your digital receiver
2.4.2 Connecting to your television
To use the HDMI connector
To use the SCART connector
To use the S-Video connector
To use the composite video connector
To connect the audio connectors
2.5 Switching on for the first time
2.4.3 Connecting to your video cassette recorder
2.5.1 Inserting batteries in the remote control
2.5.2 Powering on and checking picture
Menu language
Preference Settings
3.1 Language settings
Chapter
Subtitle language
Audio language
20 Preference Settings
3.2 Video and audio settings
3.2.1 Television standard
3.2.2 Colour model
3.2.3 Video cassette recorder
3.2.4 Television aspect ratio
3.2.5 High definition television
3.3 Local time setting
3.2.7 Audio mode
3.2.6 Video scaling
3.4 Parental control
26 Preference Settings Table 3.1 Time offset table
Time offset
City
Select the System Setting Parental Control menu. You should see a screen like the left figure, and you will be asked your Personal Identifica- tion Number PIN. The number is initially set to ‘0000’
3.7 To use MediaHighway programme guide
3.5 Adjusting the on-screen display
3.6 To turn on the time shift feature
28 Preference Settings
3.7 To use MediaHighway programme guide
4.1.1 Configuring LNB settings
Service Search
4.1 Searching broadcasting services
Chapter
The other is Ku band which ranges approximately from 12 to 18 GHz
You had better ignore the 22 kHz option
4.1.2 Configuring DiSEqC 1.2 settings
4.1.3 Configuring USALS settings
Page
4.1.4 Searching services
Searching every service of a satellite
Searching every service of a transponder
Searching one service of a transponder
4.2 Copying services
Searching every service of SMATV system
4.3 Resetting to factory settings
5.2 Watching television
5.1 Volume control
Daily Usage
Chapter
On the services list, you can see the service information
To add the highlighted service into a favourite group
5.2.2 The favourite services list
5.2.3 Viewing programme information
5.2.4 Selecting audio tracks
5.2.5 Selecting subtitle tracks
5.2.6 Viewing teletext
5.3 Viewing electronic programme guide
5.5 Using time shift
5.4 Watching multifeed programme
With time shift enabled, the following operations are possible
5.6 Using picture in picture
Listing Services
6.1 Editing the services list
Chapter
6.1 Editing the services list
To delete a service, select the Delete option and select a desired
confirmation. If you select Yes, the selected
6.2 Editing the favourite list
52 Listing Services
6.2 Editing the favourite list
6.3 How to use on-screen keyboard
6.4 Transferring receiver data
6.5 Editing channel data on your computer
2. Select the Up & Down Upload from STB menu
6.5.1 Editing satellite and transponder list
58 Listing Services
6.5.2 Editing television and radio services list
6.5.3 Editing favourite list
60 Listing Services
To modify a favourite group, select the Function Fav Group
Recording and Playing
Chapter
62 Recording and Playing
7.1 Recording a programme
7.1.1 Instant recording
To specify an arbitrary recording duration, set the Duration
7.1.2 Timer recording
receive your desired service
Every Weekday means ‘from Monday to Friday every week’
7.1.3 Scheduling recordings using the programme guide
7.1.4 Recording a time-shifted programme
7.1.5 Recording a pay service programme
7.2 File archive
7.2.1 To delete a recording
7.2.2 To sort recordings
7.2.6 To move a recording to another folder
7.2.3 To lock a recording
7.2.4 To rename a recording
7.2 File archive
7.3.1 To navigate using the progress bar
7.3 Playing back a recording
7.3.2 To play in slow motion
7.3.3 To play in fast motion
7.3 Playing back a recording
7.3.4 To make a bookmark
7.3.5 To play back a recording repeatedly
74 Recording and Playing
Select each desired recording with the
7.3.6 To play back recordings in sequence
7.3.7 To play back a scrambled recording
button. once a
7.4 Copying a recording
7.5 MP3 playback
7.6 Transferring recording files
The instructions on how to use Altair are as follows
7.7 Formatting the hard disk
Accessing to The Digital Receiver via The Internet
Chapter
8.1.1 To access within the local area network
8.1 Configuring the router
8.1.2 To access on the level of the Internet
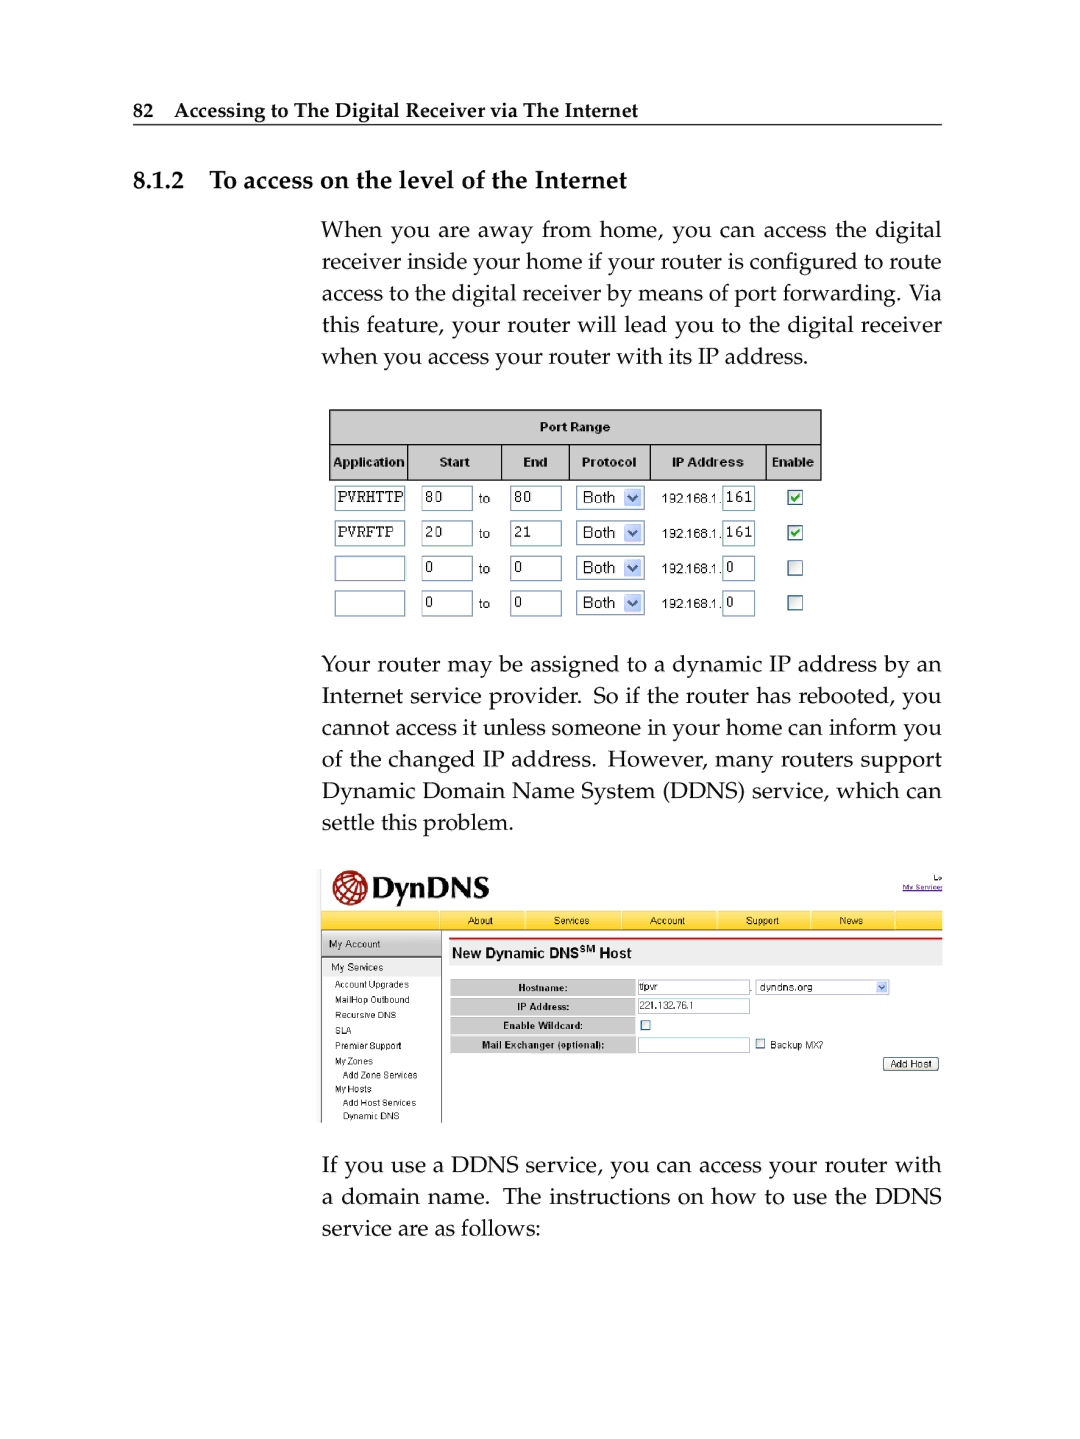
82 Accessing to The Digital Receiver via The Internet
1. Make an account on a web site providing DDNS service, which should be supported by your router
8.2 Configuring the network settings on the digital receiver
84 Accessing to The Digital Receiver via The Internet
8.3 Accessing the web server
86 Accessing to The Digital Receiver via The Internet
8.4 Accessing the FTP server
88 Accessing to The Digital Receiver via The Internet
Topfield Application Program
Chapter
Page
Firmware Update
10.1 Checking the firmware information
Chapter
10.2 From your computer via USB port
10.3 From your computer via RS-232 port
10.4 From another digital receiver via RS-232 port
10.3 From your computer via RS-232 port
10.5 Over the air
10.5 Over the air
Index
96 INDEX
Factory Setting
LAN Setting
Language Setting
Firmware Upgrade
98 INDEX
Transfer Firmware to Other IRD
transponder, 1 Tuner, 42 Tuner 1 Tuner 1 to Tuner 2 Tuner 2
TV, 15, 24 TV Aspect Ratio, 22 TV Service TV Type, 21 Type Upload
Upload from STB USALS USALS Setting USB USB, 56, 77 User User ID VCR
Tuner 2 to Tuner 1 Tuner Select, 29, 31, 34, 35 Turbo Off TV
Page
Page
Correct disposal of this product