19SLV411U 24SLV411U 32SLV411U
Dear Customer
Safety Precautions
Combination, please read this manual completely
Additional Safety Precautions
Important Safety Instructions
Installation, Care, and Service
Installation
Damage
Care
Choosing a location for your LCD TV / DVD combination
Service
TV Size Hole PatternHxV
Removing the Pedestal Stand
Never use the unit when moisture condensation may occur
19SLV411U
Moisture condensation may occur in the following situations
Structure of disc contents
On cleaning discs
On handling discs
On storing discs
Disc
Playable discs
Disc Maximum
Playback time
Energy Star User Information
Trademark Information
Contents
Introduction
Features of your new TV
TV mode
Power On / Standby LED
TV front, top and side panel controls and connections
19SLV411U / 24SLV411U / 32SLV411U Left side panel
AUDIO/COLOR Stream HD ColorStream
Overview of cable types
Connecting your TV
Connecting a camcorder
Connecting a VCR, and antenna, Cable TV
Connecting a DVD player with ColorStream component video
Connecting a satellite receiver
To view the DVD player
Standard audio cables Component video cables
To connect an Hdmi device, you will need
Connecting an Hdmi or DVI device to the Hdmi input
To view the Hdmi device video
To connect a DVI device, you will need
Before controlling the devices
REGZA-LINKconnection
Hdmi cables
To control the audio
Connecting a digital audio system
Press or to select Optical Output Format
To connect a PC to the PC in terminal on the TV
Connecting a personal computer PC
To connect a PC to the Hdmi terminal on the TV
Preparing the remote control for use
Using the remote control
Installing the remote control batteries
Subtitle / CC
Learning about the remote control
Contain two or more titles
Closes on-screen menus
Begins playback of the loaded disc
Stops playback of the loaded disc
Main menu layout
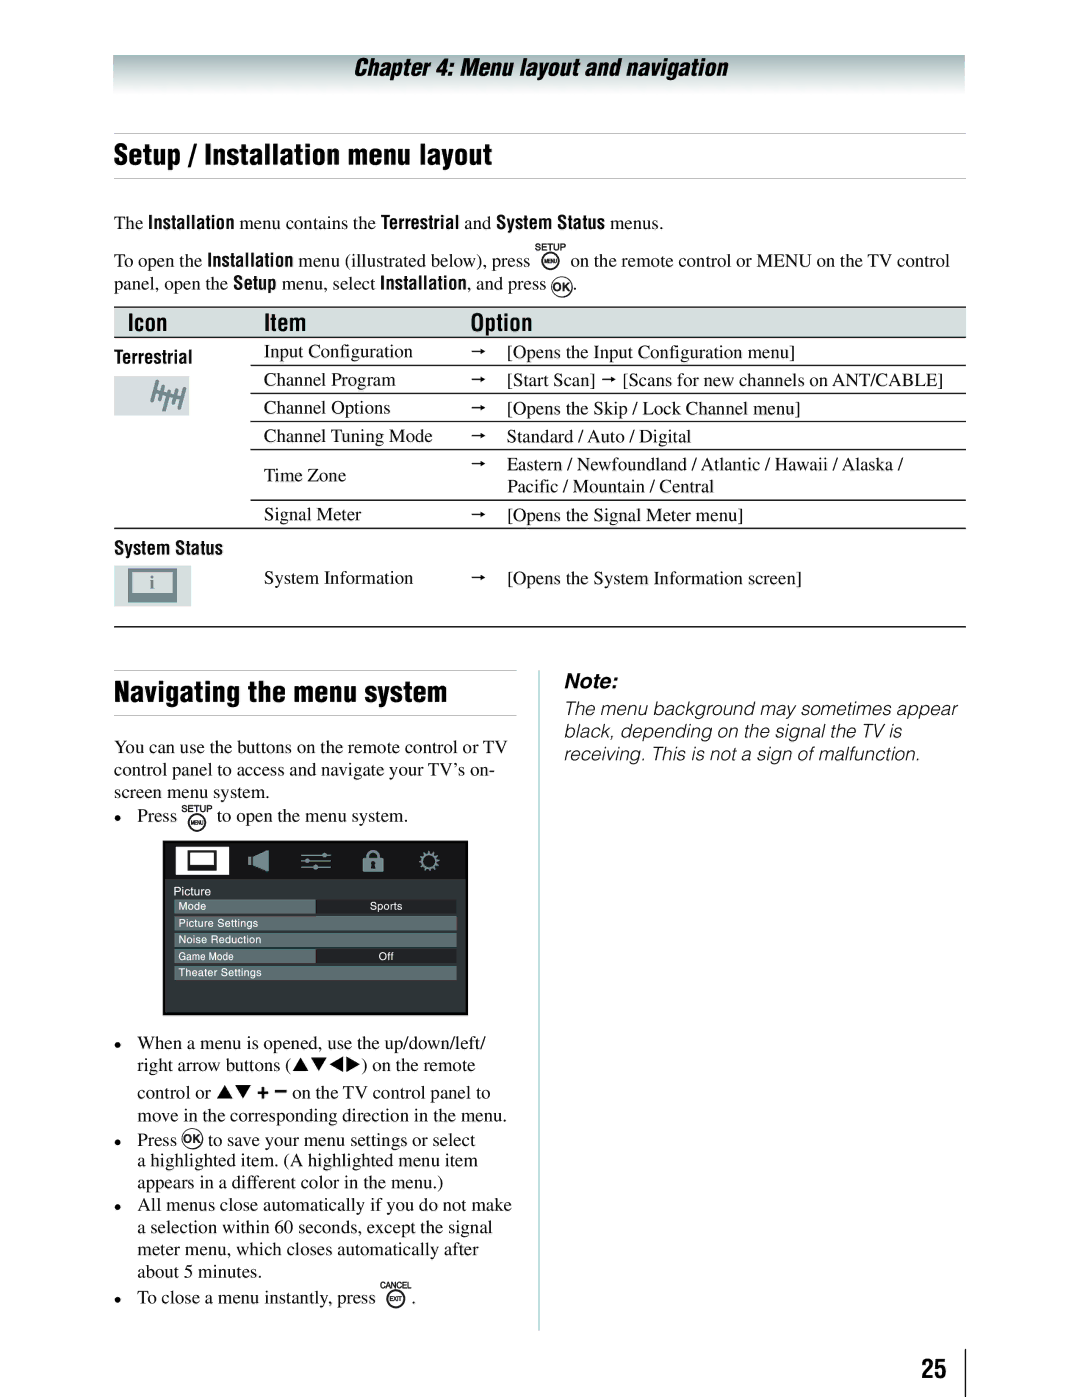
Menu layout and navigation
Icon Option
Input Configuration Opens the Input Configuration menu
Setup / Installation menu layout
Navigating the menu system
System Information Opens the System Information screen
Initial Setup
Setting up your TV
Selecting the menu language
Programming channels into the TV’s channel memory
To program channels automatically
Setting channel skip
To add a channel to the channel memory
To block channels in the channel memory
To set the Hdmi audio mode
Setting the Hdmi audio mode
Mode Description
To manually add digital subchannels on a physical channel
Setting the time zone
Viewing the digital signal meter
Reset Factory Defaults
Viewing the system status
Selecting the video input source to view
Using the TV’s features
Labeling the video input sources
To select the video input source to view
Tuning channels using Channel Browser
Tuning channels
Favorites Browser
Elements of the Channel Browser
To tune to a channel or input in Browse mode
To open the Channel Browser
To toggle among the available lists
History List
Setting the Channel Tuning Mode
Switching between two channels using SurfLock
Tuning to the next programmed channel
Selecting the picture size
Full
To select the picture size using the menus
TheaterWide
Native
To set the scroll settings
Using the auto aspect ratio feature
Normal
Dot by Dot
Selecting the cinema mode
Adjusting the picture
Using the Freeze feature
Selecting the picture mode
Adjusting the picture quality
Using the closed caption mode
To adjust the picture quality
Base closed captions
Digital CC Settings
Adjusting the audio
Using the digital audio selector
CC Selector
Adjusting the audio quality
Using the MTS button
Selecting stereo / SAP broadcasts
Selecting the optical audio output format
Entering the PIN code
Using the Locks menu
If you cannot remember your PIN code
Changing your PIN code
To block and unblock TV programs and movies
Press to highlight Enable Rating Blocking
To download the additional rating system if available
Press to select On
Independent rating system for movies
Independent rating system for broadcasters
Canadian Raging Menu will appear
English
Using the GameTimer
Using the input lock feature
Unlocking programs temporarily
Locking channels
Setting the PC Audio
Using the PC settings feature
Using the panel lock feature
Using the Media Player with USB
Using the Media Player
To select the Auto Start function
To open the Media Player
Single View
Viewing photo files
Slide Show
Playing music files
During playback
To set the repeat mode
To close the Music Player
To sort the folders and files
Automatic Power Down
Setting the sleep timer
No Signal Power Down
Available remote control key functions
Using REGZA-LINK
REGZA-LINKplayback device DVD player, etc. control
REGZA-LINKinput source selection
To set the REGZA-LINKSetup
Volume and Mute controls of Audio Receiver
Other REGZA-LINKfunctions
Understanding the last mode memory feature
Understanding the auto power off feature
Displaying TV status information
To display TV status information
Using the advanced picture settings features
Using the TV’s advanced features
Using Dynamic Contrast
Using the Static Gamma feature
Using Mpeg Noise Reduction
Using CableClear digital Noise Reduction
Using the Game Mode feature
Disc playback
Basic disc playback
Basic playback DVD/VCD/CD
Removing a disc
Playing frame by frame DVD/VCD
Playback navigation
Playing in slow motion DVD/VCD
Locating a chapter or track DVD/ VCD/CD
Advanced disc playback
Using Zoom DVD/VCD
Zoom function/Scene navigation
Locating a specific scene
Repeat playback/A-B repeat
Scene bookmark
Viewing a scene bookmark DVD/VCD/ CD
Enabling repeat playback DVD/VCD
Programmed playback/Random playback
Enabling A-B repeat mode DVD/VCD/ CD
Programming the playback sequence VCD
Press Until
Enabling random playback VCD
Scene angle/Title selection/DVD menu
Changing the scene angle DVD
Selecting a DVD title DVD
Selecting the audio channel VCD
Selecting a soundtrack language DVD
Viewing subtitles DVD
Viewing the playback info DVD/VCD
MP3/WMA/JPEG/Audio CD information CD
MP3, WMA, JPEG, and Audio CD operation
Playing an audio file CD
About the file browser CD
Viewing a slide show CD
Viewing a Jpeg file CD
MP3, WMA, Jpeg and Audio CD playback modes
To activate Music Intro mode
Enabling random playback CD
Enabling repeat playback CD
Programming the playback sequence CD
Press or to select Edit Mode, then press to disable it
To remove a file from the programmed list
Press or to select Program View, then press
DVD mode, press during stop mode
Configuring the disc playback settings DVD/VCD/CD
Customizing disc playback
Customizing disc playback
Disc playback setup
Menu English
NightNfov!Mode !FohmjtiOff
Customizing disc playback
General troubleshooting
Troubleshooting
LED Indication
Troubleshooting
Appendix
Specifications
19SLV411U 0.55 a 24SLV411U 0.75 a 32SLV411U 1.35 a
19SLV411U 3 W + 3 W 24SLV411U 5 W + 5 W 32SLV411U 7 W + 7 W
PC in signal formats
Acceptable signal formats for PC in and Hdmi terminals
Hdmi signal formats
Format Resolution Frequency Pixel Clock Frequency
Limited United States Warranty for LCD TV/DVD Combination
This WARRANTY, Whether Made by TCL, Toshiba
CORPORATION, Their AFFILIATES, ADRs and ASPs
Appendix
Appendix
Appendix
Appendix
Page
America Information Systems, Inc
Easy Setup Guide
Dear Customer
Safety Precautions
Additional Safety Precautions
Important Safety Instructions
Installation, Care, and Service
Damage
Care
44 ~ Warning j\
37 ~ Warning j\
LOOxlOO mm 200x200 mm Unit in mm
Moisture condensation may occur in the following situations
Never use the unit when moisture condensation may occur
~ x~~\
Toshiba 19SLV411U, 24SLV411U
Playable discs
Location of the required Marking
Energy STAR@ User Information
19SLV411 U/ 24SLV411 U / 32SLV411 U
Power On / Standby LED
Left side panel
Effective range
AUDIO/COLOR Stream HD ColorStream
Audio Setup menu
SUBTiTlE / CC SU@LE
Accesses the sleep timer
Illuminated in green
Reduces or turns oft the soun
Cancel / Exit 8 closes on-screen menus
Play Mode
Angle
Also see ~ / ~
Highlight Menu Language
Initial Setup
Specifications
HDl\lI signal formats Format Resolution
PC in signal formats Format Resolution
Frequency Pixel Clock Frequency
Limited United States Warranty for LCD TV/DVD Combination
COlltilll/cd
3404
Preamble
GNU General Public License GPL Version 2, June
If, as a consequence of a court judgment or allegation
Libpng License Notices
Zlib License
Toshiba
Xlx4
Assembly INSTRUCTIONS/INSTRUCTIONS DE Montage
800 631-3811 For US Customers
Littt