15CV100U 15CV101U 19CV100U 22CV100U 26CV100U 32CV100U
Dear Customer
Safety Precautions
Important Safety Instructions
Installation, Care, and Service
Installation
Risk of Electric Shock
Care
To Display your LCD TV using a Wall Bracket
Service
Choosing a location for your LCD TV
To Display your LCD TV on the included Pedestal Stand
Wait
Removing the Pedestal Stand
Structure of disc contents
On cleaning discs
On handling discs
On storing discs
Video
Playable discs
Important notes about your LCD TV
Contents
VCD/CD
Introduction
Features of your new TV
Hdmi capabilities
Energy Star qualified
15CV100U/15CV101U
TV front, top and side panel controls and connections
19CV100U/22CV100U/26CV100U/32CV100U
Adjusting the screen angle Applicable to 19CV100U/22CV100U
19CV100U/22CV100U
26CV100U/32CV100U
AUDIO/COLOR Stream HD
TV back panel connections
Overview of cable types
Connecting your TV
You will need
To view the antenna or Cable signal
To view basic and premium Cable channels
To view the VCR
Connecting a satellite receiver
Connecting a DVD player with ColorStream component video
To view the DVD player
To connect an Hdmi device, you will need
To view the Hdmi device video
To connect a DVI device, you will need
Before controlling the devices
REGZA-LINKconnection
TV’s Digital Audio OUT terminal
Connecting a digital audio system
To control the audio
Sound menu
Connecting a personal computer PC
To connect a PC to the PC in terminal on the TV
To connect a PC to the Hdmi terminal on the TV
Using the remote control
Preparing the remote control for use
Installing the remote control batteries
Learning about the remote control
Using the remote control
Menu layout and navigation
Setup/Installation menu layout
Main menu layout
Navigating the menu system
Setting up your TV
Initial Setup
Selecting the menu language
Programming channels automatically
Programming channels into the TV’s channel memory
Programming channels manually
To program channels automatically
Labeling channels
To set the Hdmitm audio mode
Setting the Hdmitm audio mode
To create and assign a custom label
To delete the custom label
Setting the Time Zone
Viewing the digital signal meter
Reset Factory Defaults
Viewing the system status
Selecting the video input source to view
Using the TV’s features
Labeling the video input sources
To label the video input sources
Tuning channels
Setting the Channel Tuning Mode
Tuning to the next programmed channel
Tuning to a specific channel programmed or unprogrammed
Switching between two channels using Channel Return
Selecting the picture size
TheaterWide For 43 format programs
Picture Size Natural
TheaterWide For letter box programs
TheaterWide For letter box programs with subtitles
Using the auto aspect ratio feature
Selecting the cinema mode
Scrolling the TheaterWide picture TheaterWide 2 and 3 only
Adjusting the picture
Selecting the picture mode
Adjusting the picture quality
Digital CC Settings
Using the closed caption mode
Base closed captions
To customize the closed captions
Using the digital audio selector
Adjusting the audio
CC Selector
Muting the sound
Adjusting the audio quality
Selecting the optical audio output format
To listen to stereo sound
Using the Dolby Digital Dynamic Range Control feature
Using the Locks menu
Entering the PIN code
If you cannot remember your PIN code
Blocking TV programs and movies by rating V-Chip
To block and unblock TV programs and movies
To download the additional rating system if available
Unlocking programs temporarily
Using the input lock feature
Using the GameTimer
Using the control panel lock feature
Setting the PC Audio
Using the PC settings feature
Setting the sleep timer
Using REGZA-LINK
REGZA-LINKplayback device DVD player, etc. control
REGZA-LINKPlayer Control menu functions
Volume and Mute controls of Audio Receiver
REGZA-LINKinput source selection
Other REGZA-LINKfunctions
Understanding the auto power off feature
Understanding the last mode memory feature
Displaying TV status information
Using the advanced picture settings features
Using the TV’s advanced features
Using dynamic contrast
Using the static gamma feature
Using CableClear digital noise reduction
Using the Auto Brightness Sensor
Using Mpeg noise reduction
Using the Game Mode feature
Using the Media Player
Using the advanced audio settings features
Using the QSound sound feature
Media Player Specifications
Viewing Jpeg files
Basic Operation
To use the remote control button in music playback
To set background music for photo mode
Listening to MP3 files
To use the photo Quick Menu
To use the music Quick Menu
Basic disc playback
Disc playback
Basic playback DVD/VCD/CD
Removing a disc
Playback navigation
Disc playback reminders
Playing frame by frame DVD/VCD
VCD/CD
Locating a chapter or track DVD
Advanced disc playback
Using Zoom DVD/VCD
Zoom function/Scene navigation
Locating a specific scene DVD/VCD/ CD
Repeat playback/A-B repeat
Scene bookmark
Bookmarking a scene DVD/VCD/ CD
Viewing a scene bookmark DVD/VCD/ CD
Enabling A-B repeat mode DVD/ VCD/CD
Programmed playback/Random playback
Programming the playback sequence VCD
Enabling random playback VCD
Scene angle/Title selection/DVD menu
Changing the scene angle DVD
Selecting a DVD title DVD
Selecting a soundtrack language DVD
Playback information/VCD play- back control
Selecting the audio channel VCD
Viewing subtitles DVD
To turn on the PBC function
Turning off the PBC function VCD
MP3/WMA/JPEG/Audio CD information CD
MP3, WMA, JPEG, and Audio CD operation
Playing an audio file CD
About the file browser CD
Viewing a slide show CD
Viewing a Jpeg file CD
Enabling repeat playback CD
MP3, WMA, Jpeg and Audio CD playback modes
Enabling random playback CD
Track or All
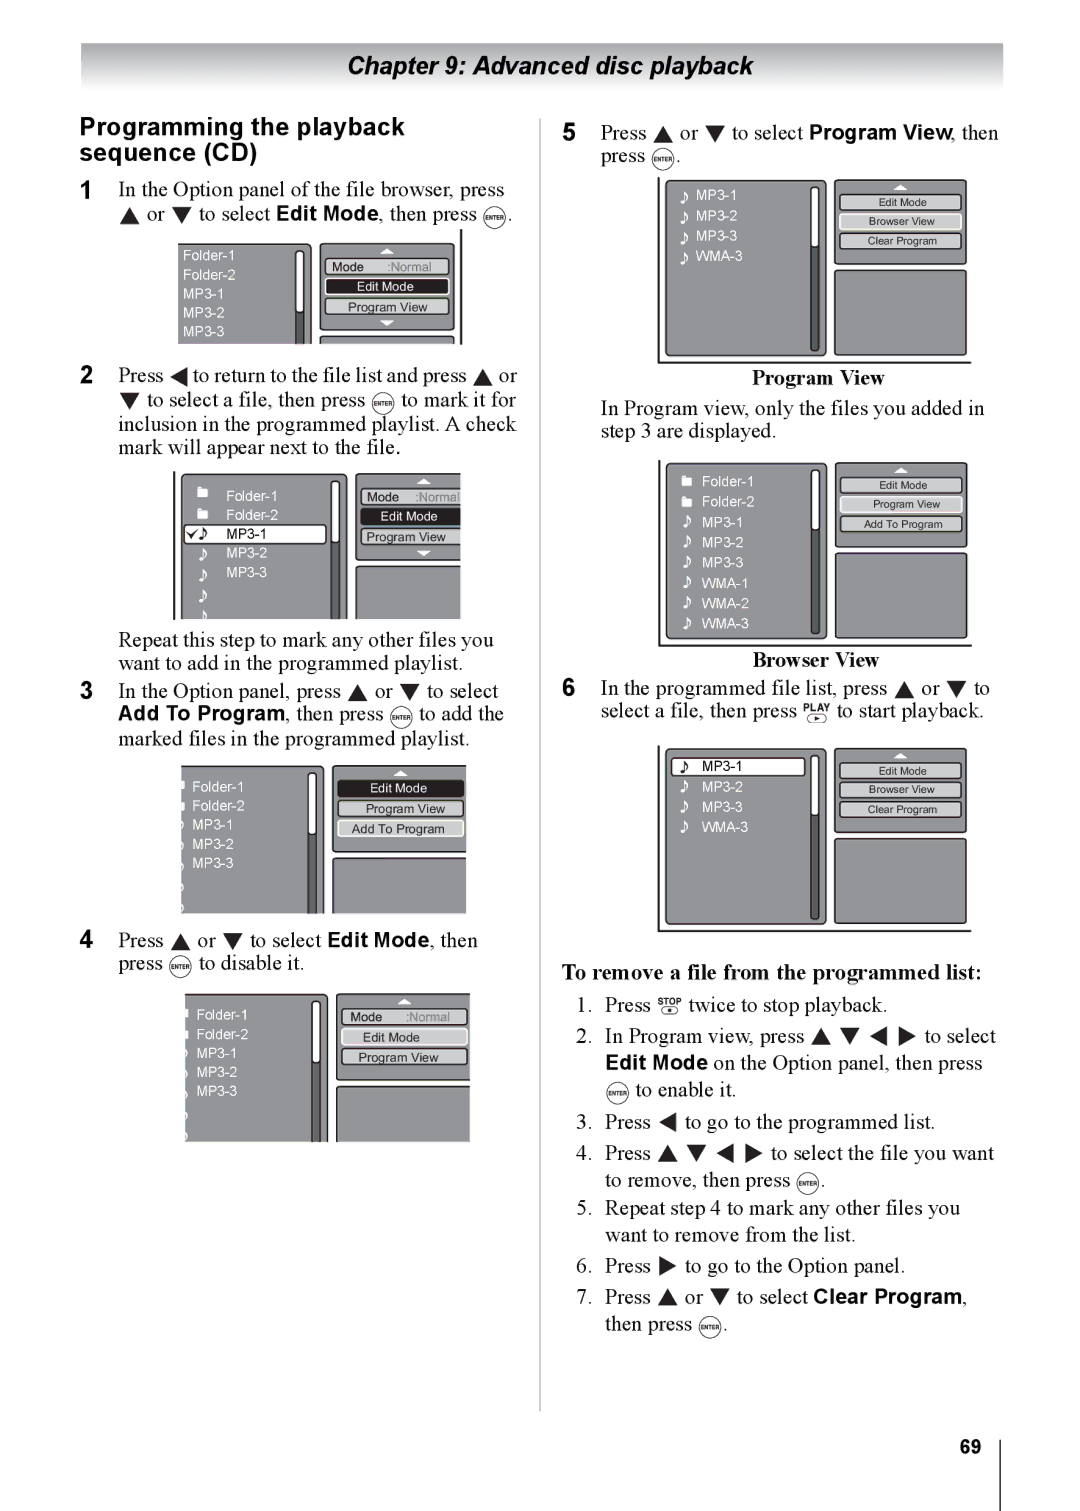
To remove a file from the programmed list
Programming the playback sequence CD
Program View
Browser View
Configuring the disc playback settings DVD/VCD/CD
Customizing disc playback
Customizing disc playback
Tab Option Description Go to
Disc playback setup
Off Slide show option is disabled
Picture Mode
Menu / OSD
Subtitle / Audio
Digital Out
Night Mode
Off
Bitstream
To temporarily cancel the parental restriction
Password
If you forget the system password
General troubleshooting
Troubleshooting
Closed caption problems
Channel tuning problems
Rating blocking V-Chip problems
Hdmi problems
LED Indication Power LED Green is on solid
LED Indication
Red is on solid
Appendix
Specifications
Acceptable signal formats for PC in and Hdmi terminals
PC in signal formats
Hdmi formats
LCD TV/DVD Combination Depot Repair Warranty
Limited United States Warranty
Appendix
Preamble
GNU General Public License GPL Version 2, June
Appendix
How to Apply These Terms to Your New Programs
No Warranty
Copyright NOTICE, DISCLAIMER, and License
Libpng License Notices
Version 1.2.3, July 18th
Zlib License
Page
Toshiba America Consumer PRODUCTS, L.L.C