MANUAL CLOCK SETTING
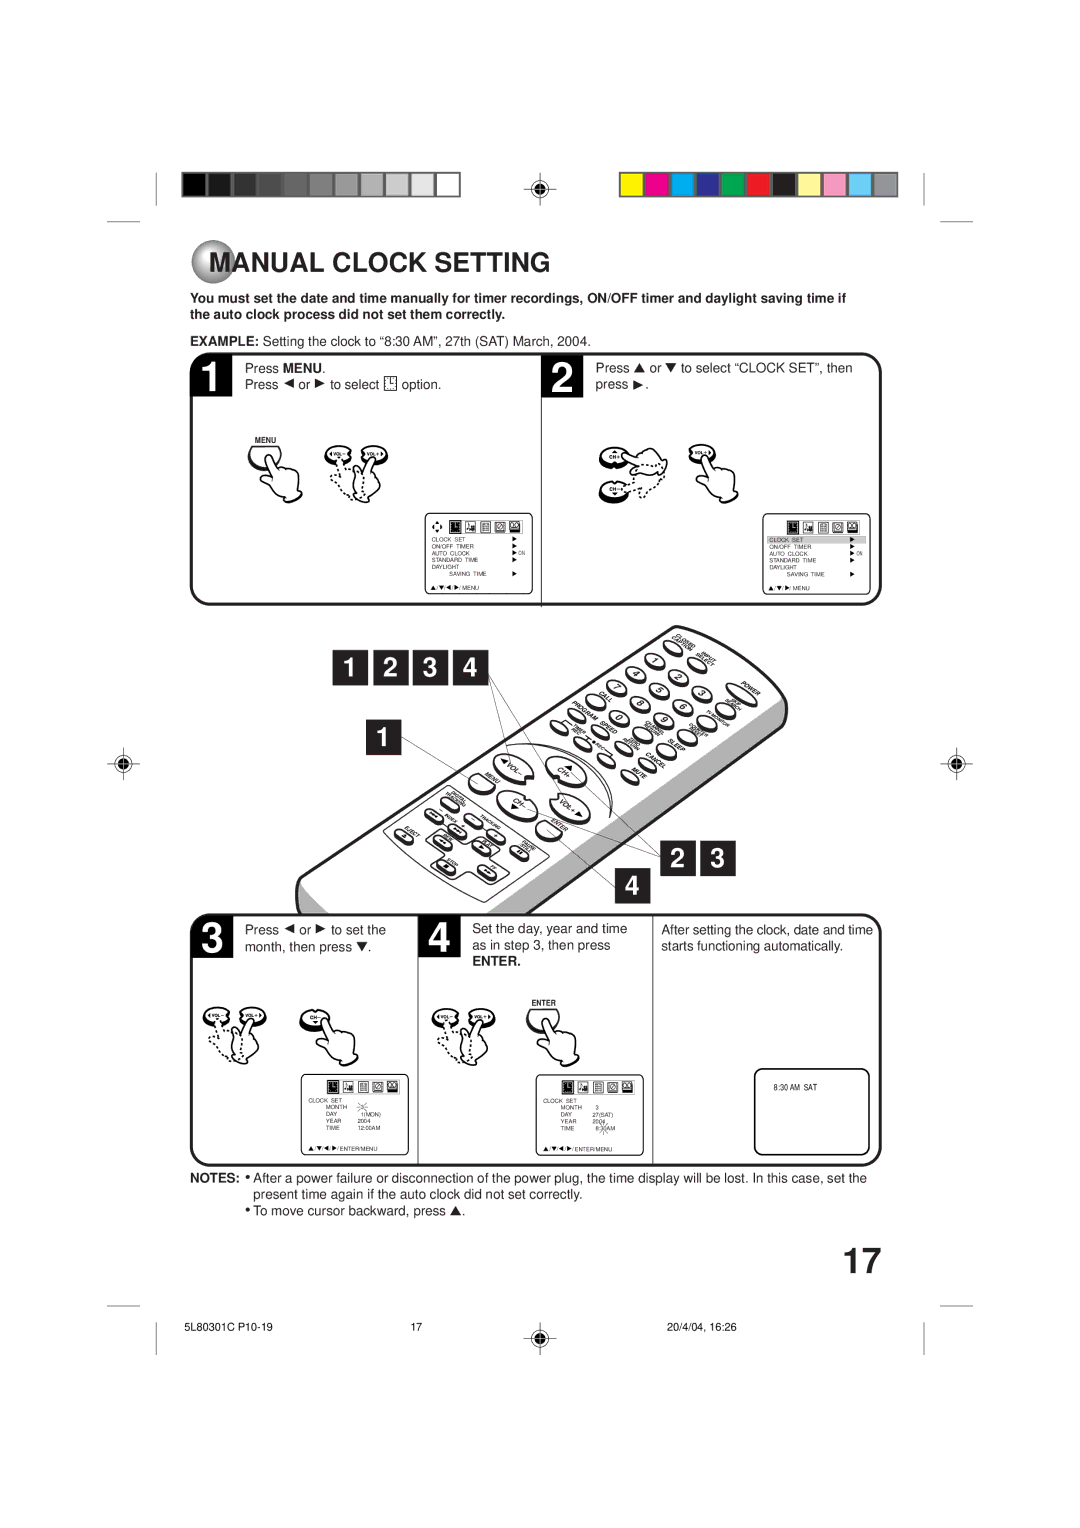
You must set the date and time manually for timer recordings, ON/OFF timer and daylight saving time if the auto clock process did not set them correctly.
EXAMPLE: Setting the clock to “8:30 AM”, 27th (SAT) March, 2004.
1 | Press MENU. |
| |
| Press Bor Ato select option. |
| MENU |
CLOCK SET |
|
ON/OFF TIMER |
|
AUTO CLOCK | ON |
STANDARD TIME |
|
DAYLIGHT |
|
SAVING TIME |
|
/ / / / MENU |
|
2 | Press ▲ or ▼ to select “CLOCK SET”, then |
| |
| press A. |
|
|
|
|
|
|
|
|
|
|
|
|
|
|
|
|
|
|
|
|
|
|
|
|
|
|
|
|
|
CLOCK SET |
|
|
| |||||
ON/OFF TIMER |
|
|
| |||||
AUTO CLOCK |
| ON | ||||||
STANDARD TIME |
|
|
| |||||
DAYLIGHT |
|
|
| |||||
SAVING TIME |
|
|
| |||||
/ / / MENU |
|
|
| |||||
1
 2
2 
 3
3 
 4 1
4 1
MENU |
DIGITAL |
VOL–
| 7 |
PROGRAM | CALL |
0 | |
RECTIMER | SPEED |
| REC |
CH+ |
|
|
| CLOSED |
|
|
|
|
| CAPTION | INPUT |
| |
| 1 |
|
| ||
|
|
| SELECT |
| |
4 |
| 2 |
|
|
|
|
|
|
|
| |
| 5 |
| 3 |
|
|
8 |
|
|
| SKIP | |
| 6 |
|
| ||
|
| TV |
| SEARCH | |
| 9 |
| MONITOR | ||
|
|
| |||
| CHANNEL | RESETCOUNTER |
|
| |
RETURN |
|
| |||
ZERO |
| SLEEP |
|
|
|
RETURN | CANCEL |
|
|
| |
MUTE |
|
|
|
| |
|
|
|
|
| |
POWER
| TRACKING |
|
|
| – |
|
|
| INDEX | – | TRACKING |
EJECT | + |
| |
REW |
| + | |
|
| PLAY | |
|
|
| |
| STOP |
| FF |
|
|
|
CH–
/STILLPAUSE
VOL+
ENTER
4
2 ![]()
![]() 3
3
3 | Press Bor Ato set the |
month, then press ▼. |
CLOCK SET |
|
MONTH | 3 |
DAY | 1(MON) |
YEAR | 2004 |
TIME | 12:00AM |
![]() /
/![]() /
/![]() /
/ ![]() / ENTER/MENU
/ ENTER/MENU
4 | Set the day, year and time |
| |
| as in step 3, then press |
| ENTER. |
| ENTER |
CLOCK SET |
|
MONTH | 3 |
DAY | 27(SAT) |
YEAR | 2004 |
TIME | 8:30AM |
![]() /
/![]() /
/![]() /
/ ![]() / ENTER/MENU
/ ENTER/MENU
After setting the clock, date and time starts functioning automatically.
8:30 AM SAT
NOTES: • After a power failure or disconnection of the power plug, the time display will be lost. In this case, set the present time again if the auto clock did not set correctly.
•To move cursor backward, press ▲.
17
5L80301C | 17 | 20/4/04, 16:26 |
