MW20FN3/R MW24FN3/R
Introduction
Location of the required Marking
Cleaning
Accessories
Power Sources Grounding or Polarization
POWER-CORD Protection
Power Lines
Replacement Parts
Safety Check
Connecting Laser Beam
Important Safeguards / Power Source
To USE AC Power Source
Precautions
Do not use the unit when moisture condensation may occur
To obtain a clear picture
Moisture condensation occurs during the following cases
On storing discs
On handling discs Structure of disc contents
On cleaning discs
DVD
On Video CDs
Playable discs
Contents
Rear panel
Identification of Controls
Front panel
DVD
TV/VCR operation status
DVD/Audio CD/Video CD operation status
Remote control
Volume
Closed Caption button
Channel
Battery precautions
Operation
Antenna connections
Connections
For subscriber to basic cable TV service
For subscriber to scrambled cable TV service
Cable TV Connections
Connections
Connecting to an audio system
Connecting to optional equipment
Connecting a camcorder or a TV game
Connecting to an amplifier equipped with a DTS decoder
Dolby Digital
Use DVD video discs encoded via the MPEG2 recording system
Basic setup
Setting the language
Setting the language
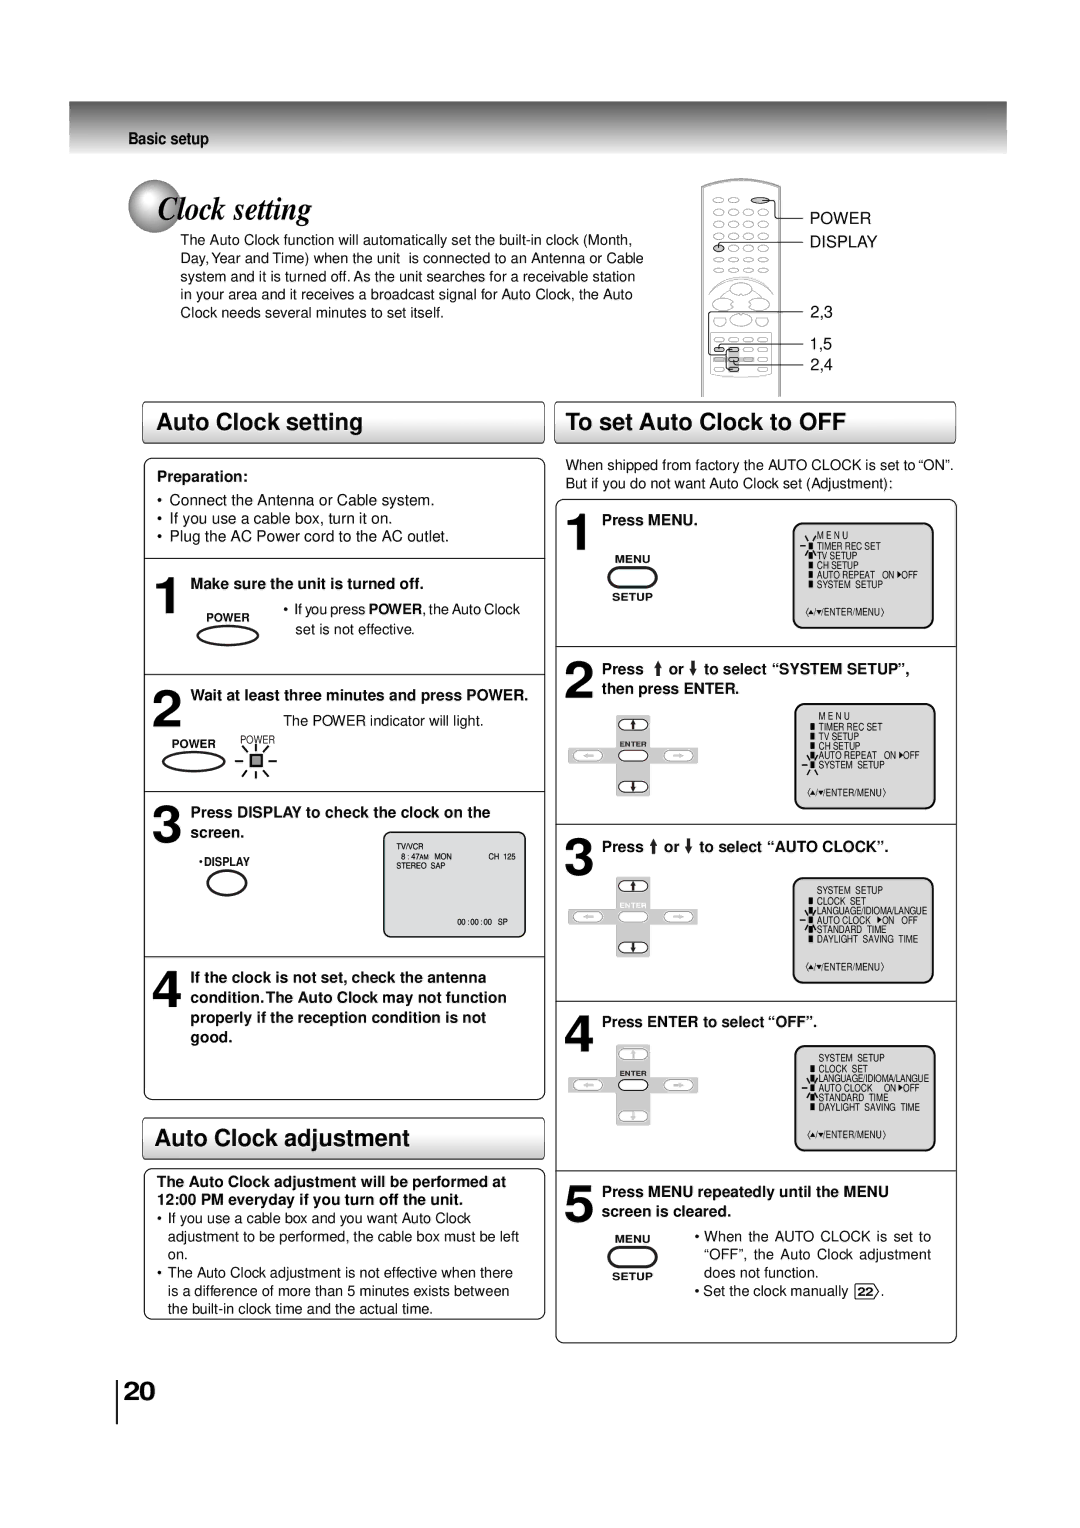
Clock setting
Auto Clock setting
Auto Clock adjustment
To set Auto Clock to OFF
To set standard time
To set daylight saving time
Enter
Manual clock setting
To make corrections any time during the process
Volume
TV Operation
TV operation
TV/VCR
Channel return
Sleep Mute
Channel
What is Closed CAPTIONING?
Closed Captions
Closed Captioning with a VCR
To View Closed Captions
TV/CATV selection
Tuner setting
Setting channels automatically
Select the desired channel to be added or deleted using or
To ADD/DELETE channels
Press or to select ADD/DELETE, then press Enter
Press Enter to select ADD or DEL
To set the V-chip
Setting the V-Chip
To register password
Press or to select desired rating, then press Enter
PG-13 Parental guidance
Press To select V-CHIP
Press Enter to display ON. V-CHIP SET
To Change password
Press MENU. Press or to select TV SETUP, then press Enter
Enter the same password again to confirm, then press Enter
Press or to select Change PASSWORD, then press Enter
To set the on timer
To set the on timer
Press or to select ON/OFF TIMER, then press Enter
Press or to select on TIMER, then press Enter
To set the off timer
To set the off timer
Picture control adjustment
Picture control adjustment
Sound control adjustment
Sound control adjustment
Press To adjust the setting
Press or to select AUDIO, then press
Loading and unloading a cassette tape
Loading
Unloading
To prevent accidental erasure
Rewind or forward the tape
Cassette tape playback
Playback
Special playback
Repeat playback
Using the real time tape counter
Convenient function
Zero return function Video head cleaning
VCR
Recording VCR
Recording a TV program
Recording a TV program
PAUSE/STILL
To stop recording
To stop recording temporarily
One-touch Timer Recording OTR
One-touch Timer Recording OTR
To cancel OTR
Set TV or Catv option to the appropriate position
Example
Timer recording
Timer recording
If the programs overlap another
To set daily/weekly timer To confirm the settings
To cancel a program
Setting the surround sound Setting the stable sound
Setting the surround sound Setting the stable sound
Other functions VCR To cancel the surround sound mode
Other functions VCR
Second Audio Program SAP Stereo recording and playback
Press or to select SAP. Then press Enter to select on
Listening to SAP
Output selection
Duplicating a video tape
Duplicating a video tape
Recording a DVD/CD disc
Duplicating a DVD or CD disc
Power
Press DVD to select DVD mode
Preparation
VCD Preparation
Playback procedure
VCD Playback procedure
VCD Fast forward playback
VCD Frame advance
Review playback
VCD Slow-motion playback
Zooming/Locating desired scene
Dvdvcd Zooming
VCD Locating desired scene
Advanced playback DVD
Repeat, Random and Program playback/Repeat A-B
VCD Repeat, Random and Program playback
VCD Repeat A-B
Program menu
Changing soundtrack language Subtitles
DVD Changing soundtrack language
DVD Subtitles
Audio Select
Changing angles/Title selection/DVD menu
DVD Changing Angles
DVD Title Selection
DVD DVD Menu
Function setup DVD
Setting language
DVD Setting Language
DVD Setting on screen display
Return
Press Or Enter to select DRC
Dynamic Range Control
DVD Dynamic Range Control
DVD Menu
Parental control setting
DVD Parental control setting
To change the parental level
DVD To change the parental level
Playback will commence if the entered password was correct
Setup DVD
DVD Temporary disabling of rating level by DVD disc
Load a DVD disc and press Play see
Before calling service personnel
Symptoms and correction
Symptoms Cause Possible Solutions Power
Others
Symptoms Cause Possible Solutions VCR
Remote Control
Reception disturbances
Ignition
Language code list
Specifications
General / input / output / supplied accessories
Supplied accessories
General
Limited warranty
Others
How to Obtain Warranty Service
Continental United States contact Hawaii Contact

 or
or  to select “AUTO CLOCK”.