RD-XS52SU RD-XS52SC RD-KX50SU
This HDD/DVD video recorder employs a Laser System
See service procedure
May result in hazardous radiation exposure
Location of the required label
Important Safety Instructions
Additional Safety Instructions
When not in use
Precautions
Introduction
Exemptions
Power Outage
Moisture condensation occurs during the following cases
Introduction Precautions
Do not use the unit when moisture condensation may occur
Wait
Connections
Registration card
Installation procedure
Accessories Remote control Batteries AAA x
Video/Audio cable IR control cable
About this product
DVD-RAM discs for your personal library
Using different disc types for different purposes
For recording / playback Disc Mark Specification Remarks
Choosing a disc
Disc
For playback only Disc Mark Specification Remarks
DVD-RAM discs with cartridges are recommended for recording
To protect recorded contents
On DVD-RAM discs
Introduction Choosing a disc
Marks on DVD video discs
On DVD-R discs
On storing discs
Structure of disc contents
On cleaning discs
On handling discs
Table of Contents
Close the cover
Preparation of the remote control
Operating with the remote control
Open the cover Insert batteries AAA size
When you connect a TV equipped with audio/ video inputs
Connection procedure
When you connect an audio system
Connections
Connecting an antenna and TV
Connect to a TV equiped with audio/video inputs
Connect the power cord of the recorder to a wall outlet
This set-up will allow you to
Connecting to cable TV signal
You will need to
Component Output
When the satellite system has audio/video outputs
Connecting to a satellite system
Signal sensor of the set top box
Connecting the IR control cable
Transmitter
About Hdmitm
Connecting to a TV with the Hdmi terminal
Audio setting for the Hdmi connection
Component video outputs/inputs
Connecting to aTV equipped with component video inputs
Digital audio input
Connecting to an audio system
Page
Basic Setup
Turning the power off
Basic Setup
Turning the power on
ON/STANDBY button ON/STANDBY indicator
Startup/finishing closing icons
Press Setup
Initial settings
Function
Tip on setting
If a message appears
Example of the icon
Basic Setup Initial settings
Language setting
Press / to select a language, then press
Auto
Time and date setting
Auto clock setting
Press / to select Auto or Manual, then press Enter
No Use
Press Enter
Auto
Use
Press / to select Yes, then press Enter
Manual clock setting
Press / and Adjust / to set the clock
After setting all the items, press Enter
Press / to select Channel setting, then press Enter
Channel setting
Press / to select TV or Cable, then press Enter
Press / to select Auto, then press
Channel reference
Adding or erasing channels
Preparation
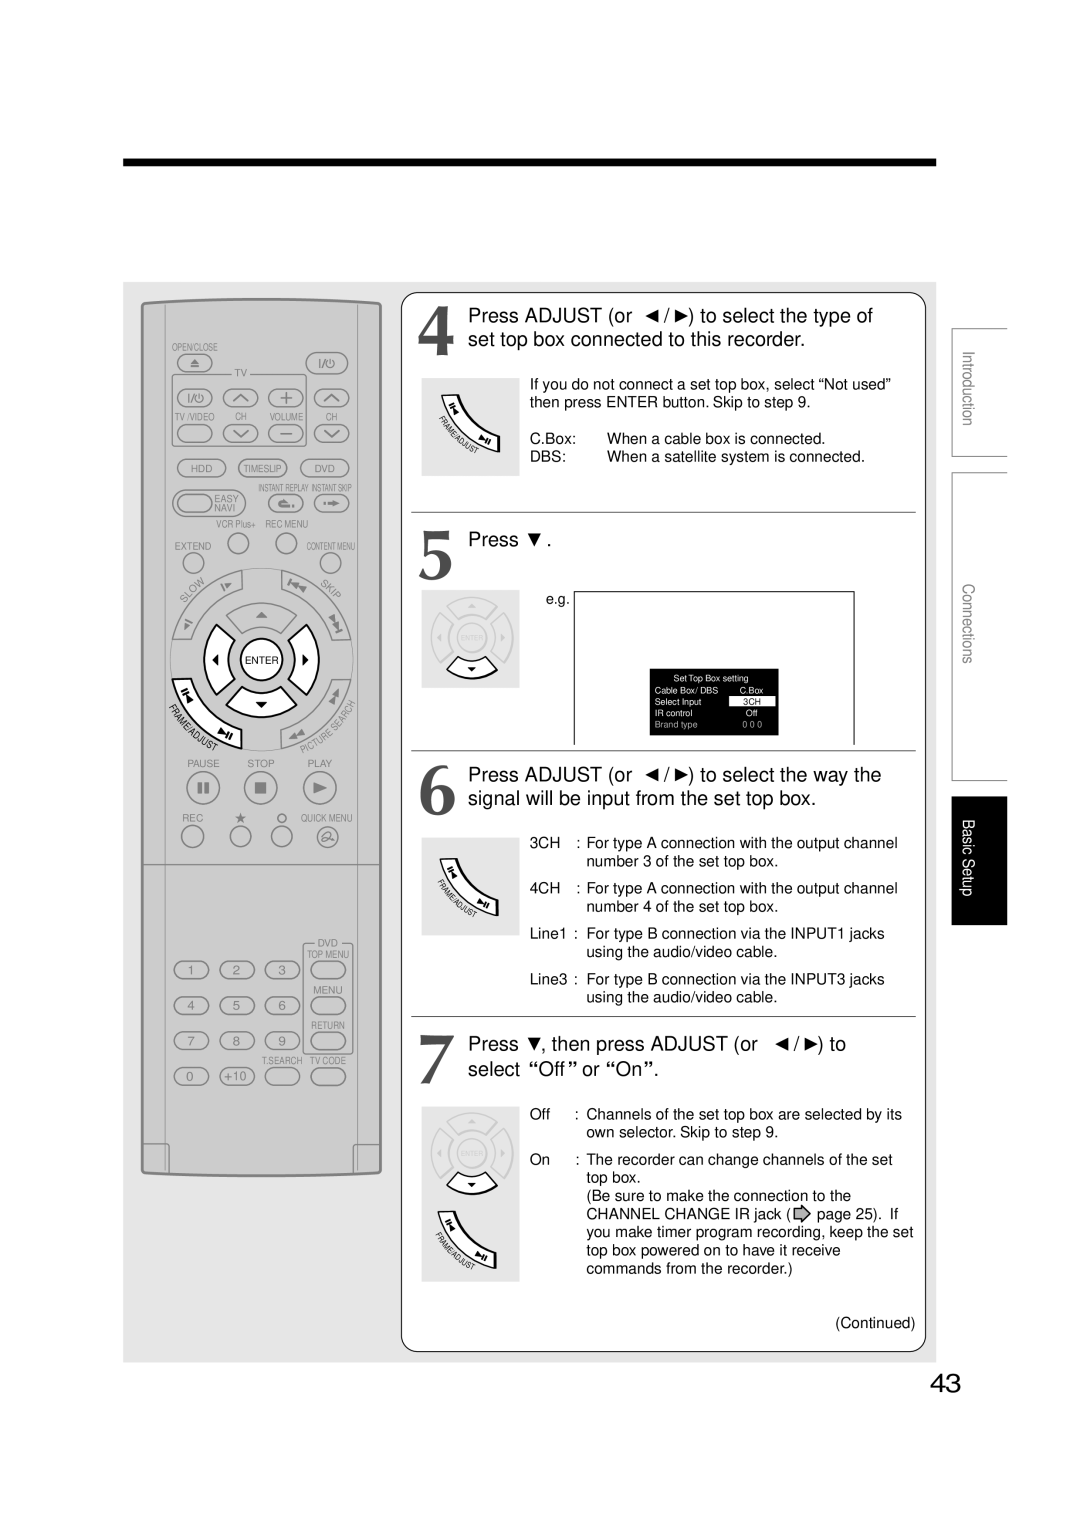
Set top box setting
Press
Press , then press Adjust or / to select Off or On
Off
10Press Setup
RCA
Set top box brand code
Sample of a Guide channel chart from a local TV listing
Guide channel setting
Guide channel number 33 HBO
Press / to select Audio out select, then press Enter
Output sound setting
Press Setup to display the setup menu
Press / to select Picture/Audio settings, then press Enter
Analog 2ch
Once the proper setting is selected, press
Press / to select the output sound format
Bitstream
Press / to select Display settings, then press Enter
TV shape setting
Press / to select TV shape, then press
Press / to select the picture shape
When the proper setting is selected, press
Release TV Code
Remote control settings
Operating a TV with the remote control of this recorder
Operating your TV with the remote control
JVC
Brand code table
Press / to select DR 2 example, then press Enter
Setting up the recorder Press Setup
Press / to select Operational settings, then press Enter
Press / to select IR code, then press
Disabling the remote control for a temporary period
Commercial Units
Limited Ninety 90 Day Warranty on Labor
Limited One 1 Year Warranty on Parts
Rental Units
How to Obtain Warranty Services
Canadian Warranty Information Garantie Canadienne
Memo
Printed on 70% Recycled Paper

![]() /
/ ![]() ) to select the type of
) to select the type of .
.![]() /
/ ![]() ) to select the way the signal will be input from the set top box.
) to select the way the signal will be input from the set top box. , then press ADJUST (or
  /
/  ) to select “Off” or “On”.