Toshiba Corporation
SD-36VESE
Getting Started
Safety Instructions
Play Region Number
Disc Type and Characteristics
Characteristics
Disc Markings
Contents
Rear View of the DVD-VCR
Display Indicators
Overviews
Front View of the DVD-VCR
Started
Accessories
Clear
Tour of the Remote Control
Connections
Quick Overview
Connecting the Audio Output Cable
By means of RF Cable
AV2 in By means of 21-pin Scart Cable
Aveuro AV By means of 21-pin Scart
Cable
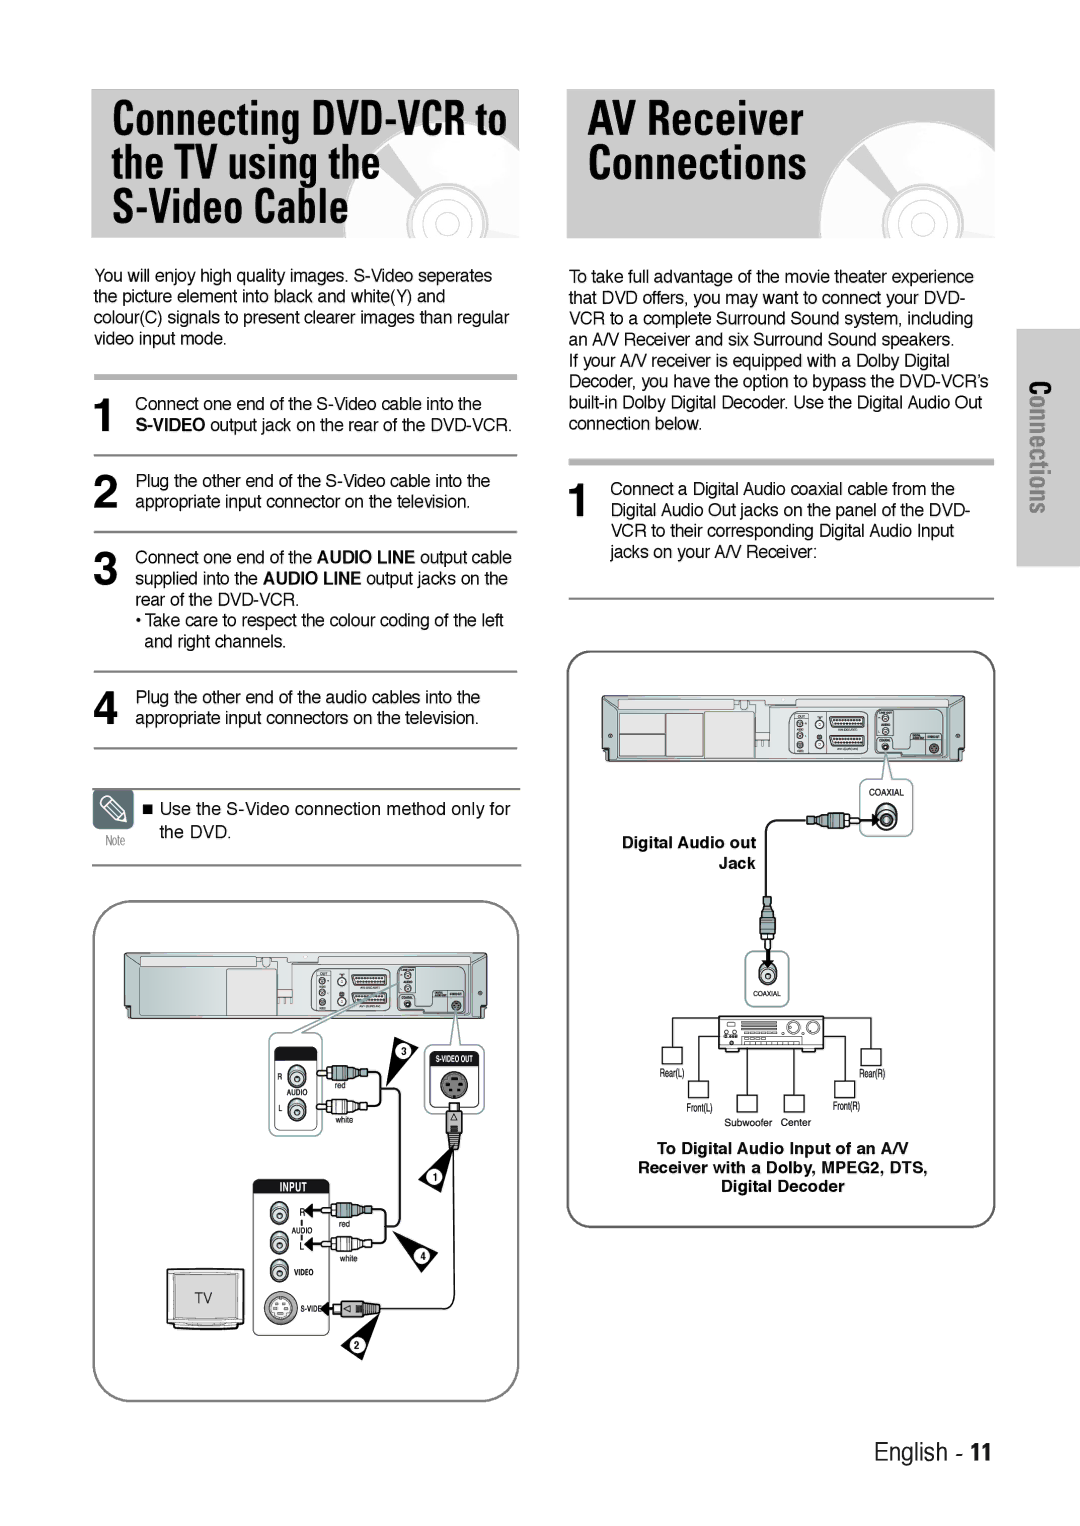
Connection below
AV Receiver Connections
Built-in Dolby Digital Decoder. Use the Digital Audio Out
Plug & Auto Setup
Connecting an Audio/Video Input Cable
Current time and date are displayed automatically
Settings
Settings
Press the … or † button to select On
Setting the Date and Time
Setting the Clock Automatically
Press the œ or √ button to select Auto Clock
Language Set menu is displayed
Setting the Menu
Language Automatically
Press the OK or √ button again
Country Selection menu is displayed
Press the … or † button to select Auto Setup
Channels already preset on your DVD-VCR will be deleted
Then press the OK or √ button
Press the … or † button to select Manual
Press the … or † button to select Install, then
Press the OK or √ button Install menu is displayed
Setup, then press the OK or √ button
Clearing a Preset Station
Press the … or † button to select required
Station Table
Press the … or † button to select VCR Output CH
Channel
Auto PAL B/W
Selecting the Colour Mode
VCR Functions
Press the OK or √ button to select required colour system
Press the OK or √ button
Intelligent Picture Control
Press the … or † button to select User Set, then
Messages
Auto Power off Screen Messages
Off
Off 1 Hour 2 Hour 3 Hour
E180 E240 E260 E300
Selecting the Cassette Type
Repeat Play
Type Recording Time in SP
Selecting Recording Speed
Functions
Front panel display
Immediately
Edit Function
DLY
Timer programming menu is displayed
Press the √ button to select Day, then press the …
Or † button to select the required day
Press the … or † button to select On or Off
Speed
Auto Tape Speed Select
Press the … or † button to select the programme
To be cancelled, then press the Clear button
Corresponding information
Playing Back
Playing a Cassette
Option Description
Playing a Sequence Frame by Frame
End Search
Searching for a Specific Sequence
Go To 00000 Stop
Index Skip Search
Intro Scan
Sequence
Using the Tape Counter
DVD Functions
Setting Up Language Features
Using the Disc Menu Language
Using the Subtitle Language
Using the Audio Language
Dynamic Compression
Setting Up the Audio Options
Dolby Digital Out
MPEG-2 Digital Out
Ntsc Disc Output
Options
TV Aspect
Black Level
Enter your password again
Setting Up the Parental Control
Press the OK or √ button Use Password menu is displayed
Re-enter Password menu is displayed to confirm the password
Changing the Password
Setting up the Rating Level
DivXR Registration
Setting up the DVD function
Stop/Resume
Slow Motion
Still
Frame Advance Step
Display button
Using the Display Function
Use the œ , √ buttons to make the desired setup
During DVD/VCD/CD playback, press
Ratio EZ View
If you are using a 169 TV
If you are using a 43 TV
Language
Press the OK or √ button Function menu is displayed
Changing the Camera Angle
Zoom
Press the … or † button to select FUNC, then
Recalling a Marked Scene
Cancel Chapter/Title
Marks
Repeat Chapter/Title
To B Repeat
Cancel A-B Repeat
CD-R MP3 discs
MP3 Play
MP3 Play Function
Repeat
Press the …/ †, œ/ √ buttons to select the first track
Program Play
Random Play
Zoom
Album Mode
Rotation
Between images may take longer or shorter
Slide show
CD-R Jpeg Discs
Depending on the file size, each interval
Playback Features
Zoom
Reference
Reference
Output
Technical Specifications
General
Input
Problem Solution
Troubleshooting Guide VCR
Troubleshooting Guide DVD