Connections
When you connect the unit to other equipment, remove the mains plug before connecting equipment or speakers.
Connecting to a TV
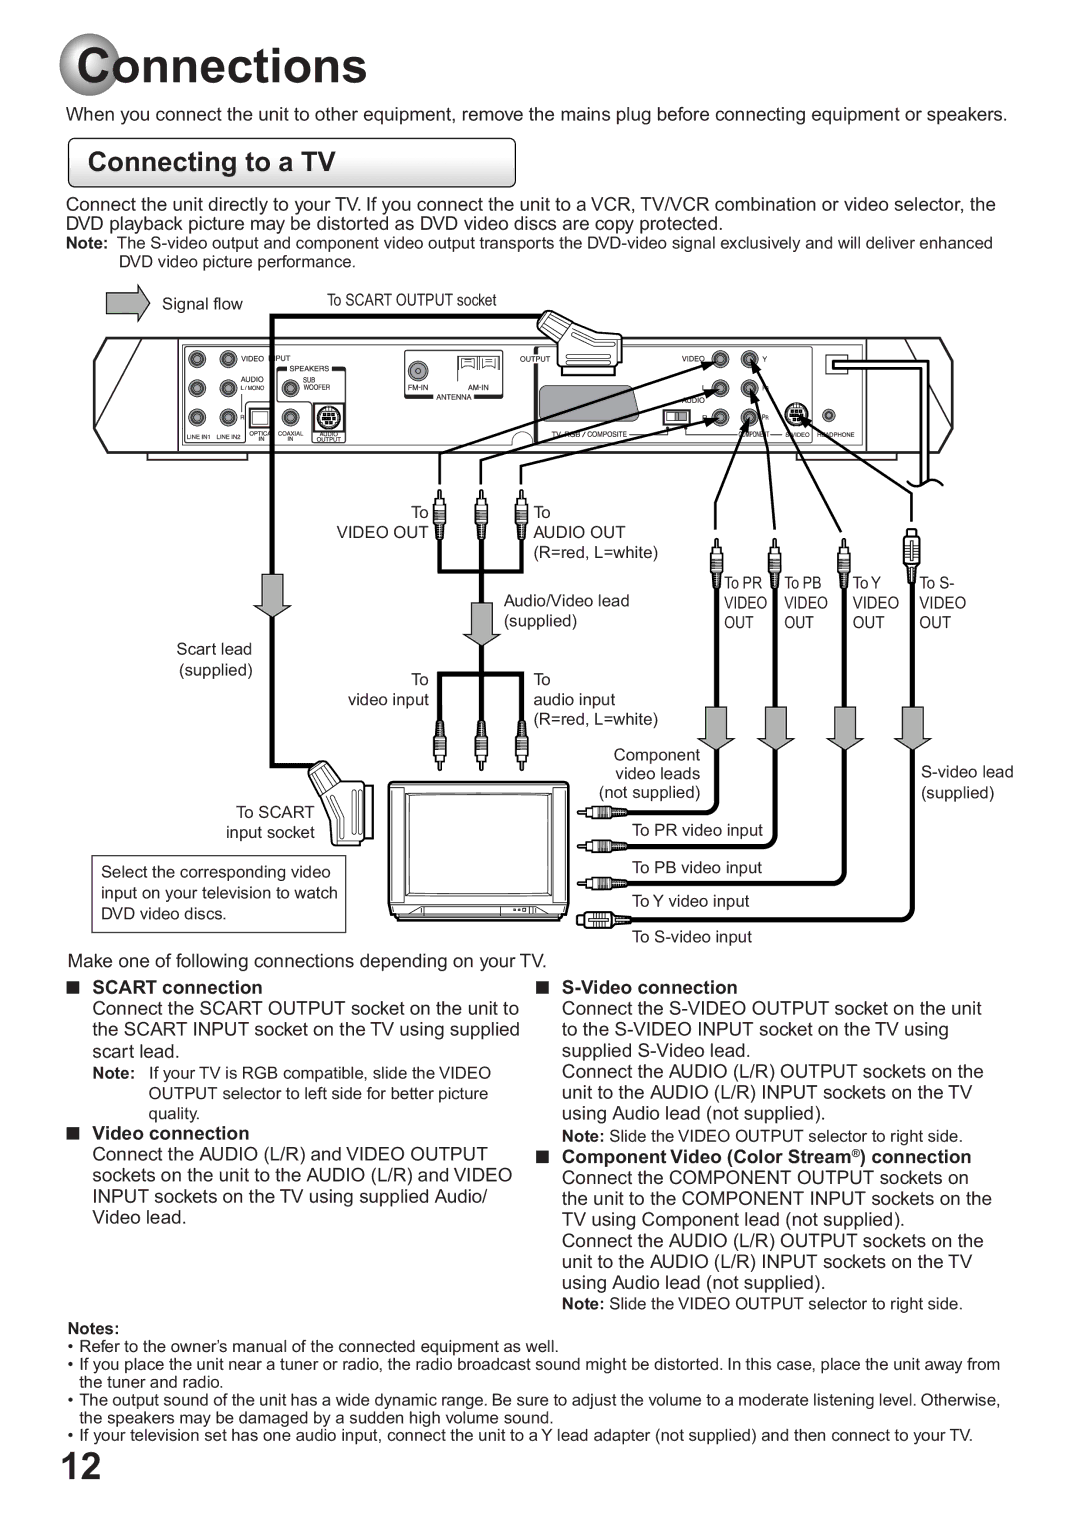
Connect the unit directly to your TV. If you connect the unit to a VCR, TV/VCR combination or video selector, the DVD playback picture may be distorted as DVD video discs are copy protected.
Note: The
Signal flow | To SCART OUTPUT socket |
|
|
|
|
|
| To | To |
|
|
|
|
| VIDEO OUT | AUDIO OUT |
|
|
|
|
|
| (R=red, L=white) |
|
|
|
|
|
| Audio/Video lead | To PR | To PB | To Y | To S- |
|
| VIDEO | VIDEO | VIDEO | VIDEO | |
|
| (supplied) | OUT | OUT | OUT | OUT |
Scart lead |
|
|
|
|
|
|
(supplied) | To | To |
|
|
|
|
|
|
|
|
| ||
| video input | audio input |
|
|
|
|
|
| (R=red, L=white) |
|
|
|
|
|
| Component |
|
|
| |
|
| video leads |
|
|
| |
|
| (not supplied) |
|
|
| (supplied) |
To SCART | To PR video input | |
input socket | ||
Select the corresponding video | To PB video input | |
input on your television to watch | To Y video input | |
DVD video discs. | ||
| ||
| To |
Make one of following connections depending on your TV.
■ SCART connection■ Connect the SCART OUTPUT socket on the unit to the SCART INPUT socket on the TV using supplied scart lead.
Note: If your TV is RGB compatible, slide the VIDEO |
|
OUTPUT selector to left side for better picture |
|
quality. |
|
■ Video connection |
|
Connect the AUDIO (L/R) and VIDEO OUTPUT | ■ |
sockets on the unit to the AUDIO (L/R) and VIDEO |
|
INPUT sockets on the TV using supplied Audio/ |
|
Video lead. |
|
Connect the
Connect the AUDIO (L/R) OUTPUT sockets on the unit to the AUDIO (L/R) INPUT sockets on the TV using Audio lead (not supplied).
Note: Slide the VIDEO OUTPUT selector to right side.
Component Video (Color Stream®) connection Connect the COMPONENT OUTPUT sockets on the unit to the COMPONENT INPUT sockets on the TV using Component lead (not supplied).
Connect the AUDIO (L/R) OUTPUT sockets on the unit to the AUDIO (L/R) INPUT sockets on the TV using Audio lead (not supplied).
Note: Slide the VIDEO OUTPUT selector to right side.
Notes:
•Refer to the owner’s manual of the connected equipment as well.
•If you place the unit near a tuner or radio, the radio broadcast sound might be distorted. In this case, place the unit away from the tuner and radio.
•The output sound of the unit has a wide dynamic range. Be sure to adjust the volume to a moderate listening level. Otherwise, the speakers may be damaged by a sudden high volume sound.
•If your television set has one audio input, connect the unit to a Y lead adapter (not supplied) and then connect to your TV.
12
