Adjustments
Picture adjustments
– Picture
Preparation
•Display the image as explained in “Picture Projection”. 21![]()
•Set the POINTER/PJ selector to “PJ”.
SELECT/ADJUST
ON
ON/STANDBY MENU | ENTER | INPUT |
LAMP
TEMP
| AUTO SET | ON/STANDBY | |
| KEYSTONE | ||
| MARKER | LASER |
|
1,5 | POINTER |
|
|
PJ |
|
| |
|
| ||
| MENU | ENTER |
|
| RGB | VIDEO CAMERA |
|
| RESIZE | RESET FREEZE |
|
RESET
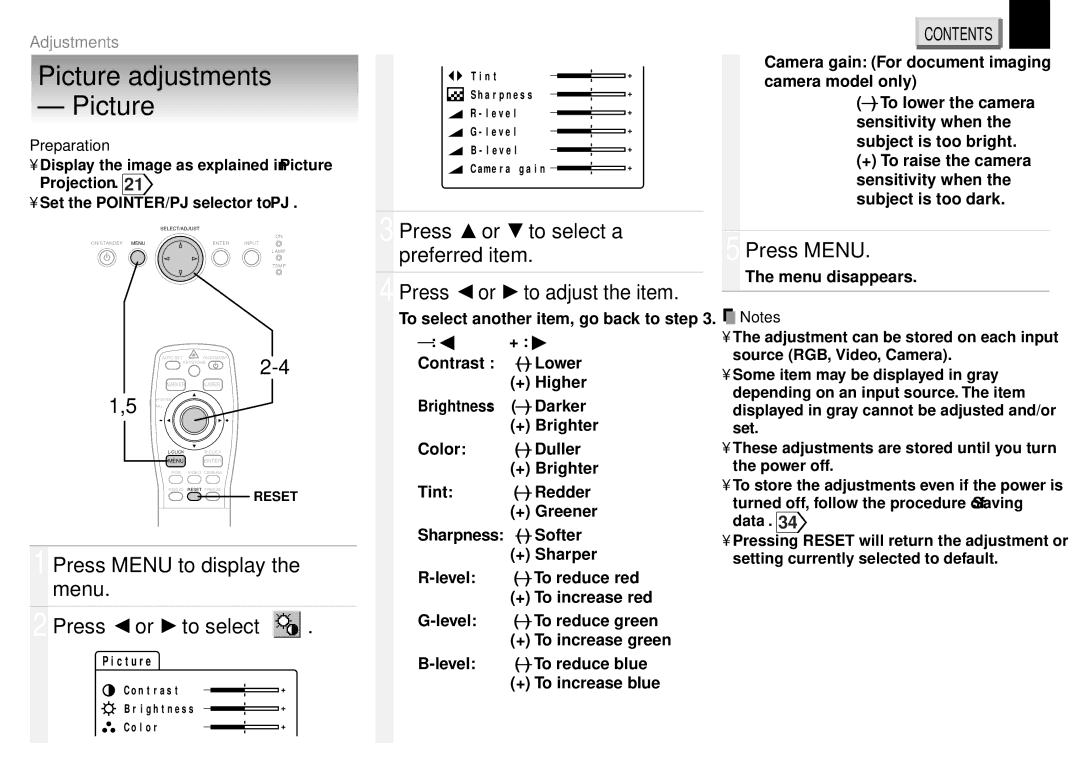
1 | Press MENU to display the | ||||||||||
| menu. |
|
|
|
|
|
|
| |||
|
|
|
|
|
|
|
|
|
|
|
|
2 | Press or | to select |
|
|
| ||||||
| . | ||||||||||
| |||||||||||
|
| P i c t u r e |
|
|
|
|
|
|
| ||
|
|
|
| C o n t r a s t | – |
|
|
|
| + | |
|
|
|
|
| |||||||
|
|
|
| B r i g h t n e s s – |
|
| + | ||||
|
|
|
|
|
|
|
|
| |||
|
|
|
|
|
| ||||||
|
|
|
| C o l o r | – |
|
|
|
|
| + |
|
|
| |||||||||
|
|
|
|
|
|
|
|
|
|
|
|
T i n t | – |
|
| + | |
|
| ||||
S h a r p n e s s | – |
| + | ||
| |||||
R - | l e v e l | – |
| + | |
| |||||
G - | l e v e l | – |
| + | |
| |||||
B - | l e v e l | – |
| + | |
| |||||
C ame r a g a i n – |
| + | |||
| |||||
3 Press | or | to select a |
preferred item. | ||
|
|
|
4 Press | or | to adjust the item. |
To select another item, go back to step 3. | ||
| + : | |
Contrast : | ||
|
| (+) Higher |
Brightness: | ||
|
| (+) Brighter |
Color: |
| |
|
| (+) Brighter |
Tint: |
| |
|
| (+) Greener |
Sharpness: | ||
|
| (+) Sharper |
| ||
|
| (+) To increase red |
| ||
|
| (+) To increase green |
| ||
|
| (+) To increase blue |
CONTENTS | 32 |
Camera gain: (For document imaging camera model only)
(–)To lower the camera sensitivity when the subject is too bright.
(+) To raise the camera sensitivity when the subject is too dark.
5 Press MENU.
The menu disappears.
![]() Notes
Notes
•The adjustment can be stored on each input source (RGB, Video, Camera).
•Some item may be displayed in gray depending on an input source. The item displayed in gray cannot be adjusted and/or set.
•These adjustments are stored until you turn the power off.
•To store the adjustments even if the power is
turned off, follow the procedure of “Saving data”. 34![]()
•Pressing RESET will return the adjustment or setting currently selected to default.