Names of the terminals on the rear panel
Preparing and using the remote control
|
|
|
|
|
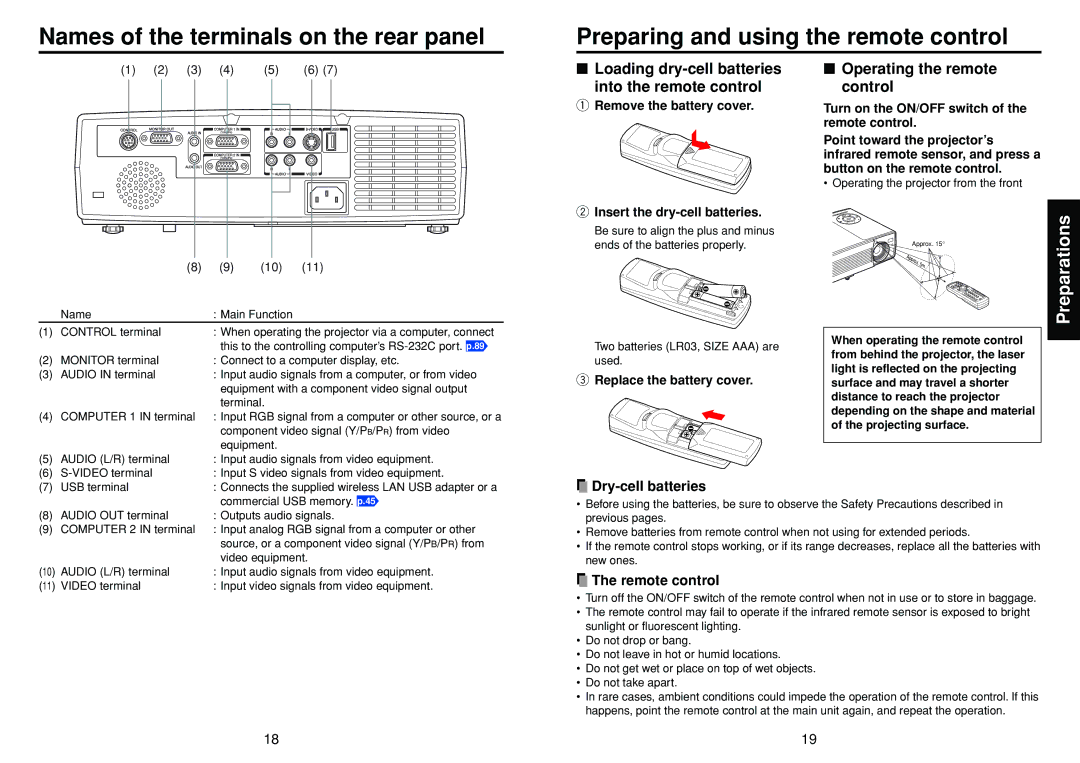
| (1) | (2) | (3) | (4) | (5) | (6) (7) | |||||||||||||
|
|
|
|
|
|
|
|
|
|
|
|
|
|
|
|
|
|
|
|
|
|
|
|
|
|
|
|
|
|
|
|
|
|
|
|
|
|
|
|
|
|
|
|
|
|
|
|
|
|
|
|
|
|
|
|
|
|
|
|
|
|
|
|
|
|
|
|
|
|
|
|
|
|
|
|
|
|
|
|
|
|
|
|
|
|
|
|
|
|
|
|
|
|
|
|
|
|
|
|
|
|
|
|
|
|
|
|
|
|
|
|
|
|
|
|
|
|
|
|
|
|
|
|
|
|
|
|
|
|
|
|
|
|
|
|
|
|
|
|
|
|
|
|
|
|
|
|
|
|
|
|
|
|
|
|
|
|
|
|
|
|
|
|
|
|
|
|
|
|
|
|
|
|
|
|
|
|
|
|
|
|
|
|
|
|
|
|
|
|
|
|
|
|
|
|
|
|
|
|
|
|
|
|
|
|
|
|
|
|
|
|
|
|
|
|
|
|
|
|
|
|
|
|
|
| (8) | (9) | (10) | (11) |
| Name | : Main Function |
| |
(1) | CONTROL terminal | : When operating the projector via a computer, connect | ||
|
| this to the controlling computer’s | ||
(2) | MONITOR terminal | : Connect to a computer display, etc. | ||
(3) | AUDIO IN terminal | : Input audio signals from a computer, or from video | ||
|
| equipment with a component video signal output | ||
|
| terminal. |
| |
(4) | COMPUTER 1 IN terminal | : Input RGB signal from a computer or other source, or a | ||
|
| component video signal (Y/PB/PR) from video | ||
|
| equipment. |
| |
(5) | AUDIO (L/R) terminal | : Input audio signals from video equipment. | ||
(6) | : Input S video signals from video equipment. | |||
■Loading dry-cell batteries
into the remote control
qRemove the battery cover.
wInsert the dry-cell batteries.
Be sure to align the plus and minus ends of the batteries properly.
Two batteries (LR03, SIZE AAA) are used.
eReplace the battery cover.
■Operating the remote control
Turn on the ON/OFF switch of the remote control.
Point toward the projector’s infrared remote sensor, and press a button on the remote control.
• Operating the projector from the front
Approx. 15°
When operating the remote control from behind the projector, the laser light is reflected on the projecting surface and may travel a shorter distance to reach the projector depending on the shape and material of the projecting surface.
Preparations
(7) | USB terminal | : Connects the supplied wireless LAN USB adapter or a |
|
| commercial USB memory. p.45 |
(8) | AUDIO OUT terminal | : Outputs audio signals. |
(9) | COMPUTER 2 IN terminal | : Input analog RGB signal from a computer or other |
|
| source, or a component video signal (Y/PB/PR) from |
|
| video equipment. |
(10) AUDIO (L/R) terminal | : Input audio signals from video equipment. | |
(11) VIDEO terminal | : Input video signals from video equipment. | |

Dry-cell batteries
•Before using the batteries, be sure to observe the Safety Precautions described in previous pages.
•Remove batteries from remote control when not using for extended periods.
•If the remote control stops working, or if its range decreases, replace all the batteries with new ones.
 The remote control
•Turn off the ON/OFF switch of the remote control when not in use or to store in baggage.
•The remote control may fail to operate if the infrared remote sensor is exposed to bright sunlight or fluorescent lighting.
•Do not drop or bang.
•Do not leave in hot or humid locations.
•Do not get wet or place on top of wet objects.
•Do not take apart.
•In rare cases, ambient conditions could impede the operation of the remote control. If this happens, point the remote control at the main unit again, and repeat the operation.
18 | 19 |