Using the Wireless Utility (Continued)
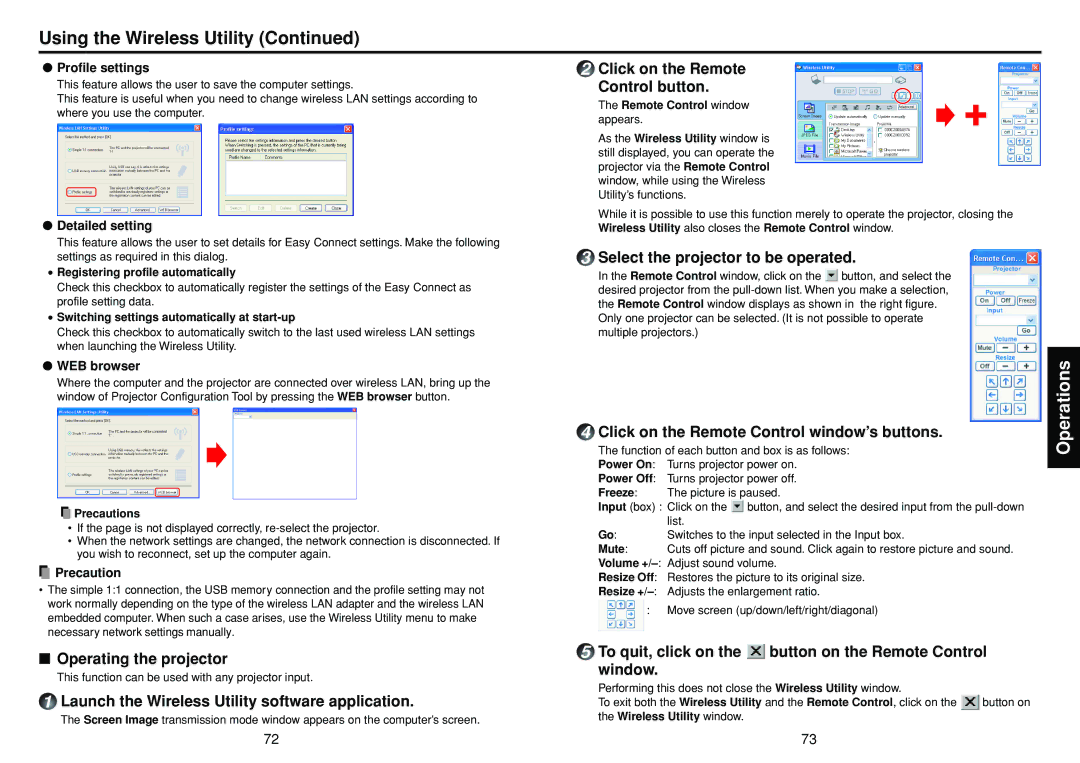
● Profile settings | 2 Click on the Remote | |
This feature allows the user to save the computer settings. | Control button. | |
This feature is useful when you need to change wireless LAN settings according to | The Remote Control window | |
where you use the computer. | ||
appears. | ||
| ||
| As the Wireless Utility window is | |
| still displayed, you can operate the | |
| projector via the Remote Control | |
| window, while using the Wireless | |
| Utility’s functions. | |
● Detailed setting | While it is possible to use this function merely to operate the projector, closing the | |
Wireless Utility also closes the Remote Control window. | ||
This feature allows the user to set details for Easy Connect settings. Make the following | 3 Select the projector to be operated. | |
settings as required in this dialog. | ||
• Registering profile automatically | In the Remote Control window, click on the button, and select the | |
Check this checkbox to automatically register the settings of the Easy Connect as | ||
desired projector from the | ||
profile setting data. | the Remote Control window displays as shown in the right figure. | |
• Switching settings automatically at | Only one projector can be selected. (It is not possible to operate | |
Check this checkbox to automatically switch to the last used wireless LAN settings | multiple projectors.) | |
when launching the Wireless Utility. |
| |
● WEB browser |
| |
Where the computer and the projector are connected over wireless LAN, bring up the |
| |
window of Projector Configuration Tool by pressing the WEB browser button. |
|
Operations
 Precautions
•If the page is not displayed correctly,
•When the network settings are changed, the network connection is disconnected. If you wish to reconnect, set up the computer again.
 Precaution
•The simple 1:1 connection, the USB memory connection and the profile setting may not work normally depending on the type of the wireless LAN adapter and the wireless LAN embedded computer. When such a case arises, use the Wireless Utility menu to make necessary network settings manually.
■Operating the projector
This function can be used with any projector input.
1Launch the Wireless Utility software application.
The Screen Image transmission mode window appears on the computer’s screen.
4Click on the Remote Control window’s buttons.
The function of each button and box is as follows: Power On: Turns projector power on.
Power Off: Turns projector power off.
Freeze: The picture is paused.
Input (box) : Click on the ![]() button, and select the desired input from the
button, and select the desired input from the
Go: Switches to the input selected in the Input box.
Mute: Cuts off picture and sound. Click again to restore picture and sound.
Volume
Resize Off: Restores the picture to its original size.
Resize
:Move screen (up/down/left/right/diagonal)
5To quit, click on the  button on the Remote Control
window.
Performing this does not close the Wireless Utility window.
To exit both the Wireless Utility and the Remote Control, click on the ![]() button on
button on
the Wireless Utility window.
72 | 73 |
