To RS-232C terminal

Connection

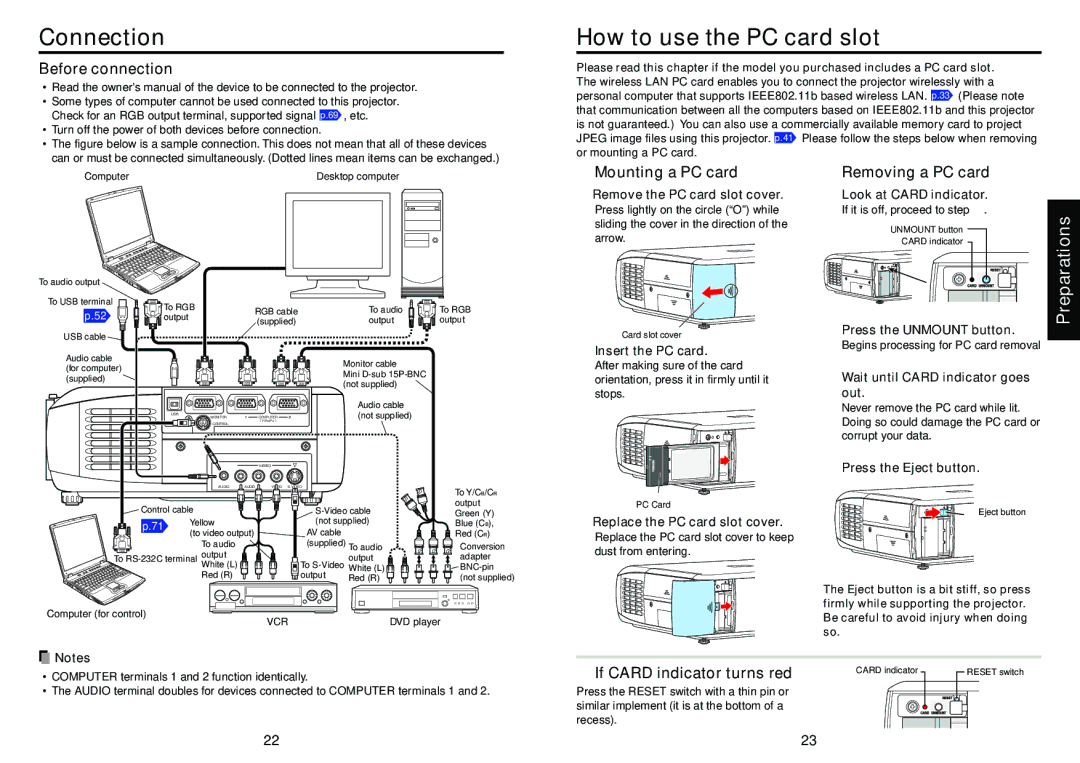
Before connection

Read the owner’s manual of the device to be connected to the projector.

Some types of computer cannot be used connected to this projector. Check for an RGB output terminal, supported signal p.69 , etc.

Turn off the power of both devices before connection.

The figure below is a sample connection. This does not mean that all of these devices can or must be connected simultaneously. (Dotted lines mean items can be exchanged.)

How to use the PC card slot

Please read this chapter if the model you purchased includes a PC card slot.

The wireless LAN PC card enables you to connect the projector wirelessly with a personal computer that supports IEEE802.11b based wireless LAN. p.33 (Please note that communication between all the computers based on IEEE802.11b and this projector is not guaranteed.) You can also use a commercially available memory card to project JPEG image files using this projector. p.41 Please follow the steps below when removing or mounting a PC card.

Computer

Desktop computer

Mounting a PC card

qRemove the PC card slot cover.

Press lightly on the circle (“O”) while sliding the cover in the direction of the arrow.

Removing a PC card

qLook at CARD indicator.

If it is off, proceed to step r.

UNMOUNT button

CARD indicator

To audio output

To USB terminal

p.52

USB cable

Audio cable (for computer) (supplied)

To RGB

RGB cable

output

(supplied)


USB

MONITOR1 COMPUTER 2

( Y/PB/PR )

CONTROL

VIDEO

To audio

To RGB

output

output

Monitor cable

Mini D-sub 15P-BNC (not supplied)

Audio cable (not supplied)

Card slot cover

wInsert the PC card.

After making sure of the card orientation, press it in firmly until it stops.

wPress the UNMOUNT button.

Begins processing for PC card removal

eWait until CARD indicator goes out.

Never remove the PC card while lit. Doing so could damage the PC card or corrupt your data.

rPress the Eject button.

Preparations

AUDIO R - AUDIO - L VIDEO S-VIDEO

Control cable

p.71

Yellow


(to video output)

To audio output White (L) Red (R)

S-Video cable (not supplied)

AV cable (supplied) To audio


output

To S-Video White (L)

output

Red (R)


To Y/CB/CR output Green (Y) Blue (CB), Red (CR)

Conversion adapter BNC-pin (not supplied)

PC Card

eReplace the PC card slot cover.

Replace the PC card slot cover to keep dust from entering.

Eject button

The Eject button is a bit stiff, so press firmly while supporting the projector.

Computer (for control)

VCR

DVD player

Notes

COMPUTER terminals 1 and 2 function identically.

The AUDIO terminal doubles for devices connected to COMPUTER terminals 1 and 2.

Be careful to avoid injury when doing so.

If CARD indicator turns red

CARD indicator


RESET switch


Press the RESET switch with a thin pin or similar implement (it is at the bottom of a recess).

22

23

Page 12
Image 12
Toshiba TLP-T72 owner manual Connection, How to use the PC card slot

TLP-T72 specifications

The Toshiba TLP-T72 is a state-of-the-art thermal transfer printer designed to meet the demanding needs of various industries, including healthcare, retail, and manufacturing. This printer is renowned for its reliability, efficiency, and high-quality output, making it a popular choice for businesses looking to enhance their label printing capabilities.

One of the standout features of the TLP-T72 is its advanced thermal transfer technology. This technology utilizes a heated print head and a ribbon to transfer ink onto various label materials, providing sharp graphics and clear text. The transfer method not only improves the durability of printed labels but also ensures resistance to smudging and fading, making it ideal for long-term use.

The printer is equipped with a high-resolution print head, capable of producing stunning print quality at resolutions up to 300 dpi. This means users can create intricate designs, barcodes, and images that are easily readable and visually appealing. With a print speed of up to 6 inches per second, the TLP-T72 can efficiently handle high-volume printing tasks without compromising quality.

In terms of connectivity, the TLP-T72 offers a range of options, including USB, Serial, and Ethernet interfaces, allowing for seamless integration into existing systems. This flexibility makes it suitable for diverse operational environments, ensuring that users can easily connect and manage the printer through various channels.

Another notable feature of the TLP-T72 is its user-friendly design. The printer comes with an easy-to-navigate control panel, which simplifies operation and minimizes the learning curve for new users. Additionally, the printer supports various label formats and sizes, making it versatile for different applications ranging from shipping labels to product tags.

The TLP-T72 also supports a range of software solutions, enhancing its functionality and offering users the ability to create custom labels tailored to their specific needs. This adaptability is further complemented by its ability to handle both direct thermal and thermal transfer printing, providing users with options depending on their requirements.

In summary, the Toshiba TLP-T72 combines advanced thermal transfer technology, high print quality, and versatile connectivity, making it an essential tool for any business looking to streamline its labeling process. Its user-friendly design and robust performance characteristics reinforce its status as a reliable choice in the competitive landscape of label printers.