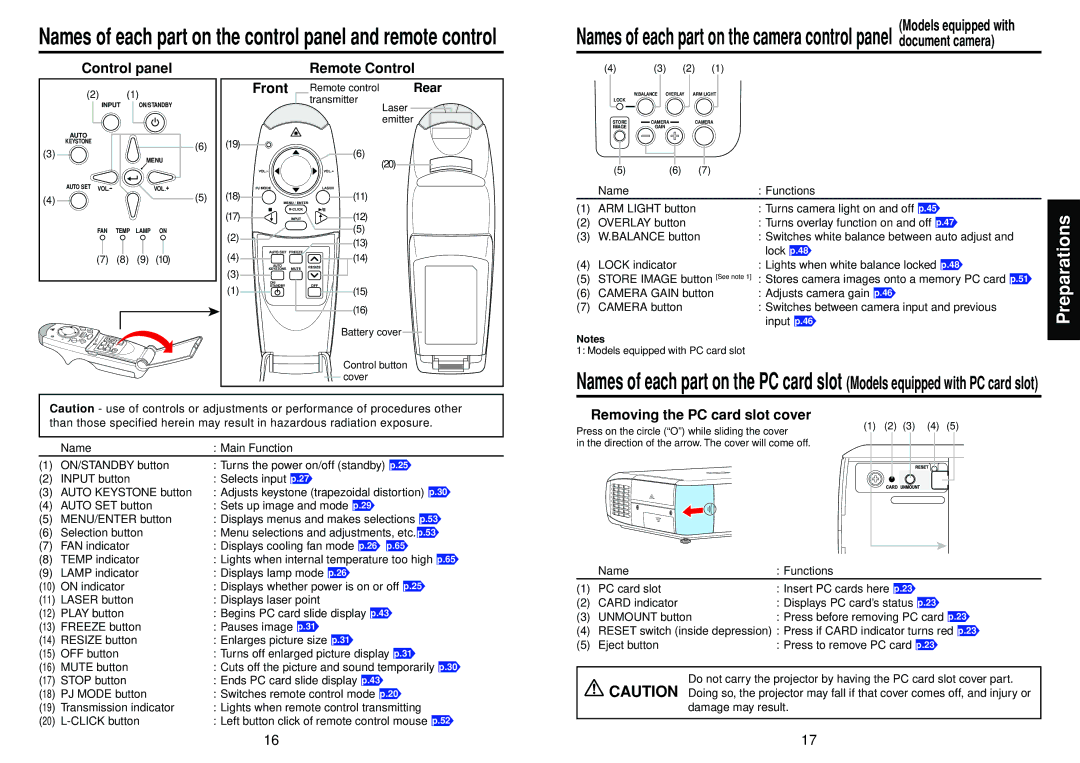
Names of each part on the control panel and remote control

(Models equipped with

Names of each part on the camera control panel document camera)

Control panel

(2)(1)

INPUT ON/STANDBY

AUTO


KEYSTONE

(6)

(3)

MENU


AUTO SET VOL.-

VOL.+

(4)

(5)

FAN TEMP

LAMP ON

(7) (8) (9) (10)


LASE


R


PLA

Y


ME

N

U


TER

INP UT


/ EN

R - CLICK


VO

.-


E


L

J M

OD

STOP


RE

SIZE


P


F R

EZ

E


OF

F


ET


M

U


A

U

T

O

S


AUT

E


STA NDBY


KEYSTON


ON/


Remote Control


Front


Remote control

Rear


transmitter

Laser


emitter

(19)


(6)


(20)


VOL.-


VOL.+


(18)

PJ MODE


LASER


(11)


MENU / ENTER


(17)


R-CLICK

(12)


INPUT


(2)


(5)


(13)


(4)

AUTO SET

FREEZE

(14)


AUTO

MUTE

RESIZE


(3)

KEYSTONE


ON/


OFF


(1)

STANDBY


(15)


(16)

Battery cover

(4) (3) (2) (1)


W.BALANCE OVERLAY

ARM LIGHT

LOCK


STORE

CAMERA

CAMERA

IMAGE

GAIN


(5)

(6)

(7)


Name

: Functions


(1)

ARM LIGHT button

: Turns camera light on and off p.45

Preparations

(2)

OVERLAY button

input p.46

: Turns overlay function on and off p.47


(3)

W.BALANCE button

: Switches white balance between auto adjust and


lock p.48


(4)

LOCK indicator

: Lights when white balance locked p.48


(5)

STORE IMAGE button [See note 1]

: Stores camera images onto a memory PC card p.51


(6)

CAMERA GAIN button

: Adjusts camera gain p.46


(7)

CAMERA button

: Switches between camera input and previous


Notes

1: Models equipped with PC card slot

Control button cover

Names of each part on the PC card slot

(Models equipped with PC card slot)

Caution - use of controls or adjustments or performance of procedures other than those specified herein may result in hazardous radiation exposure.


Name

: Main Function

(1)

ON/STANDBY button

: Turns the power on/off (standby) p.25

(2)

INPUT button

: Selects input p.27

(3)

AUTO KEYSTONE button

: Adjusts keystone (trapezoidal distortion) p.30

(4)

AUTO SET button

: Sets up image and mode p.29

(5)

MENU/ENTER button

: Displays menus and makes selections p.53

(6)

Selection button

: Menu selections and adjustments, etc. p.53

(7)

FAN indicator

: Displays cooling fan mode p.26 p.65

(8)

TEMP indicator

: Lights when internal temperature too high p.65

Removing the PC card slot cover

Press on the circle (“O”) while sliding the cover

in the direction of the arrow. The cover will come off.

(1) (2) (3) (4) (5)

(9) LAMP indicator

: Displays lamp mode p.26

(10) ON indicator

: Displays whether power is on or off p.25

(11) LASER button

: Displays laser point

(12) PLAY button

: Begins PC card slide display p.43

(13) FREEZE button

: Pauses image p.31

(14) RESIZE button

: Enlarges picture size p.31

(15) OFF button

: Turns off enlarged picture display p.31

(16) MUTE button

: Cuts off the picture and sound temporarily p.30

(17) STOP button

: Ends PC card slide display p.43

(18) PJ MODE button

: Switches remote control mode p.20

(19) Transmission indicator

: Lights when remote control transmitting

(20) L-CLICK button

: Left button click of remote control mouse p.52


Name

: Functions

(1)

PC card slot

: Insert PC cards here p.23

(2)

CARD indicator

: Displays PC card’s status p.23

(3)

UNMOUNT button

: Press before removing PC card p.23

(4)

RESET switch (inside depression) : Press if CARD indicator turns red p.23

(5)

Eject button

: Press to remove PC card p.23

Do not carry the projector by having the PC card slot cover part. CAUTION Doing so, the projector may fall if that cover comes off, and injury or

damage may result.

16

17

Page 9
Image 9
Toshiba TLP-T72 owner manual Rear, Models equipped with PC card slot, Damage may result

TLP-T72 specifications

The Toshiba TLP-T72 is a state-of-the-art thermal transfer printer designed to meet the demanding needs of various industries, including healthcare, retail, and manufacturing. This printer is renowned for its reliability, efficiency, and high-quality output, making it a popular choice for businesses looking to enhance their label printing capabilities.

One of the standout features of the TLP-T72 is its advanced thermal transfer technology. This technology utilizes a heated print head and a ribbon to transfer ink onto various label materials, providing sharp graphics and clear text. The transfer method not only improves the durability of printed labels but also ensures resistance to smudging and fading, making it ideal for long-term use.

The printer is equipped with a high-resolution print head, capable of producing stunning print quality at resolutions up to 300 dpi. This means users can create intricate designs, barcodes, and images that are easily readable and visually appealing. With a print speed of up to 6 inches per second, the TLP-T72 can efficiently handle high-volume printing tasks without compromising quality.

In terms of connectivity, the TLP-T72 offers a range of options, including USB, Serial, and Ethernet interfaces, allowing for seamless integration into existing systems. This flexibility makes it suitable for diverse operational environments, ensuring that users can easily connect and manage the printer through various channels.

Another notable feature of the TLP-T72 is its user-friendly design. The printer comes with an easy-to-navigate control panel, which simplifies operation and minimizes the learning curve for new users. Additionally, the printer supports various label formats and sizes, making it versatile for different applications ranging from shipping labels to product tags.

The TLP-T72 also supports a range of software solutions, enhancing its functionality and offering users the ability to create custom labels tailored to their specific needs. This adaptability is further complemented by its ability to handle both direct thermal and thermal transfer printing, providing users with options depending on their requirements.

In summary, the Toshiba TLP-T72 combines advanced thermal transfer technology, high print quality, and versatile connectivity, making it an essential tool for any business looking to streamline its labeling process. Its user-friendly design and robust performance characteristics reinforce its status as a reliable choice in the competitive landscape of label printers.