Using the menus (Continued)

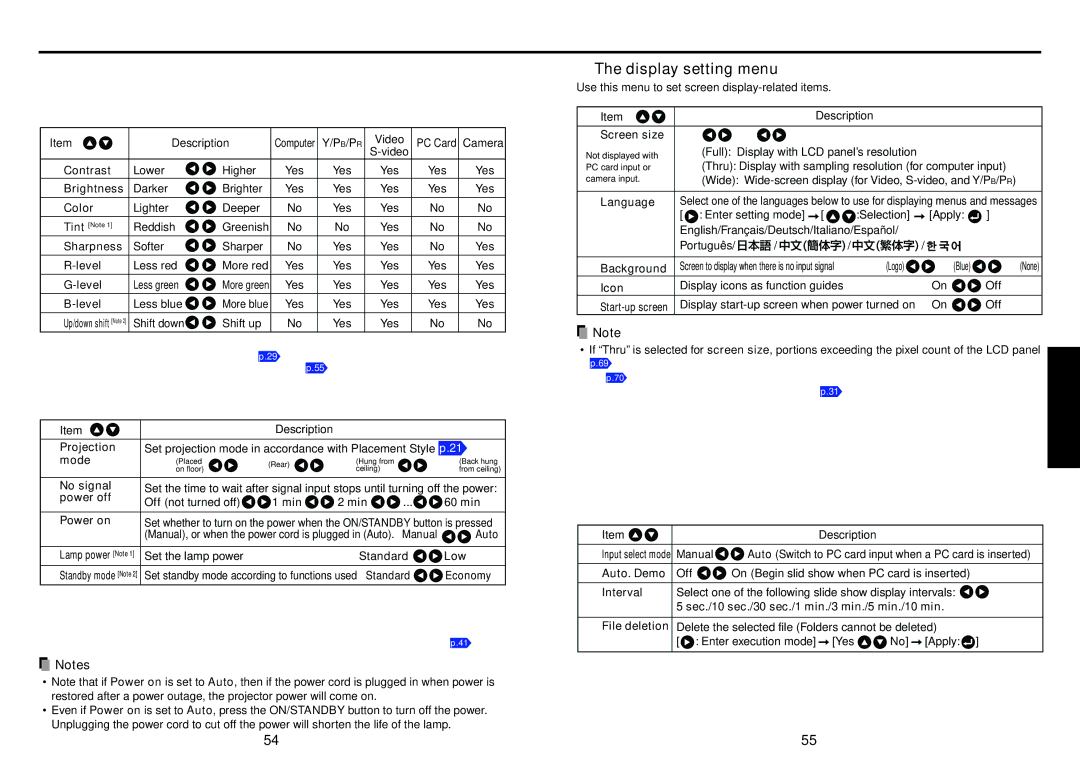
The image adjustment menus

Use this menu to adjust image-related items.

Items Items that can be adjusted are marked with “Yes”, and those that cannot are marked with “No”.

Item

Description

Computer

Y/PB/PR

Video

PC Card

Camera

S-video


Contrast

Lower

Higher

Yes

Yes

Yes

Yes

Yes

Brightness

Darker

Brighter

Yes

Yes

Yes

Yes

Yes


Color

Lighter

Deeper

No

Yes

Yes

No

No


Tint [Note 1]

Reddish

Greenish

No

No

Yes

No

No

Sharpness

Softer

Sharper

No

Yes

Yes

No

Yes


R-level

Less red

More red

Yes

Yes

Yes

Yes

Yes


G-level

Less green

More green

Yes

Yes

Yes

Yes

Yes


B-level

Less blue

More blue

Yes

Yes

Yes

Yes

Yes


Up/down shift [Note 2]

Shift down

Shift up

No

Yes

Yes

No

No

Notes

1:Tint can only be adjusted when Video mode p.29 is NTSC or NTSC4.43.

2:Up/down shift can only be adjusted when Screen size p.55 is Wide.

The default setting menu

This menu shows placement status and other settings.

Item


Description


Projection

Set projection mode in accordance with Placement Style p.21

mode

(Placed

(Rear)

(Hung from


(Back hung


on floor)

ceiling)


from ceiling)


No signal

Set the time to wait after signal input stops until turning off the power:

power off

Off (not turned off)

1 min

2 min

...

60 min


Power on

Set whether to turn on the power when the ON/STANDBY button is pressed


(Manual), or when the power cord is plugged in (Auto).

Manual

Auto


Lamp power [Note 1]

Set the lamp power


Standard

Low

Standby mode [Note 2]

Set standby mode according to functions used Standard

Economy

Notes

1:When lamp power is set to low, the screen becomes a little darker, but the cooling fan noise gets quieter. This setting will be cleared when you turn the power off. The setting will be back to “Standard” when the power is turned on next time.

2:The Standby mode function is only available with models equipped with a PC card slot p.41 .

Notes

Note that if Power on is set to Auto, then if the power cord is plugged in when power is restored after a power outage, the projector power will come on.

Even if Power on is set to Auto, press the ON/STANDBY button to turn off the power. Unplugging the power cord to cut off the power will shorten the life of the lamp.

The display setting menu

Use this menu to set screen display-related items.

Item


Description


Screen size


Not displayed with

(Full): Display with LCD panel’s resolution


PC card input or

(Thru): Display with sampling resolution (for computer input)

camera input.

(Wide): Wide-screen display (for Video, S-video, and Y/PB/PR)


Language

Select one of the languages below to use for displaying menus and messages


[ : Enter setting mode] [

:Selection]


[Apply:

]


English/Français/Deutsch/Italiano/Español/


Português/

/

/

/


Background

Screen to display when there is no input signal

(Logo)


(Blue)

(None)

Icon

Display icons as function guides


On

Off

Start-up screen

Display start-up screen when power turned on


On

Off

Note

If “Thru” is selected for screen size, portions exceeding the pixel count of the LCD panel

p.69 will not appear on the screen. Note that for RGB signals with clock speeds UXGA 60 p.70 or lower, all input pixel signals are sampled. (This effect is noticeable when the screen is enlarged using the Resize function p.31 ). However, if the clock speed is higher than this, the RGB pixel signal is thinned before sampling.

The PC card setting menu (Models equipped with PC card slot)

Use this menu to set PC Card-related items.

When using a memory PC card

Item

Description

Input select mode Manual Auto (Switch to PC card input when a PC card is inserted)

Auto. Demo Off

On (Begin slid show when PC card is inserted)

Interval Select one of the following slide show display intervals:

5 sec./10 sec./30 sec./1 min./3 min./5 min./10 min.

File deletion Delete the selected file (Folders cannot be deleted)

[: Enter execution mode] [Yes No] [Apply:]

Operations

54

55

Page 28
Image 28
Toshiba TLP-T72 owner manual Using the menus, Image adjustment menus, Default setting menu, Display setting menu

TLP-T72 specifications

The Toshiba TLP-T72 is a state-of-the-art thermal transfer printer designed to meet the demanding needs of various industries, including healthcare, retail, and manufacturing. This printer is renowned for its reliability, efficiency, and high-quality output, making it a popular choice for businesses looking to enhance their label printing capabilities.

One of the standout features of the TLP-T72 is its advanced thermal transfer technology. This technology utilizes a heated print head and a ribbon to transfer ink onto various label materials, providing sharp graphics and clear text. The transfer method not only improves the durability of printed labels but also ensures resistance to smudging and fading, making it ideal for long-term use.

The printer is equipped with a high-resolution print head, capable of producing stunning print quality at resolutions up to 300 dpi. This means users can create intricate designs, barcodes, and images that are easily readable and visually appealing. With a print speed of up to 6 inches per second, the TLP-T72 can efficiently handle high-volume printing tasks without compromising quality.

In terms of connectivity, the TLP-T72 offers a range of options, including USB, Serial, and Ethernet interfaces, allowing for seamless integration into existing systems. This flexibility makes it suitable for diverse operational environments, ensuring that users can easily connect and manage the printer through various channels.

Another notable feature of the TLP-T72 is its user-friendly design. The printer comes with an easy-to-navigate control panel, which simplifies operation and minimizes the learning curve for new users. Additionally, the printer supports various label formats and sizes, making it versatile for different applications ranging from shipping labels to product tags.

The TLP-T72 also supports a range of software solutions, enhancing its functionality and offering users the ability to create custom labels tailored to their specific needs. This adaptability is further complemented by its ability to handle both direct thermal and thermal transfer printing, providing users with options depending on their requirements.

In summary, the Toshiba TLP-T72 combines advanced thermal transfer technology, high print quality, and versatile connectivity, making it an essential tool for any business looking to streamline its labeling process. Its user-friendly design and robust performance characteristics reinforce its status as a reliable choice in the competitive landscape of label printers.