Installing the applications

Please read this chapter if the model you purchased includes a PC card slot.

If you will use the wireless LAN PC card function p.33 , install the application on the supplied CD-ROM onto your computer.

System Requirements

Turning the power on and off

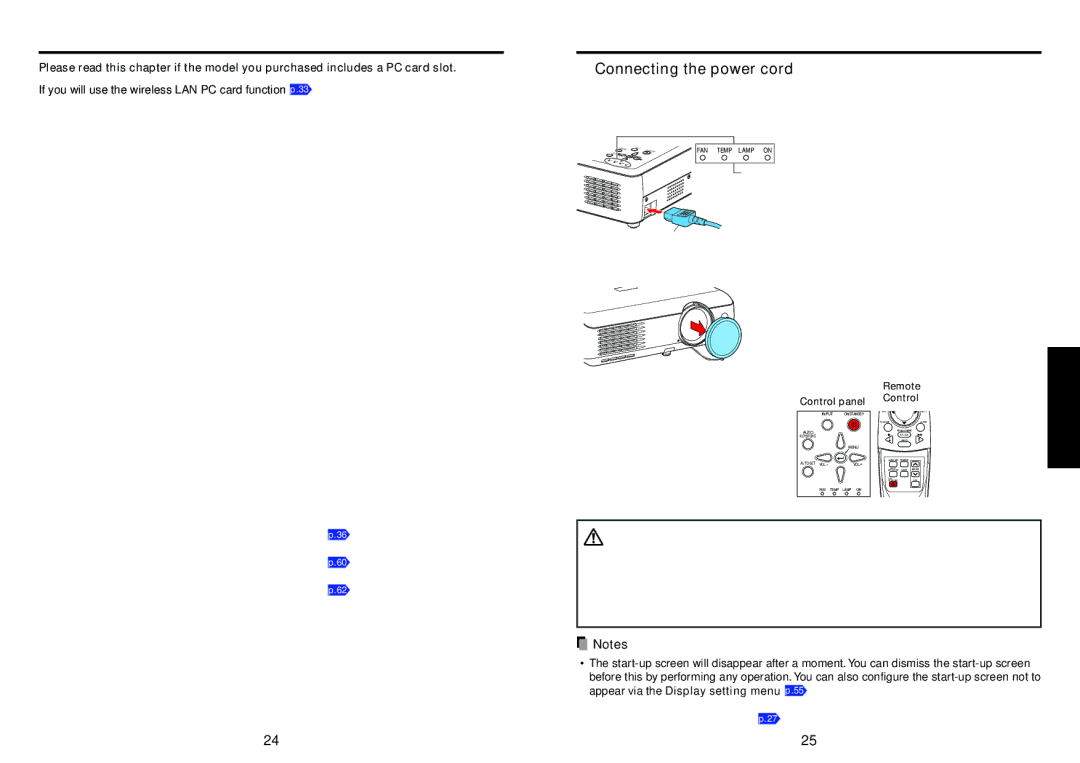
Connecting the power cord

1 Insert the power cord connector into the AC IN socket of the projector. 2 Insert the power cord plug into a wall or other power outlet.

Supported OSs: Windows® 98SE, Windows® Me, Windows® 2000, Windows® XP

CPU:

Pentium III 750 MHz or higher recommended

RAM:

256 MB or more recommended

Screen area (resolution): 1024 by 768 pixels recommended

Application Types and Major Functions

Wireless utility


ETATOU


AU

IN PUT


FAN

S

KEYSTONE


ON/S

TANDBY


VOL.-

M ENU


F AN

TEM


VOL.+


P

LA MP


O

N


(Supplied) Power cord connector

TEMP LAMP ON

When the power cord is plugged in, the following three green indicators will come on for several seconds: ON, TEMP, and LAMP. Next, the ON indicator will change to orange, indicating standby mode.

(Do not perform any operations while the 3 green indicators are lit.)

This application is used for wireless connections. Use it to send the images from the computer’s screen to your projector, and display on the screen.

Projector Configuration Tool

Use to modify wireless LAN and TCP/IP settings.

JPEG Conversion Tool

Removing the lens cover

Be sure to remove the lens cover when the power is turned on. If it is left on, it could become deformed due to heat.

Use to convert JPEG and other files into a format that can be displayed as a slide show using a memory PC card.

How to install

In the supplied CD-ROM, select the Applications folder, and run setup.exe. Follow the instructions on your computer screen.

If you are using Windows® XP or Windows® 2000, during installation a dialog box may appear with the following message: has not passed Windows Logo to verify its compability with Windows XP (2000). Click “Continue Anyway”, and continue with the installation.

When installation is finished, the following shortcuts will appear on your computer’s desktop:

Turning the power on

Press the ON/STANDBY button.

The power turns on, and the following 3 green indicators light: ON, LAMP, and FAN. After a moment, the start-up screen appears.

Control panel

INPUT ON/STANDBY

AUTO

KEYSTONE

MENU

AUTO SET VOL.-

VOL.+

FAN TEMP LAMP ON

Remote

Control

Start-up screen

VOL.-

VOL.+

PJ MODE

LASER

MENU / ENTER

R-CLICK

INPUT

AUTO SET FREEZE

AUTORESIZE

KEYSTONE MUTE

ON/

STANDBYOFF

Operations

Wireless Utility

Operations p.36

Projector Configuration Tool

Operations p.60

JPEG Conversion Tool

Operations p.62

How to uninstall

Select [Start Menu] [Settings] [Control Panel] [Add/Remove Programs], and remove Toshiba Data Projector from currently installed programs.

CAUTION

Do not look into the lens during operation. Doing so could damage your vision.

Do not block the air intake or exhaust. Doing so could cause a fire due to internal overheating.

Do not place your hands, face, or other objects near the air exhaust. Doing so could cause burns, deform/break the object.

Notes

The start-up screen will disappear after a moment. You can dismiss the start-up screen before this by performing any operation. You can also configure the start-up screen not to appear via the Display setting menu p.55 .

The first time you use the projector after purchase, after the start-up screen disappears, the Language menu is displayed p.27 .

24

25

Page 13
Image 13
Toshiba TLP-T72 owner manual Installing the applications, Turning the power on and off

TLP-T72 specifications

The Toshiba TLP-T72 is a state-of-the-art thermal transfer printer designed to meet the demanding needs of various industries, including healthcare, retail, and manufacturing. This printer is renowned for its reliability, efficiency, and high-quality output, making it a popular choice for businesses looking to enhance their label printing capabilities.

One of the standout features of the TLP-T72 is its advanced thermal transfer technology. This technology utilizes a heated print head and a ribbon to transfer ink onto various label materials, providing sharp graphics and clear text. The transfer method not only improves the durability of printed labels but also ensures resistance to smudging and fading, making it ideal for long-term use.

The printer is equipped with a high-resolution print head, capable of producing stunning print quality at resolutions up to 300 dpi. This means users can create intricate designs, barcodes, and images that are easily readable and visually appealing. With a print speed of up to 6 inches per second, the TLP-T72 can efficiently handle high-volume printing tasks without compromising quality.

In terms of connectivity, the TLP-T72 offers a range of options, including USB, Serial, and Ethernet interfaces, allowing for seamless integration into existing systems. This flexibility makes it suitable for diverse operational environments, ensuring that users can easily connect and manage the printer through various channels.

Another notable feature of the TLP-T72 is its user-friendly design. The printer comes with an easy-to-navigate control panel, which simplifies operation and minimizes the learning curve for new users. Additionally, the printer supports various label formats and sizes, making it versatile for different applications ranging from shipping labels to product tags.

The TLP-T72 also supports a range of software solutions, enhancing its functionality and offering users the ability to create custom labels tailored to their specific needs. This adaptability is further complemented by its ability to handle both direct thermal and thermal transfer printing, providing users with options depending on their requirements.

In summary, the Toshiba TLP-T72 combines advanced thermal transfer technology, high print quality, and versatile connectivity, making it an essential tool for any business looking to streamline its labeling process. Its user-friendly design and robust performance characteristics reinforce its status as a reliable choice in the competitive landscape of label printers.